|
|
|
 |
Here you will find the most simple aproach to start tailoring your own phantasies
in latex or rubber. The first pieces only require some tools and a damaged
piece of clothing which will be your material stock. With a pair of scissors,
a cutter, a steel ruler, a tape-measure and a suitable glue you enter the
world of self-made fetish wear.
Only the gentleman's body suit cannot be done by using damaged pieces, as
it requires aproximately 1m of latex or rubber cloth.
A Waist Belt
 |
This is an exercise to pratice first skills. Make a simple waist-belt.
For this, take the girth around the waist and add 3cm. The rubber strip should
have a width of 4cm to 6cm. To have a good fit of the waist-belt glue the
overlap of the two ends with 4cm. Before glueing, wrap the belt around the
body and indicate the later position. If you feel that the overlap is too
few, take a larger overlap. But do not make the mistake to glue the waist-belt
too tight! In the first minutes you will not mention, but later you may feel
squeezed. Moreover, the edges of the belt will roll and finally you end up
with some type of a round nuisance. If you are not sure if the overlap you
took is alright, simply wear the belt for one day. If it is still flat and
you still feel comfartable, then you have found the right overlap.
This type of belt frequently can be used in future projects. Please take
care that after glueing the complete piece of clothing the glued overlap
of the belt should be invisible. Thus you need to plan your clothing:
-
to the back of the body if the belt is not covered by other parts of the
clothing
-
to the front of the body if it is covered by other parts
|
A Lady's Slip
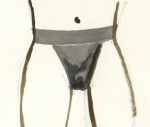 |
A lady's slip is a very simple to-do thing. First of all, make a waist-belt
as described before. Aditionally you need an almost triangular piece of cloth
and a strip of 3cm to 4cm. The length of both the strip and the triangualr
piece can be acheived this way:
-
Put on the belt and arrange it in the correct position.
-
Take a tape-measure and get the length between front and back measured from
the belt's top edge.
-
Divide this length by 2 and add 3 cm. This is the length l, which both parts
later shall have.
|
 |
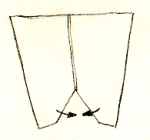
Here a sketch to clarify the description. The slip is glued easily:
-
Connect "triangle" and the strip. Do not arrange the pieces out of the middle
line! The overlap should be 4cm. With this, the slip later will not be too
slacky between the legs.
-
Turn the belt's inside out. Now glue the base of the "triangle" to the belt.
Be aware to glue this part to the later inner side of the belt. Take care
to glue the center of the trinagle to the opposite side of the belt's coverlap.
-
Spread the belt with the triangular shaped piece downwards and indicate the
center of the back part. Glue to this place the centered edge of the strip.
Take care to glue symmetrically! Otherwise, the slip later wil be uncomfortable
at one side.
|
Two Gentleman's Slips
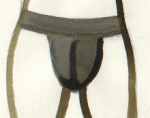 |
The gentleman's slip is slightly more work than the lady's. One part
needs to be of other shape. Of course, the starting point is a waist-belt.
If you have a damaged latex trouser, a cut from the edge will give you the
ideal material to work with. |
 |
-
Cut from the edge part the slip's middle piece. The V-shaped slot is to be
glued with an overlap of about 1cm. this later will alow the gentleman's
anatomy to feel comfortable.
-
According to the previous description, to the inner side of this part the
string is glued.
-
All other steps are the same as with the lady's slip.
|
|
|
 |
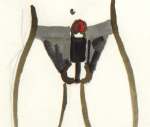
If you succeeded up to now, this piece of clothing is within your reach.
Please do not forget to take notes whiles working
and after completing the task, draw pattern for all parts. As
I made the experience, it is almost impossible to tailor this particular
slip based on measuring and calculating. As work goes on, the person for
whom the slip is made, must put it on several times. This means more work
to clean the piece of clothing between the steps. Thus, this project is more
time-consuming than those described before.
-
Make a slip as suggested for the lady. To locate the opening, the slip
is to be put on. As soon as you know location and size, pull the slip
off again and mark the cut onto the surface of the material. For this, first
tape a papertape to the surface and draw the contour with a ball-pen. The
diameter of the opening shoud not be too large. To obtain the diameter,
measure the circumference u of the penis below the testicles. The diameter
should be u/3. Cut the circumference of the opening but 3mm inside
the indicated circumference. Put on the slip and arrange all parts.
Check, if everything is in the right place. Put off the slip and do the final
cut of the opening.
-
If you tend to be a perfectionist or you think you will wear this slip
frequently, it is a good idea to reinforce the inner side of the opening
with a circular piece of textile-enforced rubber cloth. The diameter of this
piece should be 3cm more than that of the opening. Glue it centered
to the place where the opening will be and then cut the opening.
-
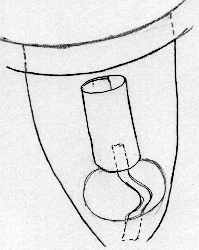
Make a hull of 7cm to 8cm length and suitable diameter. For this, take the
circumference of the erected penis and add 1cm. When glueing the hull, make
the overlap 1.3cm thus causing the necessary tightness.
-
Put on the slip again and the powdered hull. Arrage all parts into the
right position. Indicate the upper edge of the hull to the front
part of the slip. This easily can be done by a small slip of paper tape.
-
After putting of the parts and cleaning, the hull is glued to the slip's
centerline at the indicated position. The area which is glued shall be about
1.5cm wide. Take care to glue the overlap of the hull to the outside of the
slip! Thus, the overlap later will be invisible.
-
Prepare a 20cm long, 1cm to 2cm wide strip. Glue it from inside to the front
part of the hull with an overlap of 3cm. Take care that this strip is
centered. If you are in doubt of the length of that strip, first make a paper
pattern and check the measures.
-
For this step you need a mirror and a comfortable chair - or
a helping person. Prepare a smal piece of paper tape. Now put on the
slip and arrange it. Sit to the front of the mirror so you can look at the
lower edge of the opening. Now pull the open end of the strip between
your testicles to the desired tightness. Indicate the place, where the strip
crosses the lower edge of the opening with the paper tape. In case you have
helping person, the mirror is not needed. In this case, you should stand
upright and the helping person should mark the indicator.
-
Put the slip off and glue the open end o the strip to the inner
side of the opening. The overlap here also should be 3cm to 4cm.
When the slip is finished, you will find it not too easy to put it on... |
A Gentleman's Body Suit Made Easy
This comfortable and easy-to-do allday's gentleman's body suit is made of
two parts. For a person 1.80m tall and of 80kg weight, you need about 1.2m
latex or rubber cloth. Be aware to do the garment in a way that the cloth
is not planned to be stretched. So glue the parts exactly to the measures
you took.
Front
Back |
-
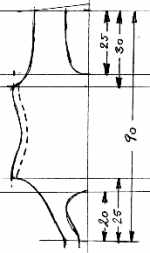
First of all draw a sketch into which you note all important measures.
To take the legth of the body, hold the tape-measure at the shoulder of the
person, pass it from the front between the legs and up the back again
to the shoulder. The length of the body you need to calculate is half
of that value. Take the pattern shown here as a guideline.
-
Make a paper pattern. It is sufficient to draw and cut only half of it, as
the human body is symmetric. The parts to top and bottom shall be at least
3cm longer than measured. to the side, the widht shall be 2cm more than measured.
The shoulder straps shold have a with of 8cm to 10cm. Take care: The
front and rear part have different patterns! Do not cut two complete
patterns - simply glue a paper flap to the pattern which can be flapped down
when necessary.
-
Cut the two pieces of cloth according to your paper pattern and clean them.
Place the two parts exactly one onto the other and take care that the later
outside surfaces face each other.
-
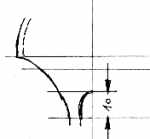
The curved edges are to be glued first. Glue with an overlap of 2cm.
After the glue has dried turn the clothing so that the outside surface faces
outside.
-
Now glue the lower straps. The overlap should be 3cm.
-
Carefully put the body suit on and arrange it correctly. If you did everything
right, then the sholder straps should overlap with about 4cm. It is very
useful to have a helping person who assists during the indicationg of the
overlap. Put the body suit off again. If you found out that the body suit
is not tight enough, turn inside out and reglue the edges according to your
measures.
-
Cut the edges at the sides, fold them and glue them to the back side of the
body suit.
-
Turn outside out.
-
Now glue the shoulder straps. The overlapped area should be 3cm wide. If
it will become too wide, cut parts of the straps. Be careful to consider
the fact that the shoulders tend to shape a "falling slope".
Because of optical reasons, the front part of the cloth should
cover the back part at this place.
-
If desired, reinforce the lower straps with a second layer of rubber cloth
from the inside.
-
Cut the straps to their final shape.
-
Prepare two strips of cloth 4cm wide. Glue these to the outer side
of the curved shapes to reinforce the seam. Take care to glue the strips
precisely to the resp. centerline. For optical reasons, these strips
may have a contrasting color.
|
text text text text text text text text text text text text text text text
text text text text text text text text text text text text text text text
text text text text text text text text text text text text text text text
text text text text text text text text text text text text text text text
text text text text text text text text text text text text text text text
text text text text text text text text text text text text text text text
text text text text text text text text text text text text text text text
text text
|
|
 The Sketchbook
1
The Sketchbook
1
 Home
Home Information
 First Aid
 Do It Yourself
 Sketchbook
 Tools
Tools Tricks & Tips
 Knowledge
 This & That
 Headline