|

This featured project
may prove to be an enormous help for travel, home or office. It's
a sewing kit made from a prescription bottle and a few other inexpensive
items. I find it to be a valuable kit to have on hand for those buttons
that decide to come off when you least expect it. There is little
or no degreee of difficulty. Just follow the instructions and take
it from there. Enjoy!

Prescription
Bottle Sewing Kit
Materials
One
1-1/2" to 2"(diameter) prescription bottle (Walgreen Drug preferred)
2
Metal sewing bobbins
2
Cover Button pusher tools (optional)
Polymer
Clay
2-3
needles
2
choices of thread
1
metal, plastic or PC thimble
thin metal wire
Thread Spool
To assemble,
stack bobbins, using thin wire threaded through holes to secure. Condition
clay and roll into a small ball and then into a snake. Flatten and
cover all metal parts. Next, place one cover button pusher (cone up)
on top of one of the bobbins. Cover with clay. The pusher will be
held in place by the clay. Next, do the same on the bottom bobbin.
Now your spool should be completely covered. Continue to make sure
that all parts are smooth. NOTE: If cover button pushers are not available,
you can roll a piece of clay the same diameter as the bobbins. Attach
to top and push down about 1/4 of an inch, so that the clay goes over
the top of the bobbin to form a seal. Insert your handy turkey skewer
to make a hole. Continue to hollow it out enough to allow for needle
storage. Keep working the top until you achieve a spool shape.
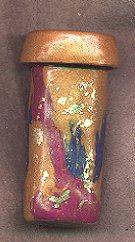
Prescription
Bottle Case
Before beginning
the case to hold the spool, you have o determine if it will fit. Carefully
lower the spool into the bottle. If it does not fit you will have
to trim it down a bit. Bake at the manufacturers recommended temperature.
Next, decide on a design for your holder. Canes work nicely. Begin
covering the bottle starting 1/8 of an inch from the notched top,
down the sides and bottom. Bake.
Cap
Remove the
inner plastic seal, if there is one as it will melt. Put it aside,
you'll put it back in after the cap has been baked. Cover top and
sides with desired design. Bake.
Assembling
The Sewing Kit
Wrap thread
around the two spaces in the spool. Insert needle through the center
hole. Place thimble on top. Place cap on bottle and you are done.
Bottle and cap may be coated with Future Floor Wax for a nice shine.


E-Mail
me with questions or comments
CraftyM@Hotmail.com

©2002
Text and Images, Crafty Michele's All Right Reserved
|