Introduction
Like most newbies I started collecting graphics from sites that offered them free for non-commercial use. I used MS Paint that comes with Windows to make my first graphics by using Paint's tools to do original artwork or just cropping screen captures. Paint saves as .bmp so I used Netscape Composer to insert them into a document. Composer would reject the .bmp and gave you the option to convert to .jpg. The created .jpg is saved alongside your original .bmp file which you can then delete.
Don't make the mistake we all make of collecting too many of free graphics. Instead have a couple of good sites you can go into and search for suitable graphics when needed.
Name (or rename) the graphic so it is meaningful with the keyword first so they are together when your browsing ie star_red_lge.gif or stargoldsm.gif is better a004.gif or special_offer.gif.
I also name my graphics folders with "img" as the first three letters which keep the folders together and then a word or part-word to describe the contents or use. Examples would include imglogos, imganimat, imgfrogs, imgcars, imgbg, imggen, imgpics and imglines.
Once I had a imgmisc (miscellaneous) but got rid of it because it was to easy just to drop everything in there .
My "imganimat" folder would contain only animated gifs . You should not really use that many so they can all be kept in one folder provided they are well named such as waterfall.gif, austflag100x70.gif, new.gif or frog_sm.gif. You don't have to add "animated" to the name of each gif (or waving or hopping or flashing or whatever) as you would if you stored them with the non-animated gifs in folders based on subject or purpose.
In the early days when I had several folders with lots of graphics, many with their original obscure names. I made one document per folder using Netscape Composer which I called viewer.html that displayed the images in that folder. It was made quickly by repeatedly clicking the Image Insert button and then selecting the next graphic file that appeared in the file insert dialogue box. Primative but I had paid nothing, stolen nothing and learned about graphics and file management.
The first graphics software I bought was ACDSee because, whatever your graphics interests you have got to be able to sort and manage the graphics you have made or otherwise accumulated. ACDSee works like Windows Explorer except it displays all the graphics as thumbnails. You can use it rename, move to different folders, copy, delete and all things you normally do with Windows Explorer except you can see the little thumbnails and so be confident about what you are doing.
I still occasionally make up a viewer.html using Composer if I'm looking at image files in a computer that does not have ACDSee (and I have forgotten to take it with me ..it fits on a floppy!), so it is still a useful core skill. I don't care how many thousands of dollars worth of software you have you have installed, if you could convince me you don't need Windows Explorer then I'll believe that maybe you don't need ACDSee.
Zara 3D was my next purchase because it was inexpensive and you could do great things quickly with minimal skill. Use it to create a text feature which is attractive and interesting but keep the file size reasonable. I was very proud of my first spectacular revolving irredescent metallic banners until I uploaded the page and tried to open it.
PaintShop Pro 4 was the last of the versions that had no copy protection and it seemed every computer at college had it somewhere on it's harddrive. Based on this early exposure, and the information available on the net and in libraries, I bought PaintShop Pro 5 and subsequently PaintShop Pro 7. PaintShop Pro 7 gives you a lot of power for the money while Adobe PhotoShop, besides being more expensive, is more complex to use partly because it is also aimed at producing graphics for print media as well as the web.
If your long term ambition is to be able to use a top-end expensive graphics package then start with MS Paint then learn to use ACDSee, XARA, and PaintShop Pro and then go on to Adobe PhotoShop, 3D Studio Max etc if that's what your accumulated experience tells you to do. Professionals use a range of tools to do job efficiently and not just a particular package that marketers, journalists and wannabes all say the professionals use.
Dont forget open source software. I dip my wings in salute to those working to keep the web open to all.
Copying Internet Graphics Or Capturing Screen Images
![]() www.htmlgoodies.com/tutors/capture.html CSS HTML primer
www.htmlgoodies.com/tutors/capture.html CSS HTML primer
Dr Joe Burns PHD's (peekaboo) site. He describes how to "CAPTURE" using PaintShop Pro.
Pressing PrintScrn for a full screen capture or Alt PrintScrn to capture the window contents is mentioned without explaining what is done next.
Aussie John explains using the PrintScrn and Alt PrintScrn to capture screen images.
![]() Cool
Cool
![]() To copy a graphic, such as a gif or a jpg, in an html document that is being displayed (rendered) on your screen just like this Aussie Flag here, right-click on it, then left click on Save Picture As or Save Image As (depending on your browser). Now enter a descriptive file name (like austflag_sm and browse for the folder you want to put it in. In this case, why not practice creating a folder on the "fly" (that's like putting in a quick attack off the line of march if that's a help). Browse for where you want the folder to be, then press the new folder icon and type "imgflags" (don't include the quotes!) and press Enter to finish making and naming the new folder. Now press Open then press Save and it's done.
To copy a graphic, such as a gif or a jpg, in an html document that is being displayed (rendered) on your screen just like this Aussie Flag here, right-click on it, then left click on Save Picture As or Save Image As (depending on your browser). Now enter a descriptive file name (like austflag_sm and browse for the folder you want to put it in. In this case, why not practice creating a folder on the "fly" (that's like putting in a quick attack off the line of march if that's a help). Browse for where you want the folder to be, then press the new folder icon and type "imgflags" (don't include the quotes!) and press Enter to finish making and naming the new folder. Now press Open then press Save and it's done.
But when you want to capture the contents of the screen as an image, press either PrintScrn if you just want the contents of the window or Alt PrintScrn for the entire screen contents including the window. These buttons paste the image onto the clipboard. (You can't select a particular portion of the screen that you want.)
Now open Windows MS Paint (Start > Programs > Accessories > Paint) and then press Edit > Paste) to display the screen capture.
Now select the portion you want to cropp using using Paint's Select button. There are two Select buttons at the top of the tools on the left side of the screen. Use the rectangular one to window the portion you want (the term "lasso" is sometimes used). Now select Edit > Cut and the portion you want will be pasted on the clipboard. Now select File > New, clicking on No in the Save File? dialog box, and a new Paint screen opens. Now select Edit > Paste and the portion you cropped is pasted into the top left corner of the new Paint screen.
If you saved now, the whole screen would save with the portion you want up in the corner. The screen has to be reduced to the size of our cropped portion before we save. First left click in the blank area of the screen. Eight tiny black grab handles appear around the edge of the screen. With so many, and considering their purpose, you would think you would be able to see them easily. This is not the case.
Slide the bottom screen slider fully to the right and the vertical screen slider fully down to the bottom and there in the extreme bottom right hand corner of the screen is the tiny little black grab we want. Any smaller and it would have to be just 1 single black pixel. Grab it by left clicking and drag it diagonally up to the lower right corner of your screen capture.
Now press Save As, say, "portion.bmp" and place it in the folder you want it in.
In this proceedure I now open a new Netscape Composer document (Start>Programs>Netscape Communicator>Netscape Composer)and immediatly click on the Insert Image button (it's the 4th last button on the top right of the screen). Click on the Choose File button in the first dialog box, browse for portion.bmp, select it and press the Open button. Composer displays three more dialog boxes but you just click the OK buttons. A file called portion.jpg is made and saved alongside your original "portion.bmp". At the same time portion.jpg is inserted into the Composer document.
Just quit out of Composer without saving now because you only wanted the conversion done. If you check your folder you will see a "portion.jpg" as appeared right alongside the .bmp file.
Now you can put portion.jpg, into your web document. If you are happy with the result consider deleting portion.bmp or you might want to hang onto it case you need it again for print work or to make a gif from it.
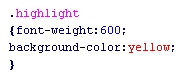
Portion of the code, (a style rule) from the head of this page presented first, as the bmp trimmed and saved using with MS Paint from the screen capture. Then follows two different conversions to a jpg (Composer and VerSee) and one conversion to png from the Paint bmp.
 highlight.bmp 41.7Kb via Alt PrintScrn using MS Paint
 highlight.jpg 4.28Kb using Composer
 highlight.jpg 13.1Kb using 32VerSee
highlight.png 1104bytes using PIViewer
highlight.jpg 13.1Kb using 32VerSee
highlight.png 1104bytes using PIViewer
Trying the screen capture again with the portion for the bmp lassoed a bit closer and then the bmp converted to gif and to png using PI Viewer 4.0. Interestingly the gif option came up in the Save As in PI Viewer 4.0 which I don't remember seeing on the first attempt. The only difference in the process was I did the screen capture with PrintScrn (I used AltPrintScrn the first time).
 highlight2.bmp 12.3Kb via PrintScrn
 highlight2.gif 1556bytes using using PIViewer
highlight2.png 1567bytes using PIViewer
highlight2.gif 1556bytes using using PIViewer
highlight2.png 1567bytes using PIViewer
Because of the few colors and plain background in this example taken from the style sheet in the head of this document, making a .gif would be more appropriate than a .jpg (see the color bluring in the example above and of course the file size is bigger). But I don't know how to make a gif for nothing.
Note I downloaded Ulead's free PhotoImpact Viewer 4.0 from Tucows. It will convert to png.
Considering you have just used your computer out of the box and used only free software I'd have to say this is pretty good.
Update! I have also found free PhotoStudio2 Std Edition (see www.arcsoft.com listing below) which converts to gif (bmp, jpg, tif,tga but not png!). If you know any free graphic format conversion software that converts to gif and png please let me know!
Tutorial Sites.
 www.grafx-design.com
Website of T. Michael Clark. Author or books on PaintShop Pro 5, 6 and 7 as well as PhotoShop and CoralDraw. Hundreds of pages of free tutorials. Includes carefully selected good graphics links.
Specifically there are 25 tutorials on PSP Pro you can do on-line. The most recent are available in .pdf format for downloading. In addition there are 3 general graphics tutorials which should done (on-line only).
hotwired.lycos.com/webmonkey/design/graphics
Web Monkey. This is the first learning site I visited. It was recommended to me when I started and has been invaluable.
![]() www.ozones.com
www.ozones.com
Dr Ozone's graphics website. I can get lost in there and always come out feeling better about not doing serious graphics. It is specialist work and I'm not in the race.
You can download backgrounds and icons for your own non-profit use.
Links to good graphics tutorials and other graphics websites.
![]() www.gurusnetwork.com
www.gurusnetwork.com
The modestly, but probably correctly, named Guru's Network.
There is a link from Dr Ozone. Visit their member's sites.
There is also tutorials and discussion forums.
www.graphicssoft.about.com
I have been led to this site a few of times while searching for tutorials. The "tutorials" are often only links to other tutorial sites. This is ok if dead links are removed.
Graphics Interest Links.
www.libpng.org/pub/png/pngapps.html The Portable Network Graphics (png) homesite.
![]() www.xara.com
A British company that makes XARA 3D and other XARA products. Great effects at an economic price.
Visit the gallery of work submitted by users as well as the these users sites. Other useful links.
www.xara.com
A British company that makes XARA 3D and other XARA products. Great effects at an economic price.
Visit the gallery of work submitted by users as well as the these users sites. Other useful links.
 www.talkgraphics.com
A good British site for users of Adobe Photoshop, Paintshop Pro, Xara and other graphics packages.
I found this artwork and this site at xara.com above. The artist is Ross Mackintosh, an architect and the moderator of this site. The software used was XaraXone.
www.computerimages.com
Older site well laid out for information content presentation. I've used some ideas and want to look at it again.
![]() Aussie John's comment on graphics file size.
Aussie John's comment on graphics file size.
If a site does not load in a "reasonable" time I assume an excess of graphics and little content or the content will be too obscured to find easily. I press the stop button and surf somewhere else. I don't have the time to spare to do otherwise.
Minimising graphics file sizes would be good for sites where the images displayed are the site content such as art gallerys, pics of animals, genuine graphic art and for those who use graphics responsibly to enhance a non-graphics content site.
My fear is that if people succeed at minimising graphic file sizes then the graphics abusers (I include people who promote graphics to present text, blinking animated ads, or use an excess of graphics in this definition) will be able to use even more graphics to pad their sites, further reducing the content ratio and making it even more difficult to find and then focus on the useful content that may be present.
Presumably we would also get more ads on including what I term "pop-spam", the pop up ads, that obscure the screen and, lately, have started to accumulate in the system tray as a permanent message until you clear them out, which is why I associate them with unsolicited email or "spam". I often have dark thoughts that pleas to upgrade may have a component of developers and website owners wanting to to be able to offer advertisers a bigger audience and more bandwidth for ads.
 www.visibone.com/colorlab
On-line color selection and matching. Interesting articles from Visibone. Choose Hex Color Pop-up. Reset screen resolution to 800x600 or 600x480 to read the lable. After you have referred to it you can minimise it down onto your Start Bar (ie the "system tray") at the bottom of the screen. If you need to refer to it again you maximise it, select a color that suits what you are doing, and then minimise it again. It's a truely good thing. Left click on the x to close it when you are finished referring to it. This is an html aid or a graphics aid depending on what you are doing.
MS Paint Links.
www.google.com/search?q=%22ms+paint%22
1 to 10 of many from search on MS Paint in Google.
www.manastungare.com/winwizard/help/resize.asp No.3 of the above Google search. Resizing images to a fixed percentage of the original size using MS Paint.
mentor.coe.uwf.edu/expressyourself/tutorials/painttutorial.htm#star1 Details function of the MS Paint buttons. Excellent use of using an image map (the toolbar graphic) to send you to the description of each toolbutton use.
PaintShop Pro Links.
 www.jasc.com For PaintShop Pro7.02 (with Animation Shop3.02)
It's 124 Mb expanded if you load everything including Animation Shop. Download a 30 day trial! If you've already have PaintShop Pro 7 and Animation Shop3, download the free patches to upgrade to PaintShop Pro7.02 and Animation Shop3.02
I have been using PSP Pro5 because it, and an older Pentium 100, was all I had. But PaintShop Pro7 is still best value for money for the personal website developer with the cost, size and learning curve of packages like Adobe PhotoShop, only justified for a dedicated graphics site or if you also produced for print media.
Jasc's website is a good place to start learning about PaintShop Pro. Click on Support then Learning Center then go from there. There is guest auther tutorials, links to 3rd party tutorial sites, archieved tuts for older versions and an on-line chat forum.
www.ulead.com For Smart Saver (free demo available).
A web-based image exporter (ie an export filter) that saves images in jpg, gif and png. Recommended if you have to save web-ready images regularly (T.Michael Clark; Sams Paintshop Pro7 in 24 Hrs)
www.psp5tutorials.freeservers.com
Paintshop Pro5 tutorial site. Worth checking out. Found searching Yahoo for Paintshop Pro tutorials.
dizz.com
A lady using PaintShop Pro to great artistic effect. Check out her skinz, tubes, icons, wallpapers and brushes. Recommended by Neat Net Tricks.
Irfanview And Graphics Format Conversion.
www.irfanview.com Irfanview Graphics Viewer and format converter. Free for non-commercial use. $10 for commercial.
Opens many formats but notably saves in bmp, gif, jpg, png, ico, tif, tiff and tga. 800kB download (Link duplicated in AutoCad -3rd Party Software).
IRFANVIEW TUTORIAL. It's an excellent, small, and free/shareware photo editor at www.irfanview.com. An equally excellent tutorial is at www.somewhere-in-time.net/tutorial/irfanview. From Neat Net Tricks. Use instead of PaintShop Pro or MS Paint.
![]() www.homeplansoftware.com/imgconv.htm For Easy Image Converter (465kb exe file). Free!
www.homeplansoftware.com/imgconv.htm For Easy Image Converter (465kb exe file). Free!
Easier to use than Infanview, but limited to bmp, gif jpg and jpeg. Ideal for those with Win 95
who would like to end up with a jpg like you can with Win 2000 Microsoft Paint.
Interesting Links I've Found.
![]() www.acdsystems.com
www.acdsystems.com
ACD Systems. Makers of an Explorer like product "ACDSee" that allows to look at, and manage your image files by presenting them on your screen as thumbnails. Available in Windows or Max OS versions.
www.digitalblasphemy.com
Superb backgrounds, 3D images and tutorials.
pcpitstop.com
To run a free test of your system to tell you what kind of video card you have.
![]() www.gifwizard.com/cgi-bin/nph-gifwiz?pn=15289
www.gifwizard.com/cgi-bin/nph-gifwiz?pn=15289
On-line .gif editor. Does further compression, cropps, resizes, rotates and changes background color. You supply the URL of the gif or browse for it on your harddrive. Service costs US$69 pa or buy "tokens" for occaisional use.
![]() www.tech.irt.org Internet Related Technologies Org.
www.tech.irt.org Internet Related Technologies Org.
Articles and tutorials on web based technologies by commited people.
www.tech.irt.org/articles/js176
Interesting overview of the Scaleable Vector graphics (svg) format. An WC3 approved standard for static text, vector graphics and images promoted heavily by Adobe (Adobe Illustrator 10 US$400) and intended to work in XML/XHTML like HTML 4. Macromedia have put their own Shock Wave Format (swf) into the public domain but perhaps a bit late. With svg you can zoom in with no loss of quality. Advertisers will love it. What is AutoCad doing? Visio was represented in the working group!
![]() www.w3.org/Graphics/SVG/Overview.html
www.w3.org/Graphics/SVG/Overview.html
WC3 page on svg format. Good links.
 www.jasc.com/products/webdraw
SVG is an open-standard vector graphics format that lets you add high-quality graphics and animation to web pages using plain text commands. Based on XML (Extensible Markup Language), SVG 1.0 is a W3C recommendation.
SVG format gives a small file size ..provides for animation, and will replace flash in time because flash is a owned by Macromedia so it's use is ultimately limited. If Macromedia had made flash open source it might have been another storey. I predict they will make flash open source soon as a belated response, but it will be too late.
www.arcsoft.com ArcSoft. Makers of a variety of graphics software for sale.
Includes PhotoStudio claimed to be the only application you need to create (amazing) graphics for the web, to edit and enhance your work, save as a web file format and upload right to the Internet. Trial avaliable (8Meg/50Meg).
I was alerted to them by the free download PhotoStudio V2.0 SE (1.9Meg) (apparently not available on the ArcSoft site) which I got through www.freewarefiles.com (although it downloaded from Arcsoft's site). SE converts between bmp, jpg, gif, tof and tga but not png
Free Stuff I have Found.
www.ulead.com Ulead Software. Makers of a variety of graphics software for sale.
They use to provide a free graphic file viewer, Photo Impact Viewer 4.0 from their site in the past but do not now. I recently got it from zdnet/downloads (I think) .. or Tucows after a search on "free graphics editors".
It also converts to a number of file formats via Save As that might be of interest to people with more advanced (or broader ranging) graphics applications.
Dispite the hype, it does not convert to gif so I converted to png which is a format designed to be better than gif (although it can't be used for animations).
You can trial Photo Impact Viewer 6.0 for 30 days.
 www.imsisoft.com
IMIS. The company that makes TurboCad.
You can download TurboCad v7 Pro (58 Mb) for a 15 day trial.
TurboCad v7 Standard has less features and is one third the price.
You can also download their free no-time limit TurboCad 2D LT version (12Mb) which calls itself TurboCad Version 6.5 when you install it. Messages suggest you upgrade to Version 6 Professional. (Note: The Australian IMSI site is offering Version 6 Standard for Australian $200 which includes voice recognition of menu commands.)
TurboCad 2D LT is an excellent, free, easy to use 2D drawing package and has quickly become one of my favourite things and encouraged me to download the TurboCad v7 Professional demo.
Emerging Open-Source Graphics (Some Free)
www.povray.org Pov Ray Organisation. Free renderer.
www.oocities.org/ccolefax Pov Ray 'includes' files and tutorials.
www.gimp.org Gimp.Org
For a free image editer that does almost everything that Adobe PhotoShop 3 does. Unix and X operating system.
Contact www.gimp.org/~tml/gimp/win32 For Windows version.
Note this listing is for reference only. Installation for either system has been considered to require higher level skills. The situation may be getting better. From the user's perspective it's like using Photoshop but without some of Photoshop's functionality.
The graphic below was donated by Susan, a visitor to my site. Thank you Susan.

Contact: Aussie John wpsmoke@yahoo.co.uk