|
Ordo Sylvanus |  |
| Combat
Basics for Mages
An Addendum to Ordo Tacticum by Nadia |
||
|
Ordo Sylvanus | |
| Combat
Basics for Mages
An Addendum to Ordo Tacticum by Nadia |
||
| The
purpose of this document is to review some solo and group fighting tactics
for those who are contemplating starting a mage character and are inexperienced
with their differences from warriors. This document was written with the
help of other Ordo Sylvanus members, notably Hexadecimal (who gave much
sought-out advise and corrected some mistakes of my first draft), Aeolus
(who taught me how to actually play a mage for enjoyment) and Genjuro (who
spent endless hours with me as we refined our tactics). It should be noted
that unlike most of our documents, this particular one is designed out-of-character
to allow some relevant player/character issues to be addressed. Another
note of extreme importance is that this deals solely with PvM combat.
General Knowledge First off, I must assume the reader is familiar with combat using melee and/or archer characters. The mage can be played like an archer, with some notable exceptions:
This serves two primary purposes. First, it allows you to get that important first strike in. The advantage of this is more prominent in lower health opponents such as NPC mages, where a single Explosion or Explosion/Fireball combo attack can seriously weaken and slow your opponent. Even against a Daemon, a strong opening attack will significantly slow one down, allowing you more time to meditate between attacks and allowing for more uncertainties such as unexpected lag. The second advantage is it allows you to pick a single target out of a large group by either picking on the nearest target and having it follow you away to a secluded area for battle or by casting a paralyze field (not recommended in areas of fame-hunting with other hunters present as you have just neutralized the fame on all monsters in the para field) and picking one out of the field with a magic arrow. It should also be noted that a mage never accidentally attacks a monster (except in cases of fields), as the character must be instructed to attack by the player even in defense. When a mage character "jumps" a kill, it was done intentionally, although the "kill-jump" may not have been intentional and is usually the result of either ignorance or a quick-trigger. It has been my experience that when this happens, the offending mage has more often than not apologized and most will offer to give up the next monster of that class that spawns, which is more than I can say for some others. Of
great help to most if not all mages is the use of macros to accomplish
various tasks. Perhaps the single most important macro is the Meditation
macro, and I cannot the value of this particular macro enough. Other common
macros are Cure, Greater Heal, Lightning, Recall, Energy Bolt, Explosion,
Invisibility, Flamestrike and Gate Travel.
Spell Combinations Although it is my opinion that a mage should wait until he/she is able to cast 6th circle spells with relative certainty before attempting spell combinations with any frequency, this section is included at the beginning of this document to cover the subject early. I have been asked and have seen others asked what spell combination is the best one to use. This is both a very easy question to answer and a very difficult one to answer. The easy answer is that there is no single spell combination that works best in all situations. A good spell combination takes into concern many variables including your mana, your opponent's ability to absorb spell damage, your opponent's health and speed, distance and terrain between you and your opponent and the number of opponents that you are trying to engage at the same time or with the same spell(s). Let me give some examples:
4 Brigands (to the east) and a Giant Spider (to the north-east) Defender type- Single mage.
A Lich Defender type- Single mage.
An Orc Scout, an Orc Chopper, an Orc Lord and 2 Orcs Defender type- Melee warrior and healer/mage. As
you can tell, most spell combinations start with an Explosion. This is
to maximize the amount of damage inflicted in the shortest possible time
by hitting your opponent with two spells very quickly. An Explosion/Energy
Bolt attack seems to be the preferred combo for most situations by most
people, myself included, but it is by no means the combination to
use.
Starting your Mage All mages should start at 50 Magery. Even if you are not a powergamer, the amount of reagents that you will save yourself in training is worth serious consideration when making a mage. I have no personal preference for the second starting skill with the exception that healer/mages should start with at least 30 (50 preferred) Healing and scribes should start 50 Inscription. The standard mage template goal is:
Beginning mage's will most likely be using 3rd (Poison, Fireball) and 4th (Lightning) circle spells in combat, but I recommend also bringing some 6th (Explosion, Energy Bolt) circle scrolls. This will very soon increase to casting 5th (Mindblast, Mark) circle spells and bringing 7th (Flamestrike, Gate Travel) circle scrolls, although these will be much harder to cast and should be attempted irregularly. My preferred prey at this stage were Trolls, Ettins, Ogres and such, as they allowed me to gain in Magery without getting buried by spells - I preferred not to powergame stats at this stage. This was also a valuable learning experience for me to estimate the amount of time required to cast each type of spell, which greatly aids in guerilla style warfare. I recommend all training to be done solo at this time as learning to fight by yourself differs vastly from fighting within a group. I cannot emphasize enough to healer/mages the necessity at this stage (or any stage, for that matter) to heal every time that you are hurt - even if you're only hurt by one point. I would recommend that you use the enlarged status screen (the one that displays your stats and attributes by number) at all times. This will also aid you in knowing exactly when you have enough mana to cast a desired spell as well as providing you with valuable information such as exactly how much your character weighs (important when fighting magic casting creatures). I would also recommend that healer/mages (primarily, but also regular mages) learn a weapon skill early (Archery suggested) for two reasons. First, it helps increase Anatomy. Second, it provides you with a fallback attack until your Magery is sufficient to be your only attack. Another
thing that I would like to note is timing when attempting to meditate during
a solo fight. Any type of attack disrupts meditation, whether it be a physical
attack or spell - Flamestrike, the effects of a Poison and even a Weaken
spell act the same in this manner. When fighting magical creatures, you
should wait until a spell combo has been completed (e.g. Weaken followed
by a Fireball or Magic Arrow followed by a Paralyze) before attempting
to meditate in order to maximize the amount of time actively meditating
between attacks.
Developing Solo Tactics There are a number of different ways to develop fighting tactics using a mage. For example, when I first started training in Magery, I wandered the lands of Britannia in search of random spawn to spar against. In contrast, Hexadecimal found that the speed of the harpies found in the dungeon Covetous level 1 to be a good training ground for an aspiring mage. There are also two primary ways of fighting an opponent. The first is simple: in open spaces where you are not worried about other spawn, you can use a fighting retreat. That is, as your opponent closes the distance to you, you fall back while continuing your assault. The second is what's commonly called "working the box" or simply "working." This tactic should be very familiar with archers, as you're basically moving in a square or diamond pattern, taking up very little space and providing a small cushion between yourself and your opponent in which to work with. This pattern also works under some conditions against mutliple opponents, as you're basically rounding them up in a circle from which you can set up an area-effect spell such as Meteor Storm. Such a tactic is recommended when hunting solo in dungeons or dungeon-like areas, such as inside the Daemon Temple on Fire Island (I like to use the small square area in front of the double-doors; perfect for healer/mages against 1 or 2 spawn when there are more than 4 hunters in the area). It is strongly recommended that you split your reagents into two containers, especially when hunting solo. No matter how good you are or what your connection is, there are always ways to lose the server at critical times (like when you're kissing a Golem when a new patch kicks everybody off the server). Many creatures (especially NPC and non-human mages) will take your reagents bag so by splitting your reagents, you are protecting yourself should you get rezzed and have to find and loot your body by yourself. When hunting solo, a smart mage will usually reserve about 20 mana. The first benefit of this is the fact that with about 20 mana, you have a greater chance of being able to successfully Meditate. Another benefit is you have enough mana to cast an emergency Cure, Greater Heal, Invisibility, Paralyze or even Recall if the situation drastically changes suddenly. Almost all "older" mages who have spent their early careers playing in Felucca will never drop under 11 mana (Recall) out of habit. One should also not overlook the advantage of Reactive Armor (against physical attacks - scribes especially) and Magic Reflect (against magical attacks - worth consideration against current Mage Controllers). Once you feel that your mage has developed enough to be pretty much independent, there are a few creatures that I feel are necessary training for a mage to hunt until you are comfortable hunting them. These creatures provide a challenge that require the player to learn how to properly use a mage. They are listed in no particular order with how they improve one's performance:
The
next step up is a Dragon, but even they are relatively easy compared to
an Avenger. The most important thing to remember against them is to maintain
a constant attack while making efficient use of and conserving mana. Once
all the basics of hunting are learnt, most creatures are very easy on a
one on one basis. I must note that neither Blade Spirits nor Energy Vortex
are necessary spells for a mage to learn when one is intent on learning
how to spar or fight a creature instead of just beating it.
Developing Group Tactics - No Pointman The tactics used by a mage often differs depending on how the group is composed. In groups that do not have a melee warrior, however, the mage's tactics do not differ greatly from solo hunting. The major difference is that you should be aware of other mages' life and mana values. Knowing when to cast a Greater Heal or when to make your partner Invisible is somewhat of a skill learned on the spot, and as such should not be taught. Depending on what you're hunting and where, it could be very easy for one to become overwhelmed by spawn before help arrives i.e. Terathan Keep corridor normally holds 3 Terathan Avengers and a few lesser creatures - it is very bad to be chased by all 3 Avengers. Something
of importance to all characters, but noticeably group leaders and mages,
is organization of data. Both Hexadecimal and Nadia arrange the group's
health bars in a ladder at the side of the main screen, in Nadia's case
dropping the paperdoll from the screen to make room for the info. Hexadecimal
takes this a step further, arranging the bars with the pointman (if present)
at the top, the body (warriors and archers) below and the cannon (mages)
at the bottom. Non-guild members are often added either below or to the
side of this. In large groups, it is often necessary to split the bars
into 2 or sometimes 3 stacks. The primary advantage of this is it provides
you with a central location that reflects the health of all party members
at a glance, noting who is getting hit and who else is in trouble. This
greatly aids a mage when supporting the group. An example is given later
in My Preferred Configuration.
Developing Group Tactics - With Pointman This is a preferred role for the mage, as you are spending less time running in circles avoiding spawn and more time either meditating or casting. The primary role of the mage is two-fold. First, and most importantly, you should be helping to keep the pointman alive with on-the-fly Greater Heals and Cures. Secondly, you are the heavy firepower of the team, capable of demolishing some targets with a well timed mana dump. In addition to these primary roles, you also have some secondary responsibilities. One of these is to avoid new spawn, preferably by moving to the far side of the tank formation so that the new spawn will flag either the point or one of the other warriors. If you are flagged by spawn, it is often best to simply Invis yourself and let the spawn flag one of the warriors instead of running around, as this creates lag, can flag other spawn onto you, and gives the others in your group something else to worry about (you). One of these secondary responsibilities should not be keeping track of everybody, as a combat mage in a group is usually already tracking a lot of data (everybody's status who's visible, any creature on screen including who they're flagging, their health and if they're casting spells at the time, yours and other mages' mana, planning your next spell combo, etc..). Those that are familiar with me in large groups may notice that I often miss group communications during battle. This is in part because of the amount of data I'm looking at and in part because the majority of data that concerns me is in the upper-right hand part of my screen whereas communication is displayed at the lower left. Healer/mages
must also decide whether they are actively healing others or not. Most
often, this is dependent on the number of warriors and bandage healing
archers there are in the group. In most situations, having three or more
of these types will allow you to function primarily as a mage whereas less
than three may require you to actively aid in healing. Great care should
be taken when actively healing, as it is usually not noticeable at first
glance when you are taking damage yourself. In these cases, it is often
(but not always) advisable to break off from the formation.
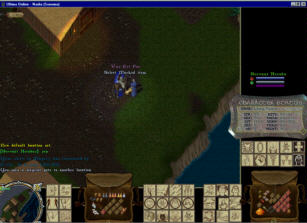
As you can see from this screenshot, much of my pack is somewhat organized. Moving from left to right on the bottom I keep the overhead (radar), travel icons, main pack, misc/field icons, combat icons and primary loot pack. Up from there I have my healing icons, status screen, and either my character profile (if solo) or group status bars (when grouped). Knowing how much of each reagent to bring into combat is another valuable skill that takes practice and experience to develop. As a healer/mage, I try to bring the following into combat (main pack):
For those that are interested in my skill set (included for reference), my goals are (achieved):
I hope that this has been of at least some interest and help to those who are either currently or thinking of developing a mage. It is my opinion, however, that the best teacher has always been experience, and most of this document has been written to provoke a new mage to learn techniques that work under his/her own play style. |