|
Go to the previous page
A simple example of how Macros are created
Before you follow this example you should select Tools / Macro / Security / Medium as explained in the brief Note on Macros.
1. Close Excel and Reopen it. Select Tools / Macro / Record New Macro. The "Record Macro" Window appears.
2. Click OK and start making various tasks in a worksheet such as formatting cells and entering numbers.
3. Select Tools / Macro / Stop Recording. You have just created your first Macro.
4. Clear all the changes you have made in the sheet. To do that click the box at the top left of the Row and Column Headers to select all cells in the sheet, and chose Edit / Clear / All. Select a cell in the worksheet to deselect the sheet.
5. Select Tools / Macro / Macros. The Macro Window appears and the Macro Name Macro1 (ie the Macro that you have created) is selected. Click on the Run Button. You will see that the Macro is run and all your tasks are automatically made.
Your Macro was written in Visual Basic for Application. You can access the codes created and make changes.
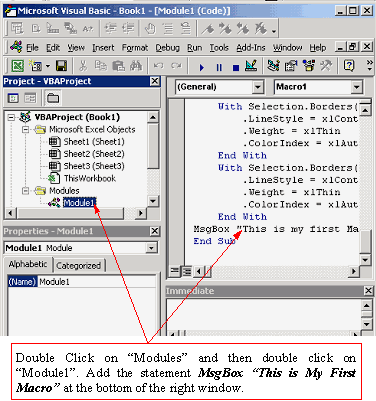
6 Select Tools / Macro / Visual Basic Editor. The Visual Basic Editor appears (as shown in the figure below)
7. In the Window at the top left of the screen (that is written at the top "Project-VBAProject" - If this window is not visible press Ctrl+R) double click on Modules ( found under VBAPproject (Book1) ) and then double click on Module1. The VBA codes of Module1( which are the codes of your macro) appears in the window at the right.
8. Find the last line where it should read as "End Sub".
9. Before this line write a new code as follows:
MsgBox "this is my First Macro"
10. Close the Visual Basic Window and go to Excel.
11. Repeat the steps 4 and 5 above and see how the macro has changed.
|