How to Draw Duo Maxwell: The Shinigami
Let's take a look at Duo (and what a fine look it is). Some people like to start with the eye, citing the whole shpeel that the head is measured by eye widths, blah blah blah. Phooey. You can't just jump in there with one eye, then another eye, expecting everything to line up right. You'll draw one eye perfectly, then the other one way out of position, thus screwing up your pic. So, we begin with the basic outline for the head.
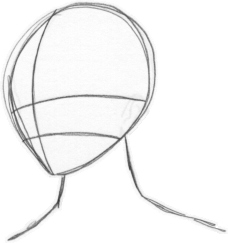 If you've drawn anything at all, you should recognize this. If you have no idea why I have a picture of a striped egg with feet beside this, we have some work to do. Just kidding, the human head is basically an upside-down egg. Those stripes are the lines that go through the middle of the eyes and the mouth. The rest is the neck.
 I like to do the face line next. Starting a little ways up from the eye line, draw a line going in just a little, then bring it in even further. The line should bottom out at the eye line, then come back out to meet the outside line. Follow it down to the lowest point, then up a little ways to indicate the jaw.
The ear is easy to do from here, too. It always fits between the eye and mouth lines. Since this is a 3/4 view, the ear will be in a little from the outside line. It's kind of a tilted rectangle shape, with little squiggles to indicate the folds and stuff. Here's where tracing comes in handy; it helped me learn ears very fast (especially if they're detailed ears, like in Dragonball). Be sure to leave that little line that sticks straight down at the bottom of the ear. That's the part where the jaw attaches. You don't have to connect the jaw and the ear, in fact it looks better if you don't.
 Quick lesson on eyes here at the left! Pretty simple, ne? Because this is a 3/4 view (the easiest, in my opinion), the eyes are a little funky. Do the farthest eye first as a reference. It goes right where the center vertical line and eye line cross. Draw the top line (the eyelash part) just above the eye line. With Duo, the end of the top line hangs lower than the part closest to the nose. Then do the round part. It's an oval, and in this view it's kind of squished horizontally. It also doesn't touch the top line in this view, since Duo is looking sort of downward. The bottom line just comes up from the bottom of the oval.
For the other eye, it goes at the eye line in the middle of the head oval, half way between the vertical centerline and the ear. Again, draw the main line just above the eye reference line, only slightly higher and wider than before. It's closer to being seen straight-on, so it will be wider. The oval goes in about the same place, still not touching the top line. It's wider, too, but still not a circle. The bottome line is the same as before. For both eyes, there's usually one big hilite to one side at the top of the oval, and it's usually a wide U shape, too. You can add other little hilites, but since this is a shojo style, not many. Make sure you draw a pupil, too.
Add the crease above the top lines of the eyes, then the eyebrows.
 The nose is really easy in the 3/4 view. It's part of the narrow eye. You've already done most of the work! From the bottom eye line, continue the curve out and down a little bit. Then come sharply back in and down. There you go. Add that other little line, the nostril line, and voila. Duo's cute little nose.
Let's go ahead and do the mouth while we're here, too. In a 3/4 view, the mouth is in a weird place in relation to the nose. Usually it's small and right on the vertial centerline, but with Duo's big smirk, it's a little different. Starting on the far side, draw a little line under the nose (be sure there's a little hook on the far left there. That's what makes him smile). Leave a little tiny space and start the line again somewhere under the nostril, bring it upward toward the near eye, and add another hook. You can add the little part right below that or not, depending on how you want the mouth to look (teeth or not). But you DO have to draw the other line below that one, the lip/chin line. It's just a simple little curve, indicating Duo's bottom lip. You can make it however far from the actual mouth you want, but keep in mind that Duo's lips are pretty narrow. They're not pouty model lips (thank goodness).
You could stop there, but what is Duo without his crowning glory? Well, he'd be a lot like Dr. Evil. So to avoid that mess (nightmares! nightmares!), let's play hairdresser, shall we?
 Start with the bangs. They begin from the center (see the little arrow?). They're just big chunks that come out, down to a point, then back up. Start with the one that hangs down between his eyes. See? Up, down, down, down, up, up. Now do the part directly to the right of that. This one is facing us, so it'll be closed off at the top. Start at the top...down, down, up, up, back to where you started. That's not too bad, is it? Add the ones on the right next, then do the ones on the left, always working from the center. It's just easier that way.
The main part of Duo's hair starts by the arrow, too. It's just a series of rounded angles. Start at the arrow with a little bend. Come in a little with a new line, and bend it, too. Keep going around, getting bigger as you go around the oval guideline. As you get behind the ear, start Duo's braid. It's just a curvy line. And remember that little cowlick there that sticks out! Duo always has that.
 Add a few squiggly little hilites to the hair (never longer than halfway down the bang sections). Now step back and admire your lovely rendition of the God of Death! When you try it by yourself, don't forget to add Duo's signature priest's collar...now go on! Try it!

Mastered it already? Head back to the Gundam Tutorials page.