
We started with a pattern that was drawn by my teaching partner, Brian Dent of Coldwater, ON.
 We had the students draw three vertical lines dividing the sideview of the pattern into approximate thirds. The sideview was then lined-up with the topview and the lines extended dividing that pattern also into thirds.
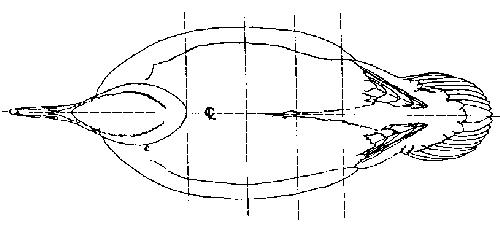 (The line down the length of the "topview" with the strange symbol, an 'L' through a 'C', indicates the centre line of the pattern. The centre line is also drawn on the blank and it should remain visible throughout the carving and shaping process)
The lines from the pattern were than transferred onto the bandsawn blank that we provided to the students. We also had the students draw in the outline of the side pockets on the top and side of the blank.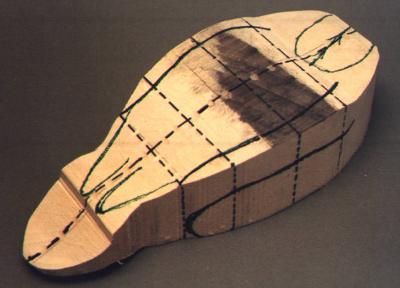
This picture shows the lines drawn on the blank. Note the centre line that has been transferred to the blank and also that the outline of the head blank has been drawn with it oriented slightly to the left.

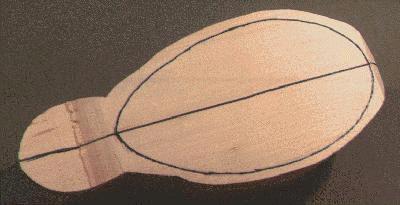
To guard against the "square look", the students were told to cut straight down, along the top side pocket line, to the curved line drawn on the side. In effect, to cut a 'notch' out of the blank. This picture shows the completed, first step. Knives, chisels or power tools can be used for this step.
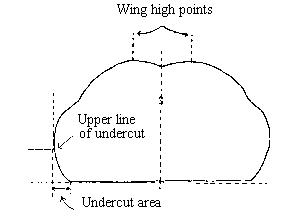
A cross section shows the true roundness of the carving at about the centre of the bird. Note the undercut that must be made to develop the round sides of the Merganser leading to the belly of the bird.
 The width and height of the undercut are transferred to the blank. The photo shows the line drawn about 1/2" to 3/4" in from the side of the blank. The line touches the outside edge of the blank at the front and tapers to almost a point at the tail. The material is removed so there is about a 45 degree angle cut from the side to the bottom undercut line.

Using the cross section as a guide, the parts of the body are "rounded" removing all sharp corners. This photo shows the completed rounding with the breast and neck area roughtly brought to shape. Again, knives, chisels or power tools can be used at this point. A sanding drum in a power tool (like a Foredom) is a great asset at this point. This is a front view of the rounded blank.


The head has a similar, basic stepped shape that can be achieved by making a notched cut to relieve the "cheeks". The head tapers down to the neck so the final thickness must be drawn on the base of the head blank (as shown in the photo on the right). This measurement can be obtained from the pattern or from various reverence material.
 With the head and the body rounded, the head should be attached (temporarily) to the body and the transition at the neck/breast smoothed. This shaping should be done carefully to ensure a full, compound curve from the thick part of the head, through the narrow neck, to the broad breast. Once sanded smooth, outlines of the major feather groups are drawn on the carving. The photo on the right shows the major feather groups relieved slightly. This will add interest and depth to the finished carving.

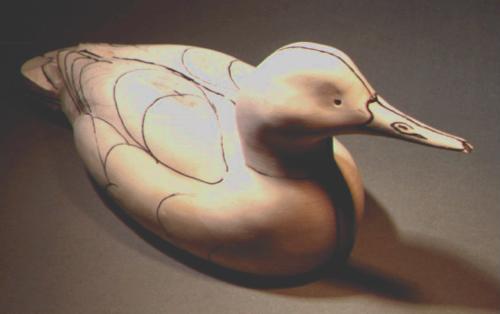
 With the main feather groups relieved, the individual feathers are drawn onto the carving. Feathers are also indicated on the head carefully following the "flow lines" (direction of feather growth).

 At this point, I usually texture the feathers using a ceramic stone mounted in my Hi-Tech, high speed power tool. In effect, I "draw" the individual feathers onto the bird.
The picture on the left shows the stone work. After stoning, I go over the feathers with a burning pen to draw finer lines and to highlight the feathers further. The texturing and burning will "relieve" the feathers somewhat.
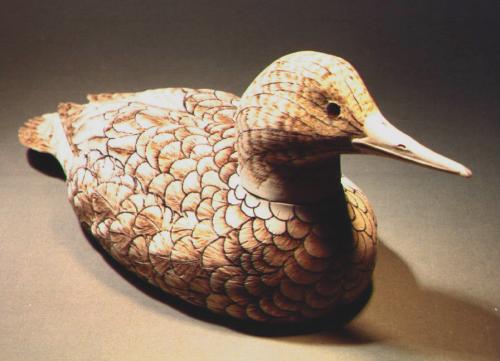 This picture shows the completely detailed bird. I usually remove the head during the texturing to make handling easier. At this point, I would cut a slight depression, or notch, around the neck joint and fill it with a joint compound. There are many on the market and all work well once you learn their characteristics. After the compound has set, I texture and burn the feathers to hide the joint entirely.
Now all that is left is to paint the carving -- but that's a different story
If you have any questions about the steps or techniques used, please drop me an email at mgdunk@home.com and I'll try to answer.
Have fun carving!
 Go to the Yosemite GeoCities