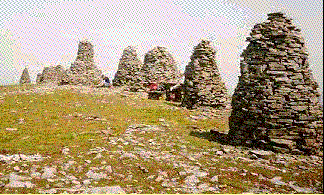
Nine Standards Rigg
Shap is left via a road directly opposite the Kings Arms which leads to a housing estate. Here turn right and follow the lane leading to a bridge which crosses the railway lines before going on between walls and passing under an electric cable before coming to a fork. At this point you need to take the right hand path and cross three fields. The way on the ground is indistinct but a series of stiles makes the way obvious. After crossing the fields you will come to a footbridge crossing the motorway. Cross the footbridge and keep alongside the fence to the right until you come to a copse of hawthorn where you should pick up a faint path bearing left and leading uphill to a gate at The Nab (a farmhouse).Go through this gate and cross the road into the field opposite. Follow the path across this field keeping the limestone scar to your left until you come to a wall and a quarry. The path crosses the quarry access road and continues on straight in front of you across the field opposite towards some trees you will be able to see. When you reach the trees you will see that they hide the hamlet of Oddendale and a wall. Turn right on reaching this wall and follow the cart-track due south over open land. After a short while you come to a stone enclosure and you need to pass this to the left and continue on for about 200 yards before bearing half left to pass the corner of another stone enclosure and cutting across open pasture to a wooden stake and a tumulus on the skyline. At this point you need to Head in a slightly more southerly direction once more to head down to the right of a limestone scar and a huge granite boulder to the Lyvennet Beck. After crossing this beck the path soon becomes much clearer as it heads to join the wall on your left. Follow this path and wall over the slight rise and down past Robin Hood's Grave until the wall turns sharply away to your left. At this point you continue straight ahead past yet another stone enclosure to join a road in the vicinity of another quarry. On reaching the road cross it then bear left round the corner of another enclosure and then turn right down a very well defined dry valley which eventually leads you to a road junction. Go down the road straight in front of you and follow it for a little over 1˝ miles into the village of Orton.
Orton is a nice little village with shops and a hotel. After reaching Orton I recommend that you partake of a little beverage before continuing the walk; for after Orton you have quite a stretch of tarmac to cover; as if the last 1˝ miles were not enough. This long road section was brought about by the actions of a few mindless cretins a few years back. The route used to go from the end of the dry valley over Beacon Hill to Sunbiggin Tarn crossing private land where no right of way existed, but where the farmers were happy enough to allow us right of passage. Unfortunately a few thoughtless people thought it was their right to damage property, camp and light fires where they felt like it and so the right of passage was withdrawn causing the route to be diverted along the road via Orton and adding an extra two miles to the walk and extending the length of tarmac from 6 yards to 6 miles.
Follow the road through Orton and when you come to the fork in the road bear left towards Raisbeck . Once through Raisbeck the road forks once again and again you need to take the left hand fork; this time heading towards Little Asby. After another 2˝ miles you will come to a cattle grid alongside Sunbiggin Tarn. You will be glad to see this as it marks the point where the path and the road separate. Cross the cattle grid and immediately leave the road to walk on a path to your right between the road and the tarn. Follow this path for about 600 yards until you come to a spring. Turn right at this point and head towards a wall not far ahead of you. Cross the stile and continue across the marshy ground to Rayseat Pike with its easily distinguishable long barrow. After passing the barrow the path continues straight ahead to descend to the Newbiggin road at a cattle grid. Cross the road and follow the path that runs alongside a wall to your left. The path follows the wall all the way along apart from one little kink where you need to detour slightly to avoid Ewefell Mire. Near the end of the wall is a gate you need to go through. Once through turn immediately right and follow the wall on your right past a barn and past Bent's Farm. About half a mile past Bent's Farm you come to a point where two walls meet. Go through the gate here and follow the wall on your right until you come to a stile in the wall. Cross the stile. Follow the path over the ridge ahead and then descend to the Smardale valley. Just before which you pass a small tarn on your left. Just beyond is a gate which you go through to cross the dis-used railway line and turn right to follow the path into Smardale Bridge.
Cross Smardale bridge and continue on up the cart-track between walls. When the wall on your left bends round to the left near the Giants graves you turn left with it. Follow the wall and go through a gate in a cross wall in front of you. Continue to follow the path alongside the wall for a little over ˝ mile to a point where the wall again bends away to your left. This time you continue straight on to meet another wall. Bear slightly right and continue on with the wall on your left to pass some old lime kilns and go through a gate onto a minor road. Turn right along this road, turn left down the Waitby road and follow it to the second gate on your right. Turn right through this gate and follow the path through the pasture to a barn on your left. Bear left and follow the path through an underpass beneath the railway. Cross the field to a stile in the right hand corner opposite and enter the larger pasture over the wall. Follow the path across this past some limestone outcrops and some larch trees to reach a gate giving access to two underpasses beneath the disused railway line. Go through Green Rigg Farm beyond to join the lane which is followed down all the way to Kirby Stephen a mile ahead.
Nine Standards Rigg
From the market place of Kirby Stephen take a by-way east to Frank's bridge; a footbridge over the Rive Eden. Once across the river turn right and follow it and an ascent up a field and a short lane lead to Hartley. Cross the footbridge to the road and follow this to the right ,uphill past quarries for 1˝ miles to a sign-post pointing the way to Nine Standards Rigg which you follow along a bridle-way which is easy to follow over rough moorland to the rigg itself. From Nine Standards Rigg aim for the grassy rise of White Mossy Hill to the south. From the summit of this hill head due south to a rough shelter just over ˝ mile hence. From here bear half left and descend S.E. to a pillar of stones at Millstones. After Millstones continue along the path in the same direction for another mile to a shooting hut near the beck at Ney Gill. Turn left and follow the path in the direction of Ney Gill to a gate near a barn. Turn right and cross the beck via the ford and continue up the rise opposite. At the top of the rise turn left and follow the minor road down into Raven Seat. Go across two bridges to some cottages up on the right and a gate leads to a path on the eastern bank of the beck. Follow this path through several fields and over How edge Scars to Oven Mouth. Here the path becomes indistinct and you need to contour round above the beck and past an enormous sheep-fold to drop down eventually to Smithy Holme Farm. Turn left and follow the track past another farm and into a lane which leads down to cross the River Swale and join the B.6270. Just before joining the road turn left and follow the footpath which runs along below Cotterby Scar and emerges at a sharp bend in the Tan Hill to Keld road. Turn right and follow this all the way down to the village of Keld. When you come out onto the road on the bend you will come across a sign-post that claims that Keld is only a quarter mile away. Don't believe it !!! it's a damned sight more than that.
Leave Keld via a signposted lane for Kisdon Force opposite what used to be the village Post Office (now defunct) and after about 300 yards a path marked by a Pennine Way sign leads down to the left to reach a footbridge over the Swale. Cross this and go up the field opposite to cross another bridge, this time over East Gill Force. Continue along the cart-track opposite for ˝ mile to the ruins of Crackpot Hall. Skirt round the wall behind the ruins and continue on another cart-track until you come to a gate. From here a narrower path continues above the rift of Swinner Gill to reach a bridge and some ruins. Pass the ruins and continue on the narrow track along the north bank of the stream up East Grain to its head where you will come to a sheepfold. The path continues straight on but becomes faint in places as you cross some marshy ground, but it does improve after you pass a shooting hut on your right. Continue on this path and as you descend you pass a cairn and a sheepfold on your left. Just after the sheepfold the path turns right towards Gunnerside but you leave it by bearing slightly left and following a very faint track that goes down the north side of the hush in front of you. ( a hush is a narrow ravine caused by the release of water in the old mining processes ). At the bottom of the hush you will come to a good path . Turn left along this until you come to the ruins of Blakethwaite Smelting Mill. Turn right and cross the beck to some ruins on the opposite bank. Climb the steep grassy bank to reach a green path and follow it to the right. The path now follows the east bank of Gunnerside beck for a short stretch. When the path starts to descend do not follow it down but bear half left and climb the stony wasteland in front of you keeping the hushes to the left and follow the path along the line of a broken wall for 1˝ miles to Level House Bridge. Cross the beck and turn right along a track running alongside the beck through what appears to be a lunar landscape (the remains of mining). Follow this track for 1˝ miles past Old Gang Smelt Mill to Surrender Bridge. At Surrender Bridge you go through a gate and cross the Arkengarthdale road to follow a signposted ‘public footpath' to the ruins of yet another smelt mill. Here you need to bear half left and the path is indistinct; but you should head for the left edge of the green field that you can see ahead. Just before you reach this field the deep ravine of Cringly Bottom bars your way. Look for a stile in the wall just above the field and aim for this. Be careful; the descent into and the climb out of the ravine is steep and the beck in the bottom can be difficult to cross. Once you have managed to squeeze through the stile the going gets a lot easier. Follow the path along the wall until it turns sharply left away from you. From here continue straight ahead to the ruins of an old barn in an enclosure. Pass this keeping it to your left. Now take the higher of the two paths you meet and follow this. It soon develops into a cart-track and you follow it down to Thirn's Farm. Here turn left briefly to head uphill in front of a cottage and follow a good path over more desolation above some intake walls until you at last come near to another farm. This one you avoid by keeping well to the left and following the path across open ground and rounding a wall corner to enter a gated lane that descends between walls to join the B.6270. Turn left along this road and after ˝ mile you are in Reeth and can now enjoy a richly deserved pint in one of the several excellent pubs.
Details of Accommodation, along the Coast to Coast can be found by following this link to http://www.coast2coast.co.uk
