Keeping Your Minnows Alive
Tempting a flounder to take the bait is often dependent upon the condition of the bait. I find that nothing is better than what is referred to on the Eastern shore of Virginia as a minnow-squid sandwich. The squid should be skinned and cut into long narrow strips, 3-4 inches long. The best offering of the minnow part of the combination is for the minnow to be alive, and the bigger the better.
To reach productive flounder haunts, I often have to trailer my boat from 1-4 hours before reaching the launching ramp. I use to have problems keeping the minnows alive until I made these two fixtures. Both cost me less than $5.
The first one consists of a five gallon bucket, lid, and small bilge pump to circulate and aerate the water. On especially hot days when ever I stop for a nature call or to buy gas, I put a couple of small chunks of ice in the water. After arriving at the launch ramp I simply pour the minnows into the minnow bucket. As soon as the boat is in the water I give the minnows a fresh drink of water before starting out. I put the minnow bucket into the transport bucket when the boat is underway to avoid spilling water into the boat. I have never lost a single minnow with this rig. The pump I used was one I removed from the boat when I upgraded to a larger model. (Launched without the drain plug in, and found water ran in faster than the 360 GPH pump could pump it out.)
The second fixture is nothing more than a plastic or Tupperware container that has had the top “swiss cheezed” with a 3/8 inch drill. A very wet rag is placed in the bottom and the minnows are placed on top of the rag. The plastic container is then placed in the fish cooler directly on top of or beside the block of ice. I find this method also better when you find you have drifted into shallow water and must make a quick retreat back into water that will float the boat. This may not be a problem where you fish, but along the Atlantic coast behind the barrier islands such as Chincoteague, you can go from 15 feet of water to less then a foot in short order. If using a minnow bucket you must first pull in the bucket before getting under way or you will quickly go through a supply of minnow buckets! Using this rig I arrive with better then 95% of the minnows alive, but slow moving until they are put on the hook and hit the salt water.
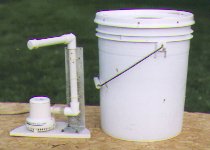
| This is the five gallon bucket with the pump beside it.
The pump is is mounted on a piece of corian or plastic. This
keeps the pump on the bottom of the bucket. The discharge
tube is mounted to a piece of aluminum for support. The pump
is powered from the power winch jack on the back of the truck.
This prevents the pump from running down the battery if it
were powered from the boat's battery. |
 |
This is the 360 GPH pump. The pipe is 1/2 inch PVC. The tube
over the pump motor has two V shaped rows of 9/64 inch holes
drilled in it. This sprays the water down into the bucket. The
upper portion of the vertical pipe also has holes drilled in it.
These holes are drilled at a downward angle to direct the water
down, and not against the side of the bucket. |

| This shows the top of the bucket. The hole in the center
serves several purposes. The wires from the pump exit through it.
I can check on the minnows, and add ice if required on a hot day.
The top also prevents the water from splashing out of the bucket
and the minnows from jumping out. I hold the bucket in the bed of
my truck with a couple of bungie cords. |

| This plastic box is 12x8x3 inches. It will hold a pint of minnows.
A wet rag is used to cover the bottom before the minnows go in.
This box is then placed in the fish cooler along with the ice and
other bait. The holes were drilled using a 1/4 to 3/8 inch drill bit. |
Bayrunner's Home Page
This page hosted by  Get your own Free Home Page