Taipan Wall Left
The Word: Class. World class!
The Crag Classic(s): Everything! But especially Serpentine (*** 29)
The Hidden Gem: Dance of Life! Only gets 1 star in the guides, but this is a full-on 3 star classic!
Best Season(s): Year round, although you'll be chasing shade throughout summer, and there'll be at least 10-15 stinking hot days when you'll be better off at Buffalo! Temperatures are no problem in winter (during the day!), but there'll probably be more rain to deal with.
Sun/shade: Shade until 1-2pm, with the wall positively glowing by sunset.
Rock type: The vertical and leaning overhung orange stuff is Grampians sandstone at its finest, plus some more run-of-the-mill vertical and slabby grey stuff.
|

|
Wet weather options: Surprisingly the start of most routes get wet in any sort of proper rain. The World Party area is your best bet (Spurt Wall is dryer). The raised humidity might make those slopers seem worse than on a dry day!
Style & Length of Climbs: Vertical and leaning overhung routes up stunning orange rock. Most routes need a good head, with bolts used only when natural gear won't go in, and even then only sparingly!
Available Grades: 18-31
The Details: One of Australia's most stunning sweeps of rock! It's reputation of not being consumer friendly is fair enough - however this seems to be far more of a deterrent than it should be, because none of the routes are dangerous. Many routes do give you the chance of some decent airtime, but when you consider that the moves are amazing, the pro is superb and there's lots of clean air to fall into, in my opinion this only enhances the fabulous Taipan experience! A point of housekeeping - as photos on Taipan generally turn out to be excellent, I now have quite a large collection which is getting slow for visitors to download all on one page. For this reason I have now divided my Taipan pages into the "left" and "right" sides. In reality there's no such division and its all one big superb wall, but this should help speed up your downloads of all these photos!
Access: 20-25mins walk, refer to the photo below. Park at the Flat Rock carpark. 5-8min walk to the rim of the amphitheatre via Flat Rock, then continue along the tourist trail down into the Amphitheatre and into the trees where the trail flattens. About 100m further, when you come across some obvious large boulders (good bouldering), turn L off the tourist track along a well trodden climbers track, and up fairly steeply for 5mins to the obvious wall above. Tokyo Connection is about 80m L of where you meet the wall, Spurt Wall is 150m to the R.
Mt Stapylton Amphitheatre and Flat Rock as viewed from Mt Zero

Descent(s): Most routes have their own rap stations (often needing 2 ropes). For all routes L of Serpentine that top out, it's possible to walk down to the Dance of Life rap anchors, which can be found by looking for the 2m stick propped up beside them (also a good idea to check out where Dance of Life is before you start climbing). When walking along the top of the wall, it's a bit tricky to find a safe way, the best way is about 30m back up from the edge, and goes along inside the large caves visible above the middle of the wall, to a short exposed traverse above Sirocco. To the R of Serpentine it is not safe to walk around above the wall without a rope.
Guidebook(s): You need several - and even then you inevitably won't have all the info!! They are: Northern Grampians (Andrews, 1990?) pages 174-198; Northern Grampians Update (Andrews, 1994?) pages 25-34; Grampians Select (Mentz & Tempest 1998); pages 28-59; Grampians New Routes (VCC/Monteith 2003 - online) page 2-3; Stapylton Amphitheatre (Loughran 1997?).
Described L to R, facing the cliff.
Taipan Wall Left Side
The view from the top of Flat Rock, showing Grey and Green Walls, Taipan Wall, Spurt Wall, and Lower Taipan Wall. From L to R, the initialled routes are: Tokyo Connection (* 18, 18), Sirocco (** 21, 26), Serpentine (*** 24, 29), Snake Flake (** 26), World Party (*** 21, 27, 24); Mr Joshua (*** 25, 26).

And here's a view of the Amphitheatre from the other direction, from below Lower Taipan Wall.

Taipan Wall left end. The routes marked are: Atomic Tadpole (* 20); Tokyo Connection (* 18); Sordid Orchids (* 25, 26M1) goes up past the big birdshit ledge, Dinosaurs Don't Dyno (* 26) takes the flakes just L of the steep arete, Dance of Life (*** 24M1) which starts as for DDD but traverses around the lip of the roof to gain the beautiful orange groove up the front face; Seventh Pillar (*** 18M1, 18M1, 1, 18); Serpentine (*** 24, 29); World Party (*** 21, 27, 24) and Mr Joshua (*** 25, 26).

Taipan Wall left end; Atomic Tadpole (* 20) and Tokyo Connection (* 18) both tackle the slabby grey rock at far left, Sordid Orchids (* 26M1) goes up past the big birdshit ledge on the left, Dinosaurs Don't Dyno (* 26) takes the flakes just L of the steep arete, while Clean Sweep (bold * 24), and Dance of Life (*** 24) (with my rope visible hanging off it between attempts) traverse low around the steep arete and up the R side of it.

Mission Over Tokyo / Tokyo Rose 45m 18 (OS)
It's a shame we have to start with such an ordinary route. This is the "other" pitches of these two routes. Let's just say that there's a good reason that it's now written up as a 'connection' (see below) so that you avoid these pitches. It's not shown in the topo here, although the "Access Route" (white line) shares the first 20m, then this route goes straight up the grey rock to join the yucky thin crack.
* Atomic Tadpole 35m 20 (OS)
An excellent warm up for the 'real' routes nearby. It's the red line in the topo on the right. The initial finger crack largely goes to face climbing, and careful gear use avoids the need for duplicate #1Frs. Sling the huge horn on the lip of the roof, and step L around it to easily surmount the roof. Up the simple slab (beware fragile holds) to the thin headwall which goes to some nice crimpy reaches, protected by some ok but small wires. Walk 50m R to rap chains above Clean Sweep, marked by a cairn/stick. .
* Posy 30m 23 (FA)
A selection of various 'flowers' plus a pose or two of it's own. Takes the aqua line in the topo on the right. Start 5m L of Tokyo Rose (Tokyo Connection) on top of the large boulder. Find adequate pro on the R up the easy slab, then trend R across Tokyo Rose, to join Ukrainian Geranium for 8m over bulges to top of short flake. Traverse R to big grey streak, undercling past FH to break, and join Sordid Orchids Direct past it's final 2 FH, to U-bolt lower-off (28m). Take cams, wires and some long draws. Will Monks, Mike File 1.10.05
|
A topo of Taipan Wall Left End.

|
** Ukrainian Geranium 45m 20 (FA)
Couldn't believe I found a new route on Taipan which went ground up on trad! Two good equally graded pitches. Start 2m R of Tokyo Rose (Tokyo Connection), and 2m L of Sordid Orchids. 1) (25m 20) Thin orange corner then diagonally up L with feet dropping into TR for a move or two. Steeply over bulge and up the short orange flake on the R to gain slab. SHB below white bulge. 2) (20m 20) Move R over white bulge to ledge. Leftward arcing thin orange corner to the intermittent crack 4m R of Atomic Tadpole's finish. Will Monks, Kevin Lindorff (alt), Joe Goding 11/9/04
Me on the first ascent of Ukrainian Geranium. The first pitch of Sordid Orchids takes the flakes on the R, with the crux being into the break up high

|
Joe models the funky thin corner on the 2nd pitch of Ukrainian Geranium

|
** Sordid Orchids Pitch 1 20m 25 (RP)
My first 25! Visible in the above left photo. Short glassy slab then a nice delicate 21ish thin flake with great gear leads 10m up to a break (#0Fr, wires). Desperately sidepull up poor flake to good L hand gaston at its top, crank off that to get your R hand over the top of the next flake (heinous for shorties who can't reach with feet in the break), and clip 1st RB. L hand intermediate crimp then pop to better sloper, R hand to unexpectedly good hold to pull through to fairly good L hand sloper (clip 2nd RB). Crux is next 2m to break, with at least 4 variations possible which all start with L hand on the sloper, and are: (1) L foot onto vertical 'sidepull' about 3 feet below your L hand, R hand to sloper gaston, L hand up 1 foot to small sidepull, R hand up R to good sharp crimp/gaston, R foot to good edge beside L foot to maintain body tension against gaston, L foot up into the sloper, L hand up to sidepull/flake at break; (2) swing wide R to the piton slot, bring up your L foot, L hand to sharp crimp, raise R foot, match the crimp, L hand to better crimp below break, then R hand to break; (3) crank from L hand sloper to get R hand onto high crimp/gaston; and (4) swing R to piton slot, L hand to sharp crimp, R hand high R to horrendous sloper, L hand to crimp below break, R hand to break. (1) is secure; (2) is good if you can do the barndoory reach into the piton slot, (3) is reachy and too dynamic for me, but has been preferred by at least one person, while (4) is desperate IMO, but again has been used on a successful ascent! You can recover in the break (small-med cams), then delicately traverse R to rap anchor.
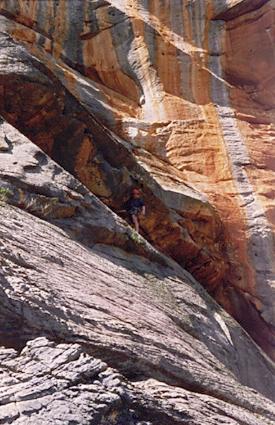
Neil places the last trad gear on Sordid Orchids pitch 1 before the hard climbing past the bolts. Note the start of Dance of Life and Clean Sweep is visible at far right

|
Me cranking out the first hard move on Sordid Orchids pitch 1 (© Neil Monteith).
 . . . .
|
*** Sordid Orchids Direct 28m 26 (TR)
A direct continuation to the first pitch of Sordid Orchids. Certainly not up there with the most classic Taipan routes but it adds a lot more very cool climbing at around the same grade, and manages to earn a third star in my book. From the post-crux break on SO p1, pull up to the break above and clip a FH. The non-obvious reachy technical crux follows, then delicately move L to med cams in a break. Thin reachy crimping leads up past another bolt then slopers take you R past the last bolt, to join the 2nd pitch of SO. Follow this for 2m to a U-bolt anchor, 60m rope required to lower off. Neil Monteith, Will Monks 26.1.05
Neil demonstrates what I now consider the best way to do the crux on Sordid Orchids pitch 1, while working the FA of Sordid Orchids Direct.

|
Neil on the lap where he finally linked it through the crux of Sordid Orchids Direct - only to peel off the top!

|
*** Clean Sweep 40m 24 (TR)
Takes the subtle grey scoops 3-4m L of Dance of Life. Brilliant sustained climbing all the way, not letting up until the very top. Although somewhat notorious for being under-protected, provided you can hang on to fiddle the gear in there is only one runout greater than 3m to worry about and the potential fall is always into clean air anyway so whats the problem!? I highly recommend toproping it just to sample yet another superb Taipan pitch, which is easy given that it's directly below the rap anchors servicing this end of the wall. I reckon this convenience also makes it a prime candidate for grit-style toprope sieges, pre-placed gear and subsequent 'headpoint' lead ascents for up and coming hardfolk (who aren't quite hard enough to go ground up! :).
*** Dance of Life 40m 24 (L, TR)
An amazing climb, marred only by the need for an aid bolt at the start. However once you get going the climbing is absolutely phenomenal!! With a full set of wires and plenty of cams from aliens to #2Fr you can really sew it up. Take extenders and drag is no problem. Start from the elevated ledge on the L, you'll need to protect this then backclean it. I pulled on a cam to lean over and even then had to clip the bolt using two wires threaded together. I also aided on a good small nut in the flake up R of the bolt, then started freeing from there. From there up is pretty obvious from these pics (oh plus there's another carrot near the top), so I'll just say once again: it's friggin' awesome!!
Kent eyeballs the way ahead after the airy start on Dance of Life. This view also shows the start of The Mint, which heads around R under the roof.

|
Kent continues up the superb face of Dance of Life. Note the finish of both Seventh Pillar and Serpentine are initialled in the background.

|
Me on the stunning Dance of Life (*** 24), with the flakes of Dinosaurs Don't Dyno (* 26) obvious on the L, and the arete of Great Divide (** 27) visible on the R. My new traverse route The Mint (* 21) starts on far left of shot and traverses R-wards along the break under the large low roof, and continues out of shot to the right.

Here's me approaching the crux on Dance of Life, with a shirtful of breeze way up the top of Taipan.

|
Here's me towards the end of the crux sequence on Dance of Life.

|
Neil 10m from the top on the stunning Dance of Life (*** 24), while Clean Sweep (bold *** 24) takes the faint grey groove on the L.

|
Taipan Wall Left End, with Dance of Life (*** 24), Great Divide (** 27), The Chick is Trouble (26), Seventh Banana (** 23, 27) and the first belay of Sirocco (** 21, 26) initialled. My new traverse route The Mint (* 21) emerges from the large low roof and keeps traversing R towards camera to finish at the first belay of Sirocco. Note Neil rapping off Threadneedle in the background.

|
* Dance of Life Dinosaurs Don't Dyno Connection 40m 23 M1
Takes in some great climbing and avoids the crux of both routes. 1) (25m 23M1) Up DoL to the major break 10m below the top, step R to comfy belay off bollards and large cams. 2) (15m 20) Traverse L along the break, cross Clean Sweep, and join DDD at good stance on the arete. Up the short slab and groove finish of DDD. Will Monks, James Pfrunder, Kevin Lindorff 25/9/04
Kevin seconds up the magnificent lower section of Dance of Life, belayed by James, during the first ascent of Dance of Life Dinosaurs Don't Dyno Connection. The crux of DoL is between James and the camera. Note Leanne snoozing on the rock way down below.
 Kevin continues up Dance of Life.

|
James works hard through the desperate holdless slab finish of Dinosaurs Don't Dyno, during the first ascent of Dance of Life Dinosaurs Don't Dyno Connection.

|
* The Mint 42m 21 (RP)
My second ground up trad first ascent on Taipan, and bloody good fun it is too. (Do you go ground "up" if its a traverse??? ;) Start at the R end of the elevated ledge at the base of Dinosaurs Don't Dyno, but belay on wide ledge 6m below to see crux. 1) (32m 21) From elevated ledge, step down to hand traverse R under large roof, cross Great Divide and continue traversing R to Seventh Banana first anchor. 2) (10m 17) Continue traversing R to Sirocco first anchor. Rap off. Take a full set of cams. Has also been done by starting up the unpleasant flakes 10m L of Great Divide leading to the largest part of the roof (10m longer, not recommended). Pitch 2 can probably be reversed at the same grade by those wanting more after Sirocco's first pitch (or those who don't like Sirocco's sling anchor!). Will Monks, Mark Rewi (alt), Neil Monteith 15/1/05
Mark wishing the pre-crux rest wasn't quite so hard to leave while seconding the first ascent of The Mint.

|
Mark jumps in to lead the second pitch of The Mint.

|
The Chick is Trouble 20m 26 (TR)
3m L of the Seventh Banana p1, and easily toproped from the SB anchor. Two horrendously difficult moves past the bolt on the lip of the roof (surely that's harder than 26?!?) ruin what would otherwise be a nice flake. The face moves off the top of the flake to gain the belay are really nice.
** The Seventh Banana Pitch 1 20m 23 (OS)
Fantastic climbing, if only there was more of it. Takes the chunky flakes above the lip of the low roof, with a bolt protected pocket move over the lip being the crux. Start up the nice flakes about 4m R of the bolt (surprisingly tricky), then traverse L in the big break to clip the bolt (large cam and long sling protects the clip). One big R hand crank off the highest pocket and you're into the fantastic flake climbing above. Take cams to #3Fr, plus wires.
Mick eyeballs the crux holds over the roof of The Seventh Banana Pitch 1, with the awesome expanse of Taipan off behind
 Mick susses the awesome flake climbing ahead on The Seventh Banana Pitch 1, with the Northern Walls of Stapylton Amphitheatre visible in the background.

|
Mike takes the R hand option on the crux of The Seventh Banana Pitch 1

|
Mike enjoys the best bit of The Seventh Banana Pitch 1: the post-crux flake climbing
 A view of most of Taipan Wall; initialled are Dance of Life (*** 24), Seventh Pillar (** 18M1, 22M1 or 28), Serpentine (*** 24, 29), Invisible Fist (of Professor Hiddich Smiddich) (** 26), World Party (*** 21, 27, 24) and Mr Joshua (*** 25, 26)

For route descriptions and photos of the other half of the wall, go to my Taipan Wall Right Side page.
Trackside Boulders
Hard Right [V3, ]
Lessons in Socialism [V5, ]
Sick Nutter [V5, ]
D [V2, ]
B [V0, ]
Paranoiac Critical Town [V3, ]
A [V1, ]
Wiggly Boy [V3, ]
Da Boys havin' fun in the sun! Check the sizes of those grins! This is at the top of Taipan Wall, looking back over the Amphitheatre.

More Internet Sites on Stapylton Climbing
 Victorian Climbing Club (VCC) go here to check for new routes, and/or upcoming trips to this area.
Bureau of Meteorology Navigate to "Wimmera" - Horsham's weather is the closest.
Australian Maps Enter "Reservoir" as the road and "Laharum" as the suburb (and Victoria as the state).
Chockstone has several good pics of Taipan.
Onsight Photography The first 15 or so Grampians shots are from Stapylton.
Parks Victoria Grampians National Park information, downloadable maps, etc.
Parks Victoria Education Resource Kit A fascinating explanation of Grampians climate, geology, wildlife, vegetation, soils, history, park management, and visitor impacts.
Neil's Photos 1
and 2 - a great selection of shots from two of Neil's Taipan trips
TheCrag.com As always. Record your Stapylton ticks here, and see what everyone else is climbing.

© 1998-2004 Will