![]()
![]()
There are several knots that you should become very familiar with that will save you time and a lot of lost fish. These knots are easy to learn and can be applied to almost any situation where you need to attach different diameters of monofilament together, add wire leader, or just attach a lure or hook to you line. They are:
Below are diagrams demonstrating how each knot is tied. Just remember to always moisten the knot before tightening, trim the tag ends as close to the knot as possible, and practice makes perfect.
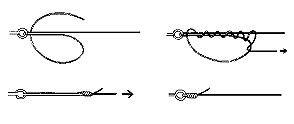
The Uni-Knot was created by outdoor writer and angler Vic Dunaway. The Uni-Knot is the basis for an entire knot tying system. Once the basic knot is learned, it can be used for everything from tying hooks to light line, to joining lines that vary by 10 times in test strength. It also provides 100 % knot strength in most of it's applications.
The Surgeon' s Knot should be formed slowly and carefully using two over-hand knots. It is best to moisten the knot, then pull all four ends of the knot evenly and smoothly until it's tight. Done correctly, the Surgeon's Knot can be used to attach 6 pound test to 60 pound test mono.
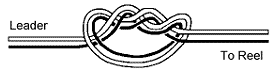
Also called the 20 Times Around Knot, and the 100 Percent Knot, the Bimini Twist is the mainstay of light tackle anglers for building a leader system foundation. It is the knot that connects the main fishing line to leaders, as well as forming "doubled" line configurations.
The Bimini Twist Knot has a reputation as being a difficult knot to tie, following the steps below will make it much easier. Tying the Bimini correctly does take more practice than most knots, but with practice, anyone can tie this knot in a short time.
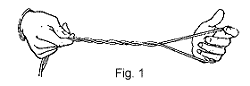 This step determines how large of a loop[ will be created with the Bimini
Twist. For most light tackle situations, 6 to 8 feet of line is doubled, creating a
"loop" 3 to 4 feet in size. Form the loop in one hand while holding the
line end and standing part together firmly in the other hand (Fig 1). Then twist the
loop 20 times.
This step determines how large of a loop[ will be created with the Bimini
Twist. For most light tackle situations, 6 to 8 feet of line is doubled, creating a
"loop" 3 to 4 feet in size. Form the loop in one hand while holding the
line end and standing part together firmly in the other hand (Fig 1). Then twist the
loop 20 times.
|
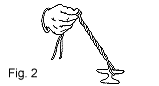
Now fit the loop over a stationary, non abrasive object, like a boat cleat, or even your foot (Fig. 2). |
This is the most critical part of the knot, and the step most beginners find difficult. While pulling on the standing part of the line, "open" and increase the size of the loop by inserting your index finger in the loop and pulling the knot wraps away from the stationary object.
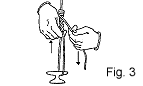
| As the knot wraps "gather" pull the tag end of the line back toward the loop (Fig. 3). This will cause the tight line wraps to double over themselves. |
|
 |
Maintain tension on the loop, standing line, and the knot wraps, until you put a Half-Hitch in one side of the loop (Fig. 4). Tightening the Half-Hitch secures the Bimini's wraps (Fig. 5). |
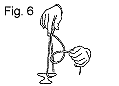
| Put another Half-Hitch on the other side of the loop to "lock" the Bimini's wraps in place (Fig. 6). |
|
|
Wind the tag end of the knot three to five times around the large loop, then push the line end back through the small loop just made and tighten (Fig. 7). |
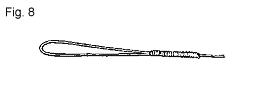
| The completed Bimini Twist should look like this (Fig. 8), with the loop made to any size desired. |
|
This knot is named after the famous Florida Keys guide Jimmy Albright. This is a great knot for attaching light line to heavy leader. it can also be used to attach wire cable, nylon coated wire, and single strand wire to monofilament line. When using heavier mono or wire, make sure that the heavier mono or wire is used to make the single loop in the connection, and the lighter mono is used to make the wraps.

 This
is one of the most commonly used methods for linking solid wire leader to any connecting
ring. The number of wraps and the two different kinds of wraps in the Haywire Twist
are absolutely necessary to keep the wire from pulling apart.
This
is one of the most commonly used methods for linking solid wire leader to any connecting
ring. The number of wraps and the two different kinds of wraps in the Haywire Twist
are absolutely necessary to keep the wire from pulling apart.
Thread the end of the wire through the eye of the hook or lure, pulling about five inches of wire through it (Fig. 1).
Pinch two pieces of the wire together, and begin twisting the wire strands simultaneously together, so they wrap around each other at about a 45 degree angle (Fig. 2). Make about four to six wraps.
Now bend the tag end of the wire at a 90 degree angle to the standing part of the wire, and begin making "barrel wraps" tight to each other (Fig. 3). make four to six "barrel wraps". Bend the tag end of the wire back and forth until it breaks. Your Haywire Twist is now complete. Attach wire leader to your running line by using the Albright Knot.
![]()
Special thanks to: "Bob McNally's Complete Book of Fisherman's Knots, Fishing Rigs, And How To Use Them", McNally Outdoor Productions, and Atlantic Publishing Company, "Vic Dunaway's Complete Book of Baits, Rigs, and Tackle", Wickstrom Publishers, Inc., for the use of these illustrations.
Copyright © 1999, Dave's So. Florida Home Page
This page hosted by ![]() Get your own Free
Home Page
Get your own Free
Home Page