Ducati Stator Info Page!!
Just when you thought it was safe to own a Ducati...

Before starting any Ducati repair, it is imperative to have plenty of espresso. This is important as any repair job that should take you two hours will invariably take at least six. Two shots of espresso should be taken for every time someone asks you if you are done yet.
Oh, and you should be using Illy Espresso. "Illy" is an Italian word for "don't bother me, I'm having my coffee", dontchaknow...
I've learned about as much as I want to know about Ducati engineering, luckily there are others who have pushed on further and reported back their findings. One such fearless explorer is Larry Kelly, whose email to the Ducati List with lots of info is reproduced here by permission.
I also rely heavily on my Haynes 916/996/748 manual for guidance. If you have only one workshop manual, get this one. However I also have a factory manual which is helpful for confirmation of info, and goofy Italian/English translations.
Below are photos from my recent replacement and rewiring of the stator on my Ducati 916. I found the wires going to my stator were fried, and decided to beef up the replacement (used) stator with better wires. Either I did an inadequate job in re-wiring, or the replacement stator was bad, but as of this writing I'm only getting 8volts at 3k RPM out of my Electrex voltage regulator. I will soon be diving back into the engine to fit another stator, hopefully with the results intended.
March 2003
UPDATE, Sunday March 16. After replacing the stator again with another that I was assured would work, I again got only 50 volts AC at the wires. After much head scratching I swapped the voltage regulator back to the stock Ducati unit. Presto! Holy crap, look at the power! It works! So I'm back on the road and a happy camper. I also installed the Allied Electronics volt meter recommended in Rich's email, so I can keep an eye on the System. I have also upgraded to the "NEW" Ducati voltage regulator that started showing up on Ducks since the late '90s. I've been told that these are much better and more efficient, but who knows?
Here is my page showing the new volt meter installed on my Ducati: Volt Meter Page.

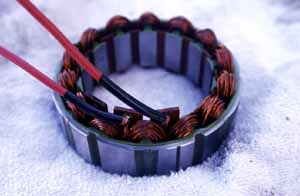

Another photo of the new wires in the replacement stator. The Ducati two wire stator is meant to have .2-.4 ohms of resistance, and put out at least 70 volts AC at 3,000 rpm. This one only put out 50 volts AC, which ends up being about 8 volts DC at the output from the Electrex voltage regulator. Not enough, so out it will come.
Note: as stated above, it seems that 50v AC IS enough, but the voltage regulator was fried. Strange that the manual states very clearly that there must be at LEAST 70v AC. Maybe having upgraded wires and a new-model voltage regulator helps here.


This is a rather vital little tool. It is a scrap piece of cardboard employed in holding the engine case screws in order and off the floor. This is time well spent, as putting it all back together goes smoothly and you don't accidentally put that 2" screw into a 1" hole and crack the cases.

Here are my tools I use for soldering. I'm still not very good, but the connections stay connected at least. The important things here are a powerful instant-on soldering iron that can heat up heavy gauge wire and the solder for good connections (with a good tip, this tip is done and has been replaced). Also here is soldering iron tip cleaner and tinner, important to keep the tip in good shape. The flux in the white tin is vital, don't expect "rosin core" solder to do the job, it isn't good enough by itself. Use flux on every connection. This is plumbers flux, it says "not for electronics", ignore that. I have it on good authority that it doesn't matter. NOTE: I HAVE SINCE FOUND THAT THIS STUFF CORRODES THE COPPER WIRING TOO MUCH, SO I NOW USE REGULAR FLUX PASTE FROM RADIO SHACK. Heat shrink tubing is the only way to go in making things neat and clean. I dislike using electrical tape as it almost always peals off especially around heat. I haven't tried the brush-on type of coating yet, but it is on the list to try.
The other thing I've started using is dialectric grease for all connections. Also called "tune up grease" it is typically used in spark plug boots for better non-sparking connections. I found that all the grounding connections had corroded and needed cleaning and re-soldering. Available at auto parts stores.
Conclusion: So my Ducati works great now. It has the original Ducati voltage regulator installed, awaiting the outcome of further testing of my Electrex unit. When I ride the bike the volt meter shows me how well the System is working, so I have some peace of mind knowing everything is OK. I came home the other night and had a surprise when I plugged in my battery tender to charge the battery- the green light came on right away! That signifies that the battery was already at full charge, something it was never able to do before. I attribute this to the fact that the charging system wires were breaking down from the beginning, plus the grounding connections were terrible. By upgrading the connections and wires it seems that I have solved much of the problem with this System. NOTE: I HAVE ALSO REPLACED THE STARTER CABLES WITH VERY THICK HEAVY GAUGE WIRES, WHICH HELPS THE STARTER TO SPIN OVER AND REDUCES THE DRAW FROM THE BATTERY. EVERY BIT HELPS.
March 20, 2003