 PART 2: LESSON
- DRAWING A ROSE PART 2: LESSON
- DRAWING A ROSE
TIME:
Allow 40min
Aim:
This is a project that has two parts. Part one, in this section, is learning to draw a rose and part two is in the general lesson section on making the drawing into a painting.
Materials;
The sketch pad, HB and 4B pencil, eraser.
In addition each student will need a single rose ... either have the student obtain one in preparation or the teacher might decide to provide them in which case one per every two students will be sufficient.
Allow five minutes to for the quick sketch test. Two minutes to do and three to mark. Swap, display and title if necessary.
You will need five sheets for this lesson but have the student prepare them as they need them.
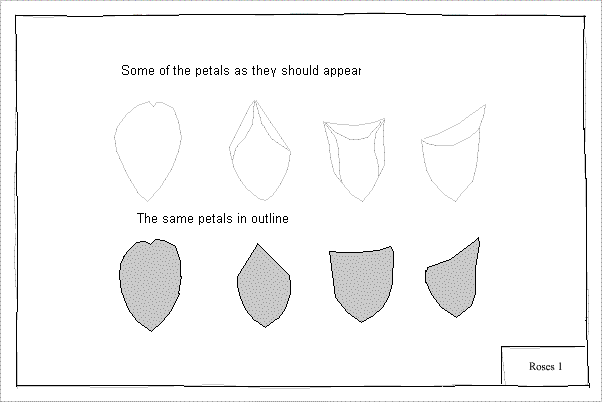
Next have all the students examine the petals on their rose. They should take particular interest in the outside drooping petals where they will observe the following shapes. These they will draw as I have demonstrated below but with their own variations.
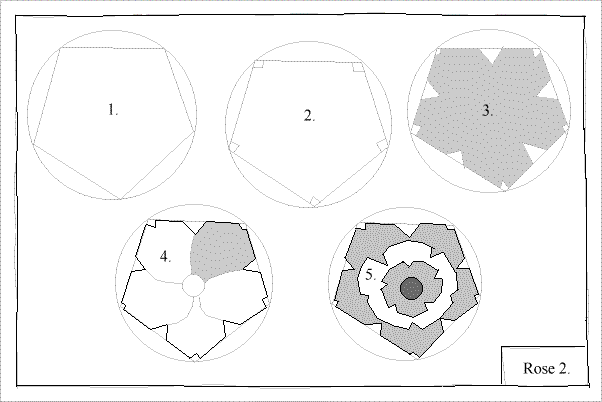
You will note that roses generally have five petals ... inside five petals - inside five petals etc. The petals are offset so that the outside petals don't line up with the adjacent row inside and so on and so forth. Therefore on the next sheet lightly draw a pentagon (five sided figure) as shown in Fig.1. You may use a circle if you like to be more accurate.
Nick the corners as I have shown in Fig.2
Put a vee in the flat sides of the pentagon as this will define the extent of the petals. Fig.3.
Firm in the outline as in Fig.4. as well as defining the petals and the center of the rose. You should now begin to understand the basic structure of the rose as seen from in front.
Complete and label the sheet.
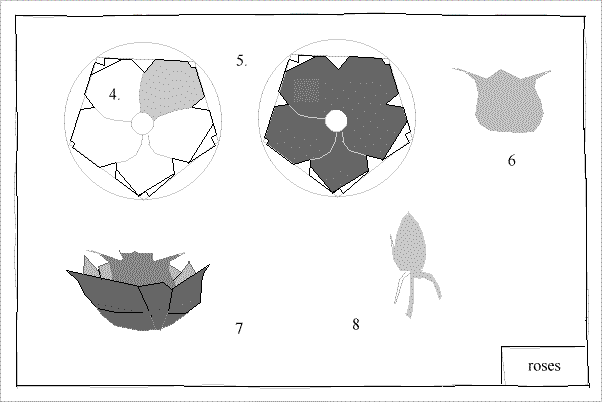
On a new sheet draw the rose as I have done taking particular care to vary the edges of the petals as you discovered in your drawing sheet No.1. Though the structure (pentagon)remains the same the outline gets varied as the petals fold over on themselves hence we get the irregular outline as in Fig.5.
In Fig.6 we will draw the classic 'bell shape' of the internal section of the rose as viewed from side on.
Fig.7 shows the 'bell shape' inserted into the outside petals.
Fig. 8 will be your sketch of the 'rosebud.' Label all these drawings and title the sheet.
On the next sheet (below) we will draw the front view of the rose from the 'inside' out.
Begin with the center as I have in Fig 1 and carefully construct your petals around it getting bigger as they spread out. Shade the deep parts of the petals as I have done until you have the complete 'reference sheet' similar to mine.

For our final reference sheet we will be drawing the petal again and forming it into side on views of the rose in semi and full bloom. Note the classic 'bell' shape and just concentrate on assemblying all the petals. You will note you will only just see the tips of the inside petals though they will mostly appear flat on top as they curl over. They get smaller and stick up more as they get toward the center of the rose.
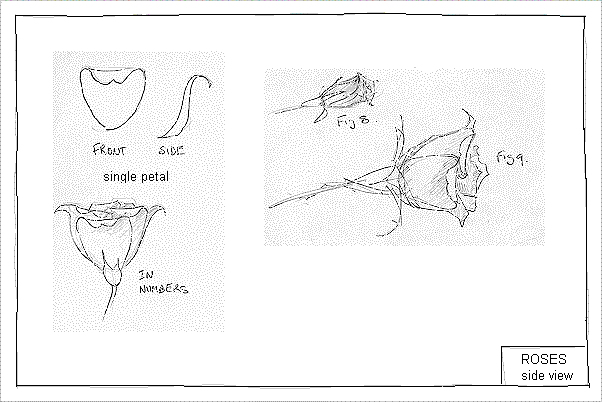
Please note the other 'parts' of the rose and add them as I have. Complete as shown above ... and add the title.
HOMEWORK
Observe and practice until you are comfortable drawing the rose from any angle. Try drawing it from the back!
For those students wishing to see how such a drawing can be converted into an oil painting depicting a vase of roses go to painting roses in the advanced lesson section and for a video demonstration visit our site here:
Including two Video Lessons
1) Painting Roses Part 1
2) Painting Roses Part 2
 END OF DRAWING BOOK END OF DRAWING BOOK
back to start
This site is a small part of the Cowdisley Painting lesson site.
Teachers wishing to take students to more advanced drawing lessons will find them on other sections of the Cowdisley site, specifically:
Cowdisley painting/drawing section
Cowdisley advanced 'roll over' perspective
John Hagan warns teachers that there is some nudity in some examples of master paintings that some schools of colleges might feel inappropiate for students in the first of these links.
You might like some limited edition CD's of all the lessons of the Cowdisley Site including these drawing lessons ($29)or the recently released DVD ($45)

|  PART 2: LESSON
- DRAWING A ROSE


