This lesson is a summation of the practical demonstration I sometimes give to further explain some of the points made in the previous lesson. My purpose is to use common household materials to make an oil painting while my method of teaching this is similar to those cooking shows you see on TV. My desire is to familiarize the students with what 'might' have happened during the 'invention' of oil painting back in the sixteenth century and thus remove some of the hesitation from trying the method themselves.
The first thing I do is to search the kitchen and laundry for the materials I need. It is best if this is done without alerting other members of the household as they often don't appreciate your dedication to such an elevated cause. |
 |
I describe this lesson as the ultimate alchemy since we are literally going to turn base materials into gold. Of course the 'gold' we paint is sometimes even more valuable than the gold in the ring on you finger which you would discover if you tried to purchase Rembrant's 'Man with the Golden Helmet'. It would certainly cost more today than the helmet itself.
The main ingredients I will use for this recipe are a linen table napkin, artificial saffron, white zinc cream (prevents sunburn), white shoe polish, black shoe polish, a stick of blue chalk, some sunflower cooking or salad oil, a pack of drinking cocoa and an egg yolk. I will also use the mortar and pestle from the kitchen though a glass bottle would do just as well.
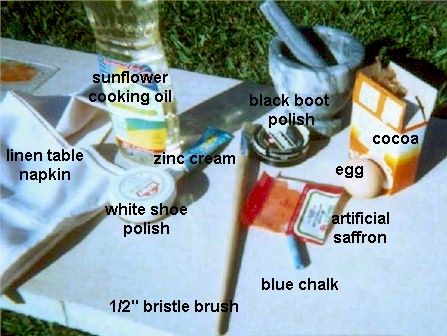
First I find an old frame and stretch the table napkin across the back and staple it in place. Remember to stretch from the center outwards and not from the corners in.
Next I separate the egg keeping the yolk and mix that with some of the saffron. I paint this mixture on to the stretched napkin. This seals the surface and gives a nice quick drying yellow surface. Those who have made mayonnaise will also realize that egg yolk will mix with oil if carefully added and it was most likely this transition that originally led to the development of oil painting anyway.
Next we can grind the colors with our pestle and mortar and mix the powder with the cooking oil making a thick paste. You might like to experiment here with your shoe polish and zinc cream to get variations of the colors you need. You will find that mixing the saffron with the white will quickly give you a rather powerful yellow.

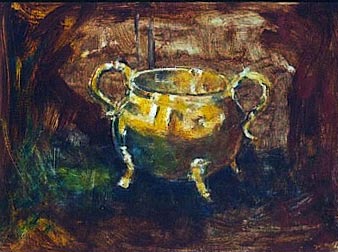
Next I selected a small silver bowl from the china cabinet (as my household is bereft to anything gold) and placed it where I might paint it ... in the meanwhile changing the silver to gold. Below you will observe my efforts. This whole demonstration should only take you an hour at most from making your paints to the finished article while the student can take as long as they like.
You will find the brush a little more difficult to handle as the pigments are much coarser than the commercial alternative. Still persevere and you might manage to amaze your friends if not your own household. After the painting dries you might find it becoming a little dull and lifeless. This is easily fixed with the application of some ordinary furniture polish or wax ... as has been done with oil paintings for centuries!
The palette
When I started painting my palette was - red (light red), yellow (yellow ochre), blue (cobalt) and white. Next I needed some bulk earth colors and purchased burnt and raw sienna and similar umbers. Later I added some cadmium reds and yellows, a crimson, cerulean and ultramarine blue. Finally I purchased some transparent colors like alizarin, Italian pink and thalo blue. I stupidly have many colors I never use.
Surface preparation
I will usually paint on anything that will hold paint but it must be dry, flat, rigid and have a little tooth (roughness). Canvas will also do but it must be laid flat or glued on a board later, otherwise cracking will occur. I like to underpaint the surface with a couple of coats of gesso. I usually use a flat, thick, water based white paint with whiting or some other compatable filler to add body. If it is too thin I will sometimes add PVA glue to bind. If I intend to paint with glazes in the smooth finish traditional manner I will lightly sandpaper the surface. Make sure the surface is completely dry before using oil paints (two or three days).
Underpainting
Called the 'imprimatura' or base coat. Use the cheaper opaque ground colors, umbers ochres and siennas are ideal, and apply thinly with turpentine.
Glazing
Glazes allow light to penetrate the layers and enhance color. They also permit the artist to construct the painting in stages. I use a glaze 'medium' (the liquid to add to the paint) of oil (stand/linseed or the like) varnish (resin/alkyd) and sometimes a little white spirit (turpentine). Modern alkyd lacquers dry rather quickly and may be retarded with more oil or speeded up with the white spirit.
Student Activity: Make a list of other common products you think might be oil based and therefore compatible with oil. Also nominate those common oil based products that are slow drying and those that dry quickly. The student should also place some small pools of various oily substances on a sheet of glass outside and over a number of days observe the different drying times.
|