
 We will start
with the zigs! These will be the pieces that come down on the left
in the peak of your quilt.
We will start
with the zigs! These will be the pieces that come down on the left
in the peak of your quilt.
Lay your strips on the ironing board.
This is the measured end while you sewed. You see it is very evenly staggered in.
What I do first is to give the whole piece a good dousing with spray starch. Spray starch is your friend! If the strips are stiff, it is much easier to cut them as they don't "squiggle" around as much.

I will loose one or two diamond cuts because of that, so what I might do, is to cut a different piece of fabric and sew it onto the end where the short piece is after I cut all my strips from this piece. It will give me one or two more diamond strips. If not that, if I have another short strip, I can unsew the short pieces and stitch together the longer ones from two strips. Waste not!
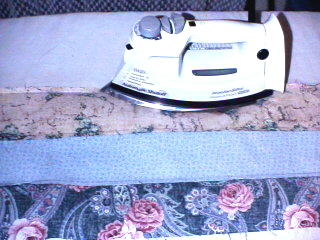
So take the flowered, blue and tan strips in the photo and fold them down over the pink one. (Your fabrics may be different!) Your seam will face away from you.
Press the top seam the length of the piece. Don't attack it with the iron and push down the length of the seam. All that will do is stretch the seam! Be gentle!
Down with the iron, press..... up with the iron, and move down the strip further and press, up with the iron, move the iron and press...

Very important! Be sure there aren't any little tucks or creases where the seams are pressed. You want your seams to be all the way flat without any tucks. Little tucks where the fabric isn't completely ironed over at the seam will really mess up any quilt project!

..
.
.
.
If you have to, get your fingers under there and push the seam away from you and press.
Don't burn your fingers!
Stubborn spots can be re-sprayed with starch to make them co-operate.
.
.
.

PRESS!


Remember, press all the seams in the same direction. In this case they will all be away from you.


Why? So when you sew the two rows together, your seams will be going one way on one piece and the opposite way on the strip you are sewing it to. The seam will butt together for a prefect match! Honest!
And if you happen to want to turn one upside down (yes you can do that!) you can just flip the seams up or down. It works really slick.
So, for the zags, you want your seams coming toward you, so start by flipping the three strips closest to you away from you over the last blue in this photo. In other words, fold the flower, red and light print strips over the blue one. Your seam will face you this time. Press each row from the back then front as you did before, just go in the opposite sequence.