Cutting ...

Depending on whether you are right or left handed, you will start to cut from different sides.  I can cut with both hands so I usually don't worry too much about which end I start at, you can determine which end you need to start at.  You may be a quilter that needs to turn the mat to cut from another side of the ruler. That is fine, be comfortable and do what is necessary and safe for you.
1) First, you have to find a 45 degree on your strips. 

If  you have a narrow ruler on way to find the 45 degree is to put a "square-up" ruler on the seam so both corners are exactly at at the seam line.

Now line up your regular ruler along the square one and you will have a 45 degree angle to cut on. 

2) If you have the 6.5" wide Omnigrid ruler, find the 45 degree line on the ruler and line it up with the seam line of the strip set.  This will give you a 45 degree line to cut on.
3) Just another view...

If you have the 6.5" wide Omnigrid ruler, find the 45 degree line on the ruler and line it up with the seam line of the strip set.  This will give you a 45 degree line to cut on.

4) To double check your wide or narrow ruler for a true 45 degree angle, you can take a 45 degree angle triangle and line one edge up with the seam line and then butt the straight ruler up against the triangle.

This will also give  you a true 45 degree angle. 

5) Okay, slice off the staggered edge.

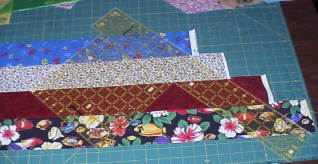
Now  you see that if you just sewed the strips together in a straight line, you would waste a lot of fabric.  But by staggering the edges, you can save fabric.

I didn't invent this by any means. This method has been around for a long time as a way of making Lone Star quilts. 

Actually, this quilt was a mistake of a Lone Star quilt I was making.  In a Lone Star all your strips are staggered one way only.  I made a mistake and did staggers both ways and when I went to sew the strips together, they zigged and zagged instead of forming a star!  But I liked it and I am sure that many quilts where "invented" by mistakes such as this.

6) Sorry... I digressed!

Now, to cut your first set of diamonds...

If you have a 6.5" ruler, measure 3 1/2" from the edge you just trimmed and that is where you will make  your cut.


7) If you can't cut with both hands (it is something I highly recommend you learn to do!) you will have to walk around your table to make the cut. 

I learned to cut with my left and my right hand.  All I have to do is switch hands to cut and I never have to turn my fabric around and risk the chance of messing it up, or I never have to walk around my table to make a cut.  Try it!  A way to practice is on scraps for a string quilt or something that doesn't have to be exact.  You can even practice on paper with an old blade in your cutter!

8) Keep cutting diamond sets across the strip set. 
9) Every so many cuts, realign your rulers and check and make sure you are still on a 45 degree angle.

You can see here that I got off a little on the bottom edge.  I like the triangle for checking this. 

Trim up the crooked edged and then continue to cut.

10) When you get to the other end you will not have an even edge like you did with the beginning because all fabrics are not exactly the same width from selvage to selvage.

I have two options here.  I can take off the really short flowered piece and sew on a longer strip and I will get probably two more diamonds. 

Or I can just cut it the way it is sew on one diamond if I have one left from another set.  It can be different, it just doesn't matter. 

11) Okay, this is the zag's strip.

You cut them just the same way, only you are angled in the opposite direction.  It is very easy, right?

Just remember to keep checking your angle as you go.

I put the stacks of the same diamonds in piles in a box until I am ready for them.  One more thing!  When you get really confident doing the cutting, you can layer three strips sets on top of each other and cut three at once.  If you are really brave, you can even cut more layers. 

Just be very careful to line them up evenly. 

All done!  Just be very careful you don't stretch the fabrics. Handle with care as the diamonds have very bias edges.  If you do stretch, you will have troubles!  Lots of spray starch helps keep fabrics in place. 

That is advice for any quilt project. 

 Introduction and objective 1) Supplies and fabric needs 2) Basic quilt / quilt with "built-in borders"

2b) standard matress sizes

3) Larger quilt chart 4) Sew your strips together
5) Press your strips 6) Sub-cut your strips 7) Sew your diamond rows together 8) Sew your diamond rows together,  page 2 9) Admire the work of these "frenz" and see their "stripper quilt" pic's!
Back to  Main Frenzy Page
Back to Mary Ann's Cyberspace Quilt Page (my personal web page
(my personal web page