I will cut my strip blocks the EXACT same size as the width of my strip set.
This is where careful sewing and exact seam allowances pay off !

I cut off the selvage edge first. I had a 14" strip width which meant I had "maybe" one inch of waste, so I had to be very careful. If you use a 13" or 12" strip set you will have a little more to play with.
Be sure to line up one of the measure lines on the ruler with one of the seam lines so the blocks will be square.
Cut your edge straight.
Put one ruler horizontal the required measurement in from the side you trimmed edge... line up another ruler vertical with the edge of the first one, take away ruler #1, and cut along ruler #2.
Be sure to line up one of the measure lines on the ruler with one of the seam lines so the blocks will be square.
Do the same for all cuts.

Layout: very important stacking directions.
I used the purple... I put two squares so the reference purple stripe is on the bottom and horizontal like the top squares.
Then I put two strip squares under those with the reference purple strips facing each other in the center like the bottom two blocks.
The reference strips form a T... see the purple T? Always look for the T!
I flipped the bottom strip set up over the top strip set so right sides where together. They will form a two blocks layer with right sides together.
 |
|
 |
 |
I found out the hard way that it is very important to have the layers turned like this or you will not get your final blocks correct!
Pin in place all around the outside edges of the blocks, matching the edges. I used about four pins in each side, and that is what I was confident with.
Sew all around all four outside edges using your 1/4" seam allowance.

However, on the outside of the blocks where I sewed all around the outside edges of my quilt sandwich, my seams are sewn down in one direction. When you go sew together the whole finished quilt blocks and try to flip one seam up or down to butt them, one of the seams will end up with a twist in it because it is sewn down on the opposite way on the other edge. I have tried and tried to think of a pressing sequence to avoid this, but it is hopeless or so complicated to keep track of you will go mad! Soooooooooooo...
![]()
![]() Now
on my first blocks I did have the twisted seams... I hate them because
when you go to quilt your quilt, you have the bulk of the seam
on one side halfway, and the bulk on the other side the rest of the way
... and sometimes, unless you are especially good at using the "Arnold
Schwarzenegger" method of heavy handed pressing", there will be a
lump where the twist is.
Now
on my first blocks I did have the twisted seams... I hate them because
when you go to quilt your quilt, you have the bulk of the seam
on one side halfway, and the bulk on the other side the rest of the way
... and sometimes, unless you are especially good at using the "Arnold
Schwarzenegger" method of heavy handed pressing", there will be a
lump where the twist is.
Now you notice there is a double flamingo head (the flamingo head representing anal behavior) ... and what I did was end up picking out the stitching over all the twisted seams and resewing every one of them!!! No kidding!
I had to make a few more blocks as I was just learning about this quilt, ... and I remembered something that I taught for eight pointed stars... don't sew over the seams! It sounds troublesome and hard to do, but once you get onto it, it is just as easy as sewing over them... okay not just as easy, but not that hard at all! Takes a few more minutes but you only have to this when you sew all around the four sides of the quilt sandwich.
You can do this on your blocks or not... It is up to you...
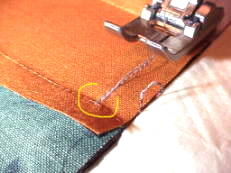
First sew up to the seam allowance... then take two backstitches...
Pull the fabric toward you with the needle up, and let the machine release the thread.

Put the needle back in where the seam will start again on the other side. (red line) If you have your glob of tape on your sewing machine as a guide, just line the edge of the strip up and you will be fine.
This would be equal to sewing several stitches on "0".
But you do have to secure that stitch somehow or it will just come loose so backstitch one or two stitches if you can't get the hang of "holding back" the fabric.

Like I said, you only have to this on the layered blocks where you sew all around the four sides. It is up to you, but this also works great on other quilt projects too.
This takes me * maybe * four minutes more to do... but the end result is worth it to me.
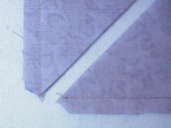
Be very careful because your layers may have a tendency to slip.
I put a ruler on both sides of the cut to hold down all the bias edges. They both help to hold the fabrics and "squashes" them if they area a little "lumpy".... (yes, some of mine were lumpy!)

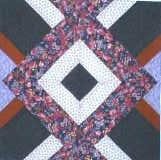
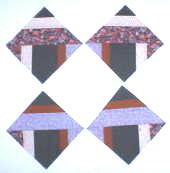
11) I will call these "X blocks" throughout this lesson. We cut them like an X... get it? X squares... now if I can just remember that.
The top two X squares form one finished block
The bottom two X squares form the other finished block.
Look at the orientation of the strips, they are all different ~
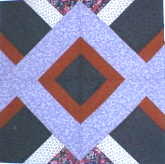
So you need two strip set "sandwiches" to form two finished blocks.
These will be blocks Y and Z... see below...
 13)
See
the triangle "pyramids" (horizontal strips) are different on
the two sets. The top set pyramids have dark, light and floral and the
bottom set pyramids have green, gold and purple.
13)
See
the triangle "pyramids" (horizontal strips) are different on
the two sets. The top set pyramids have dark, light and floral and the
bottom set pyramids have green, gold and purple.
Also again notice the light strips on the bottom half triangles (we will call these the "wells" as they look like they go deep) with the vertical strips are on opposite sides.
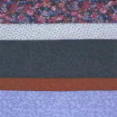
Now, if you are afraid of the "quilt police" that tell you only to press to one side then do that for sure.
Yes, the seams are not quite as strong, but sometimes you have to go for ease in sewing the look of the final product over all else.
Just open the block and press the seam open with the tip of your iron.
Yes, that is burnt starch all over my iron! I use tons of starch remember.... it comes off easily...

Turn over and give it a press from the top.
Remember to PRESS... Those corners will get messed up really fast if you start to drag the iron over them.

At this point, I actually dipped the corners into full strength liquid starch. It was like a piece of paper when I ironed it... But I have to tell you, those tips did not get chewed up at all when I started to sew over them. You know how those tips just seem to get dragged into the needle hole of the sewing machine? Mine where too stiff !