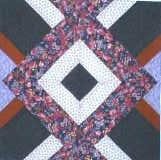
The top two X blocks "a and b"
are for one complete block (Y)
The bottom two X blocks "c and d" form
the second complete block (Z).
I stacked all of my matching blocks on top of each other on my table.
Once again:
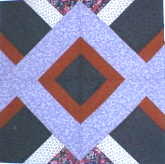
I ran into some confusion because the stripes on the triangles that point to the middle of the four squres are different for the two blocks that make finished block Y and Z.
The "a - b" set has different colors on the pyramid triangle than the "c - d" set.
See in the outside vertical stripes (the wells), the white stripes are on opposite sides on the top set and facing each other on the bottom set. I figured out that this is correct.
Okay, I stacked my matching sets on top of each other.
 |
 |
 |
 |
I had to print out this chart and keep looking close...
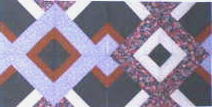
X blocks "a"
and "b" make
finished
block Y
X blocks "c"
and "d" make
finished block Z
 |
 |
 |
 |
 |
 |
 |
 |

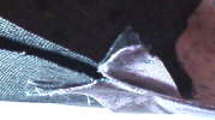
Often when you pre-press seams to one side or another, you will end up with the seam allowances going in the same direction when you go to sew two seams together.
That is why #1, I don't sew down my seam allowances when I know this will happen.
So you have to decide if you want to twist your seams for easier matching, or just try to sew them going in the same direction.
 9)
This
is seam butting!
9)
This
is seam butting!
If you have the top seam going in one direction and the under seam going in the opposite direction, when you sew that seam, the bulk of the two seams makes them snuggle right up against each other and fit perfectly. I never even have to pin them. I just match-em-up and hold tight, then sew.
Some like the top seam toward them and some like it away from them. You test them and see what you like best.

When the top seam is away from you when under the needle and the bottom seam is toward you, when you sew over them the machine pushes the seams right together. It is so slick.
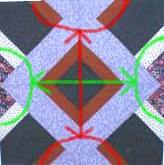
Green line area floral is the same, red lines area purple are the same ... very important!
(Yes, I sewed it that way and had to rip it out ~)

Two blocks together...
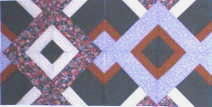
This forms the design of the quilt. It is now time to find a place to lay out all the blocks on a design wall, arrange them on a sheet on the floor, pin them to my drapes... somewhere...
I sewed the blocks into rows and then I sewedthe rows together to make my quilt.
Remember to butt your seams! I discovered that if you sew each
block in order into a row, you will have the best chance of not getting
lost...
|
|
|
|
|
|
|
|
|
|
|
|
|
|
|
|
|
|
|
|