
Ten Mile Canyon, containing I-70, runs west from Frisco, Colorado towards Copper Mountain and contains a large concentration of good crags with some excellent routes. Parking for Mount Royal and Solomon Dome is at the bicycle path parking lot 50m west of the West Frisco exit; parking for Via Boulders is at the trailhead 20m east of the West Frisco exit. For all other crags, you will generally pull off the interstate and park in small, noisy meadows. The police don't seem to mind so long as you are well out of the flow of traffic. It's a noisy place to climb, so have backup communications plans or systems in place when you go there. The interstate provides great access to the crags, so deal with it - the climbs are worth it.
Mount Royal East Buttress 1. Dirty books 5.5 FA unknown (dirty and sometimes wet) Descend the awful rock-choked avalanche gully just south of the buttress.
Mount Royal Northeast Buttress 1. The Great Roof 5.10 A2 R or 5.8 A3 R FA D. Hurst and J. Ray
2. Frisco Kid 5.10 A0 R FA M. Gruber and S. Stull
Mount Royal West Face Mount Royal's huge west face is 500-plus feet of face and crack climbing on loose, dangerous blocks ready to tumble to the choss-fields below. The routes are reached by an 800-foot bushwhack directly up from the bike trail parking lot at the western I-70 Frisco exit. Protection is marginal when it exists at all; be very redundant and trust nothing here. Wear a helmet (and body armor, if you have it) - your rope will discharge hand- to head-sized rocks as you are climbing. Descend N from the summit along the well-worn trail; do NOT leave the trail or you will encounter loose avalanche chutes that might take you for a 500' rock-ride to cliffs.
1. East Flank 5.8 FA M. Gruber
2. Central Chimney III 5.7 R FA unknown
3. Chaucer III 5.8+ R FA B. McDaniel, S. Elliott, K. Bates. Link the first two pitches of Central Chimney then exit right to a 1' sloping grassy belay ledge. Climb up to small roofs and a single fixed piton. Traverse right into space and climb/traverse in big air 1/2 rope length to either a tree just left of the arete or a grassy meadow just right of the arete. Pitch 4 ascends straight up or just left of the aforementioned tree to near the summit of the western lower summit. Pitch 5 is easy climbing across the notch and up to the summit. Pitches 3 and 4 are the crux leads and it is easy to stray into 5.9 or harder terrain. Click here for detailed route photo.
4. Left Face III 5.7 R FA P. Johnson and friends
5. Wandering on Rubble III 5.7 R FA P. Johnson and friends
6. Right Face III 5.7 R FA P. Johnson and friends
7. The Far West II 5.6 R FA P. Johnson and friends
Via Boulders - no data yet. Went looking for the crags and couldn't find from the guidebook topo. More later, perhaps.
The Dome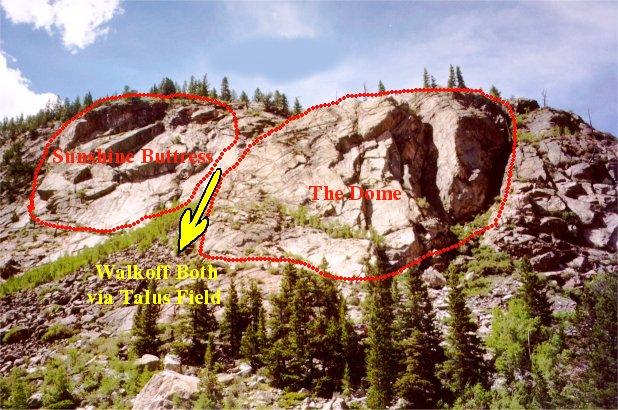 From the west Frisco exit, take I-70 west (towards Copper) .4 miles, then pull well off the highway in a small clearing on the north side. It's an unlikely place to park, but the rocks are immediately above you. Take radios or know reliable alternate communications techniques - the highway is loud!!! The rock is licheny and loose on the less-frequented routes (on the right). Descend the Talus field (west) separating the Dome from it's neighbor, Sunshine Buttress.
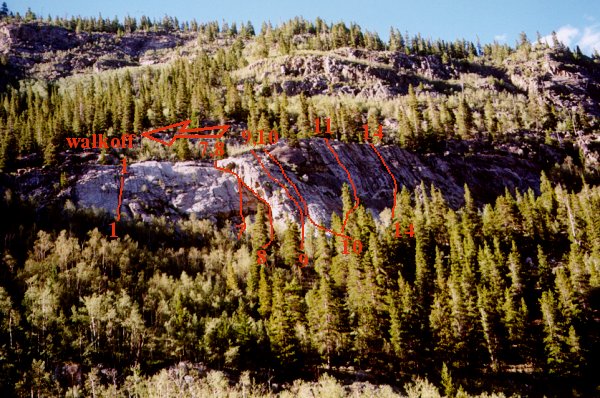
(Routes from left to right)
0. Elvis Loves Twinkies 5.7- FKA Bryan & Lisa Carbol. Left of Bye Bye on a prominent ledge (approach from the talus field and step up 2-5 feet onto a wrapping ledge), climb up nice chicken heads and horizontal cracks to a licheny slab with decent large nubbins but little pro. Anchor below the leftmost dead tree and belay 30' below with a body block behind an obvious large block at the end of the difficulties (3rd class above). Descend by climbing up the 5.2 ridgeline to the next dead tree and left/north into the talus gully.
1. Bye Bye 5.9- FA M. Hartley and friends. Little pro in the spiderweb of the face makes this more difficult than the appearance of the route suggests. None of the cracks are good for pro or grip, but it's still exhilarating. Anchor as for route 0 above.
2. Andy's Route 5.7 FA Andy, Alice, and D. Hurst
2a. Andy's Roof Variation 5.8 3. C'est Le Pied 5.5 FA Unknown
3a. Direct Start 5.5
3b. Left Out Variation 5.6 R
3c. Over The Top Variation 5.6 S. Stull and Smith
3d. Right Variation 5.6 FA Unknown Good and clean 5.6, a bit interesting in the right-facing dihedral up to the mid-way tree.
4. C.B.U. 5.7 R FA D. Hurst and Birdman
4a. Variation 5.8 A4 R-VS FA D. Hurst and Birdman (Copperheads, Rurps)
4b. Variation 5.7
5. Just Say No To Bolts 5.10 TR
6. Lower Chimney 5.7 FKA G. Kenniston
6a. Left Variation 5.8 FA Unknown
7. Chim Chimney 5.6 FA Unknown Beware the orange lichen - it turns to dust easily. Very loose at and above the chockstone at the top. Recommend helmets for followers as well as leaders.
8. Face Left 5.7 FA Unknown
9. Arete Face 5.7 FA Unknown
10. Arete Direct 5.8 FA M. Hartley (extra 1/4" nuts)
11. Fancy Free 5.11a FA M. Hartley and D. Hurst
11a. Just Enough Slack 5.10d FA T. Helms rope solo
Sunshine Buttress
Park as for The Dome (immediately above). Sunshine is a large collection of slabs with a huge roof in the middle, just left and above the talus field separating Sunshine from the Dome.
(Routes from left to right)
1. Reflections 5.10d FA S. Stull and T. Helms
2. Above All 5.9+ FA M. Hartley solo 3. Jam Crack Route 5.8 FA Unknown
3a. Direct Start 5.8 R FA Unknown
4. Beam Me Up Scotty 5.10a R FA R. Gale and D. Hurst
5. Free Fall 5.10b FFA M. Hartley and friends
5a. Variation ? FA S. Stull and T. Helms
6. Paradise Lost 5.6 R FA G. Kenniston and D. Hurst
7. Zig Zag 5.6 FKA R. Gale and D. Hurst
8. Gully 5.4 R FA Unknown
9. Cerebellum 5.7 R FA Unknown Ascend the crack/dihedral just left of the 6' roof and turn the roof on the left to green licheny covered slabs above. Pro is marginal on the upper slab and traversing keeps the grade at 7. Very licheny. A good anchor location is on the right of the arete where a 50m rope will be quite stretched. Either locate your anchor site early for a 3rd class walkoff to the climber's right before climbing, or run a second easy 5.3-4 pitch to the summit to clean. Same anchors can be used for routes 10 and 11. A higher anchor will require two ropes for a TR for all 3 routes.
9a. Variation 5.9 R FA Unknown
10. Center Roof 5.8 R joins route #9 FA Unknown Ascend easy slab to the yellow lichens on the face/roof (hidden roof in the picture is directly behind the tops of the aspens). A manky down-facing piton at the base of the roof should be backed up or not used. The roof pull is about 6'.
11. Roof Right 5.8 R joins route #9 FA Unknown Ascend easy slabs 40' to the prominent left-leaning crack on the right side of the roof - where the roof is still 5' tall, not further right where it becomes a 3' overhang/step. Excellent stemming moves get you to the upper slab.
Note! Routes 8-11 can be done on TR.
Solomon Dome - no data yet.
White Cliff
 0.8 miles up the canyon on the north side is a, well, white cliff. Park off the highway in a roadside clearing watching for large rocks, and ascend a trail to the base of the Apron (cairned start 50m west into the clearing). The rock tends to have a smooth, crystal-grained finish, and a large mixture of grabbable crystals protruding for feet and hands. All of the climbs can be TRd, although some to the right require a top belay or two ropes to do so. Most on the left side of the crag have anchors, some still with older 1/4" pins.
1. Left Line 5.5 R FA D. Hurst, G. Kenniston, 'Birdman,' W. Brown, and K. Berghoff
2. Ain't Misbehavin' 5.9 R FA D. Hurst, G. Kenniston, 'Birdman,' W. Brown, and K. Berghoff. Notes from R. Trathrigg, '** slab/friction.'
3. Hard Monkey 5.9 R TR FA D. Hurst, G. Kenniston, 'Birdman,' W. Brown, and K. Berghoff
4. Parallel Universe 5.9+ R TR FA D. Hurst, G. Kenniston, 'Birdman,' W. Brown, and K. Berghoff
5. Water Groove 5.6 R FA unknown The first 20' are the only hard part on this climb. Anchors at 90' shared with 6 below.
6. Little Di 5.8 R FA unknown
6a. Left start variation 5.8 R
7. No Name Face 5.6 R Joins route 8.
8. Big Dihedral 5.8- FA unknown
9. Apron Area 5.0 R
10. Ramp 3rd class
11. Blitz Girls 5.8+ FA D. Hurst
12. Zebra 5.8 X (usually toproped).
13. Chimney Route 5.5 (not recommended) Too much rockfall potential.
Brick Wall
 At 1.0 miles in you will pass a road cut through rock (not obvious). Brick Wall, Alcove, and Teeter Top are best approached from parking just past this road cut, where a narrow strip on the north of the highway provides a small parking area. You'll be much closer to the road here, so use caution in parking and gearing up.
Brick Wall faces SE, so you won't observe it until you've parked and looked back over your shoulder. Brick Wall is the closest approach in the valley from parking.
1. Left Edge 5.10 TR FA M. Gruber
2. Center Face 5.10 TR FA S. Astaldi
3. Crack in the Wall 5.10b FA S. Astaldi & M. Gruber (Take lots of RPs)
 Alcove Area
From the trail used to approach Brick Wall, continue uphill bearing right and walk around the back side of Brick Wall. On the top of the outcropping you'll be on a protected, quieter flat hill where squatters (summer people) sometimes camp and leave their camps and trash. Take a trach bag with you and clean up some, please. The center alcove is below and SW of this flat area, facing S but approached from the NE. The other two areas are 20 feet lower on the south faces of the rock. This is a small, short area with much less highway noise than most of the other crags in the canyon.

 1. Tip Toe 5.7 R FA S. Astaldi & M. Gruber
2. Boulderer's Delight Left 5.9 FA FA M. Gruber solo
3. Boulderer's Delight Right 5.9 FA M. Gruber solo
4. Little Lie Back 5.7 FA S. Astaldi
5. Finger Tips 5.11b R FA S. Astaldi & J. Astaldi
6. Cornered 5.9 FA M. Gruber & S. Astaldi
Teeter Top Rock
 From the flat area on top of the Alcove and Brick Wall trail, Teeter Top Rock lies NE across a rubble-strewn loose gully. You cannot see the signature teetering boulder from here, but the many-branched dead tree is visible (although not from the base of the climbs). Proceed up to a lightly worn belay area amid three or four larger aspen. Teeter Top and Alcove may also be approached up pleasant 3rd class ledge-steps from just east of the road cut, although parking as for Brick Wall is still recommended. Teeter Top should be visually identified from the eastbound lanes of the highway before approach is attempted to alleviate identification problems.
 1. Line of Little Resistance 5.6 FA M. Gruber & S. Astaldi Ascend the easy blocky arete.
2. Tree Trimmer 5.7 FA S. Astaldi & M. Gruber Start between the two largest, closest Aspen up the obvious line.
3. Right Away 5.8 R FA M. Gruber & S. Astaldi Start right of all of the prominent aspen and ascend the face.
Officer's Gulch Wall - no data yet.
Peace Sign Rock - no data yet.
Officer's Gulch West - no data yet.
Ten Mile Smile - no data yet.
Summit County Rock Climbing Home
Area Overview
Montezuma/A-Basin Areas
Ten Mile Canyon Areas
Quandary Peak Area
Other Areas
Ethics & Regulations
Mountaineering Colorado