Laser Tag Weapon Configs
| Laser Tag Main Page | Laser Challenge Classes | Laser Challenge Leagues | Laser Challenge Pro Codes | Laser Challenge Webring Info | Laser Commandos | Laser Tag Gear | Laser Tag Links | Laser Tag Weapon Configs | Official Laser Challenge League |
 EX-D Rifle
- (Submitted by Doug Ross)-Over the past 7 years that I've been experimenting with tag gear electronics and optics, I've discovered a few secrets about
obtaining long range. My longest range gun (WoW Lazertag Compatible) has a range of 1500ft. Our group here in Seattle,
WA, USA had recently switched over to Laser Challenge gear. Being the range hungry kind of guy that I am, I started playing
with the Laser Challenge Ex-D rifle and I was able to make some simple, very simple, modifications to it and I was able to
obtain a range of 800+ feet (no joke). I'm selling a kit for $15 which includes a new lens, LED holder and other parts to boost
the range of the Ex-D rifle. Only minimal cutting, epoxying one part into the gun, and soldering two wires is required. I include
detailed step by step instructions, each step with pictures to make the modification as easy as possible. I was able to modify 6
guns in about 2 hours. If anyone is interested in the kit for $15 (postage included) or a finished Ex-D rifle with front and back
sensors for $50, get a hold of me through e-mail at dougross@jps.net so that we can get everything set up. I've already sold
several kits and I have several ready to ship the same day I receive payment.

Security Guns
- (Submitted by XR9)-Here is how to make a security gun. All you do is take a TV remote, use a clothes pin to hold down the volume button, set the remote in a tree and stand back. Any opponents who come within 10-15 feet of the remote's infra-red beam will get hit. Just remember not to walk near it!
Tripwires
- (Submitted by John Bacon)-First make a good trigger Here are three:
Clothspin - Use a jaw type clothspin, put a flat thumbtack in each jaw connecting a wire to each tack. put a piece of cardboard
between the jaws and hook the trip wire to the cardboard.
When the cardboard is removed, the switch is closed.
Tremer - Get a thin piece of brass or copper rod, a piece of
plastic tube that barely fits over the rod, and a copper or
brass tube that fits over the plastic tube tightly. Next find
a piece of brass tube that is at least 1/4" diameter bigger
than the other one.
Cut the rod to 4"
Cut the plastic tube to 3"
Cut the first brass tube to 2 1/2 "
Cut the biggest brass tube to 2" and solder an endcap on it.
Glue the plastic tube over the rod with 1/2 on each side
glue the smaller brass tube over the plastic tube.
Connect wires to the center rod and small brass tube.
Connect trip wire / string to larger tube.
balance larger tube on brass rod.
Spring - cut a "u" shaped piece of wood and drill it
so a dowell will slide back & forth between the two
uprights. drill a hole for the trip wire in one end
of the dowell, put a spring over the other end so
that the dowell is under pressure when centered in the u.
put a small nail through the center of the dowell
put two nails through the center of the u so the
nail in the dowell rests between them. connect 1 wire to the
nail in the dowell, 1 to the two nail on the u.
Next pick some good IR leds - Use the Radio Shack hi power
or Siemens SFH485-2. Get as wide an angle as posible.
Next build your driver circuit - use either the HBLT circuit
or Layfayette Laser Club's but retune them to a carrier
frequency of 32-33 kHz and a hit freq of 500 hz.
Replace the trigger switch with your trip wire switch.
Configure the LEDs to cover as wide an angle as possible.
V2 Configs
- (Brought to you by Khan Jal)-If you are transfering the electronics of the V2 pistol (or any other V2 gun) into a new gun shell, you know how hard it is to get the on/off switch on. I have instructions here on how to change it to a better switch. Here is how to change the current LC V2 switch to a double pole, double throw switch, with center off (basically the same switch as a V2 gun but if you want to go to radio shack that's what they call them). Make sure you get center off too. There are some that have the center doing something too. The switch also has 6 sodering posts, while the V2 Switch only has 5 wires. One wire will go to two posts, but that'll be later.
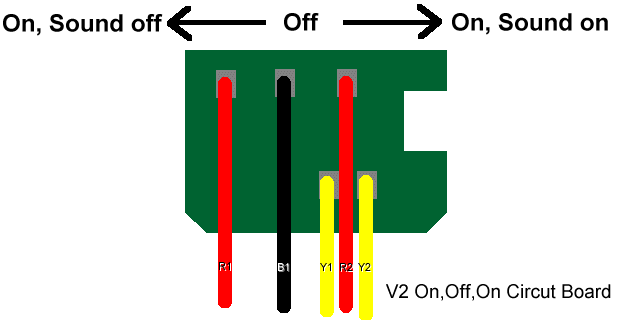
Here is an image of the original V2 circut board:  (Click for a larger view)
Quick description of the wires (also for later reference):
R1: Positive connection from battery.
B1: Ground
Y1: Speaker
R2: To the lights and IR?
Y2: Another Speaker connection
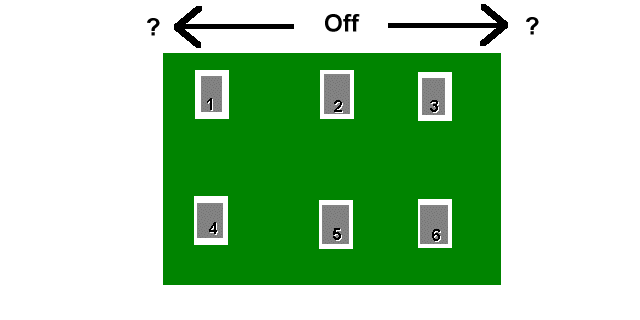
Now that you bought the new switch, lets take a look at the back of it:  (Click for a larger view)
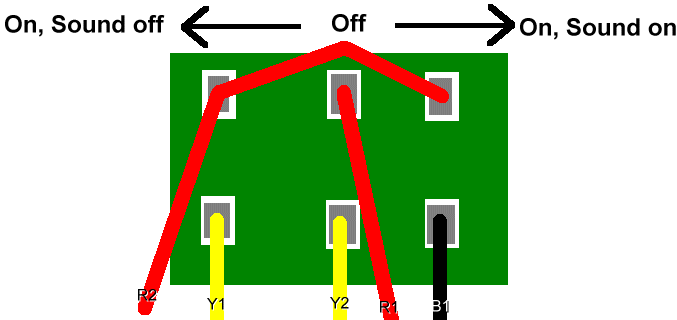
Your sodering iron is now hot and we'll connect the wires, you also have the above two digrams printed out or at least written down ;). Read everything down below first before you start sodering. There is one wire that goes to two posts. You either have to strip a long section of plastic off the wire and soder the begining of the strip to one post and the natural end to the other post, or you can join the two posts with one wire, and then attach the R2 wire to either of the two posts connected by the single wire.
Wire connections:
Post 1: R2
Post 2: R1
Post 3: R2 (Just use one of the connection types above)
Post 4: Y1
Post 5: Y2
Post 5: B1
And here is what you should have (or something similar):  (Click for a larger view)
The only problem you should have is getting the one wire to two posts. If any questions arise, contact me by e-mail.

 (Click for a larger view)
 (Click for a larger view)
 (Click for a larger view)