|
with Adobe Image Ready 2
Optimizing files for the web is easy in Image Ready 2. You use the optimization palette, which is alot like the 'save for web' dialog box in Photoshop 5.5. If you want to optimize a whole folder of graphic images with the same settings, you can easily create droplets for batch optimization. Let's take a look at how Image Ready does it. 1. I created an image in Photoshop 5.5 with alot of color variation and gradients to show you how well this feature works. Then I saved it in Photoshop format, and clicked file>jump to Image Ready 2. [fig 1 ]
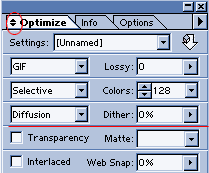
2. The image opens in the document window in Image Ready. To choose optimization settings, go to the optimization palette. [ fig 2 ] When you see the default view of the optimization palette, you will only see the part above the red line in [ fig 2 ]. To view all of the options, click the arrow on the optimize tab.
3. To view the image with the optimization settings you have selected, click the optimized tab in the document window [ fig 3 ] . At the bottom of the preview window, you will see the file size and download time for the newly generated image with the optimizations you have specified in the optimization palette.
|Back | Home | Tutorials| email | created by Roxanne Etheridge
© 1999-2000 all rights reserved
|


