Here is a way to make easy '3d' text as you see above with Native Photoshop filters only.
This text is based on the same principal as the easy round buttons,and is a very easy basic way to make 3D text. it can be done in ANY program that has gradients and layers.
1. Create a new file (for this example I used a 600X200 file, RGB)
2. Choose the colors for your text. Pick the lightest shade of (blue) for your background color, and the darkest shade for the foreground color.
3. I used a white background, but you can make it any color at this time .
4. type your text with the type tool. It will automatically be placed on a new layer. For this example I used Arial Bold. It is best to use a font that is not thin.
5. Choose Layer/duplicate layer.
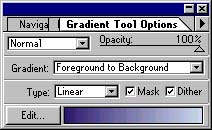
6. Make sure that the preserve transparency option is checked in the layers palette, and click the gradient tool. click your mouse on Layer 1 and fill the layer from top to bottom with the gradient set to linear, foreground to background color. (Hold down the shift key to constrain the gradient tool so that it applies smooth and straight)
|
|
7. Click your mouse on layer 1 copy to select this layer. Make sure that the preserve transparency stays checked..It comes undone switching between layers sometimes. fill this layer of text with the same gradient from bottom to top.
8 Offset the top layer by
4 pixels right and down. (you can offset it with the arrow keys, click 4 times
right,(Click on the move tool or the arrow keys wont move the text) and 4 times
down, or you can do it with the move tool and adjust it until it looks right.
you can adjust it depending on the font and size of text. but it should look
something like this.
9. When this looks right and you can see a slight bevel as the example directly above, choose Layer, merge down. Then choose layer, duplicate layer. move this layer 4 pixels down and right, (or adjust it as you did the first time) This will create an actual 3D bevel.Then choose layer, merge down.. .Repeat this step until your text is "extruded" as far as you want it. I did this step 4 times with the example at the top of the page..
10. When you are finished, if the edges of the text look too rough,Like the areas circled in red below) use the zoom and smudge tool to smooth them out. (Click on the magnifying glass and zoom to 300%, then click on the smudge tool and choose the smallest blurred round brush. first brush second row in the default pallet of brushes. carefully smooth the very edges of the text. (tip: you will have to uncheck preserve transparency for this to have any effect at all) This step may or may not be necessary.
 |
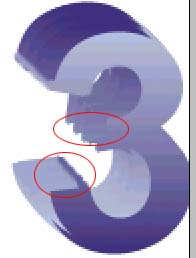 |
The 3 has been magnified and the bottom edge has been smoothed. I left the middle one jagged to show the difference. |
11. You can add a drop shadow as described in the drop shadow tutorial, or you can use eye candy if you have it.. try adjusting the drop shadow to the left and top, to the right and bottom or just up or down to see which one you like best. When you are happy with it, flatten it and save it as a Jpg, or convert it to indexed and save as gif
Back | Home | Tutorials| email |next tip