Adding rivet details to thin sheets is often required when scratch building or adding parts. The two most critical requirements are spacing and apparent size. In smaller scales, actual domed head shape is not readily visible. The process consists of pressing a formed tip into the sheet to produce a dent by stretching the material. On the reverse side, a bump appears. Thicker, stiffer and harder materials require more pressure. Control of the parameters will depend on the method used.
The least expensive and time honored method is to use a pounce or dressmaker's wheel with a soft backup material. These are generally used to trace patterns onto cloth leaving fine pin holes in the weave and to mark surfaces through plans. Basically they are cog wheels with tapered, pointed teeth mounted on an axle in the slotted end of a dowel. While some are offered by hobby tool suppliers, inexpensive versions are commonly found where dress patterns are sold. Normally they are sold by the number of dots per inch (dpi), they produce.

Note: Adjust brightness and contrast for optimum viewing.
POUNCE WHEEL
DRESSMAKER'S WHEEL
To obtain rivet spacing produced, make a test on a piece of scrap, then the distance can be measured. If the dpi is known, the scale spacing can be found from:
Scale spacing = scale ratio / dpi
In HO for 15 dpi: Scale spacing = 87.1 / 15 = 5.81 scale inches
For odd sizes, many cheap, stamped, toy or old clock gears can be found and sharpened. Since they are inexpensive, the dressmaker's wheel axel pin can be drilled out and replaced with a shouldered screw and nut. Altrnatively, using a 5/16" dowel or barstock with a slit sawed in the end and a shouldered screw for an axle, various gears may be fitted. Spacer washers can accommodate various thickness gears. For better clearance, a short, 1/8" rod might be used chucked in a pin vise or handle.
Use takes a little practice on scrap. Place sheet on an old magazine and while pressing down, roll teeth along surface. Harder backup, thicker sheet or less pressure produces smaller rivets. Harder sheets over .010" are difficult to work. Rivets produced are sufficient for structures and less critical uses.
For more accurate work rivets are pressed one at a time using fairly sharp male and dimpled female dies. To produce round heads, they must be precisely centered and aligned perpendicular to the work sheet. This requires a rigid frame with a movable arbor similar to a drill press or arbor press. Thickness of material, die tip size and pressure effect final rivet size. Pressure must be applied equally on all rivets to maintain consistent head size. NWSL offers a set of 5 matching dies from .010" - .050", which can be mounted in an arbor or drill press. Maximum sheet thickness is generally about .020". Harder brass, bronze, iron and steel should be avoided. Since work is done on rear side of sheet, rivets can be laid out by scribing reference lines and setting spacing with dividers. Prick punching centers will aid location of male die point prior to press. Tapping male die with a hammer is too inconsistent for good head size.
In some cases, using specialized rivet makers, spacing and alignment can be achieved through some calibrated means. Several commercial aids help in some areas, but none provides complete control of the three requirements : head size, spacing and alignment.
As an accessory to the Sensipress, NWSL offers the Riveter, with a 4 1/2"travel, screw fed table, which provides dial calibrated spacings to .001". No fence is provided for alignment. Suggested material holder is double sided sticky tape. Available die sets to produce rivet head sizes are: .010", .015", .020", .030", .040" and .050". At the low end, about 1.4" in N and at the high end, about 2.4" in O. As with all screw fed devices, to avoid backlash errors, feed should be in one direction only. To reduce table play, guidebar and feed screw should be lubed with a heavy grease. On the Sensipress tested, alignment of dies could not be achieved at the distance along the arm. Increasing bore of socket screw holes and placing washers under heads permitted proper alignment.
Note: Adjust brightness and contrast for optimum viewing.
NWSL RIVETER
MAKING A FENCE AND HOLD DOWN CLAMPS _ for the Riveter is relatively easy.
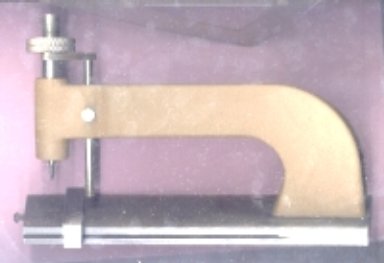
Cherry Scale Models of Whissendine, England offers a 2" throat rivet maker with adjustable rod stop. Spacing is set by sliding previous rivet against notch on female die. The actual spacing is the notch distance minus 1/2 the rivet head diameter . As provided the two notches are .055" and .087", while the die radius is .110". A little tricky to feel, die may be turned to increase spacing. Head size is difficult to control, since there is no fixed adjustment. However it can be placed under an arbor press, where more precise control can be set by handle position.

Note: Adjust brightness and contrast for optimum viewing.
CHERRY, ENGLAND
Top: Spring loaded male die.
Right: Adjustable stop rod with screw.
Left: Female die with spacer notch.
Note: Adjust brightness and contrast for optimum viewing.
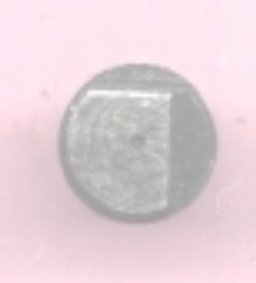
FEMALE DIE
Top and right: Spacer notches.
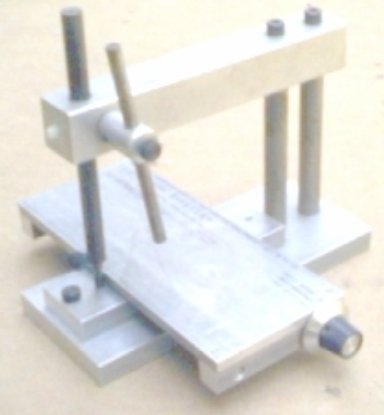
Scratch builder of note in the NMRA Mid-eastern Region, Robin Love offered a limited quantity of rivet makers with a 5 3/8" throat and adjustable fence. A unique head size control uses the weight of two knurled nuts and the male die plus the distance they are dropped. A rod with a perpendicular stop sets rough height. Final adjustment is made by setting nut position. Bottom nut is set on stop and then stop is turned to release die for the drop. Very precise, repeatable head size can be set. The original rod was replaced with a length of 1/4-20 all-thread and the screw end was tapered to a point, to maintain height with a loose tightening for easier release. Unfortunately no spacing is provided, but female die can be modified as with Cherry above.
Note: Adjust brightness and contrast for optimum viewing.
ROBIN LOVE RIVET MAKER
Left: Male die w/ nuts.
To right: Drop stop w/ setting screw.
Below: Adjustable fence.
To left: Female die (barely visible) and mounting screw.
Sewing machine

Note: Adjust brightness and contrast for optimum viewing.
SEWING MACHINE
BACK TO METHODS INDEX
BACK TO TOOLS INDEX
