Back in the 50's, these cute little brass tank 0-4-0's with 39" drivers were offered with and without tenders for less than $ 10. Unfortunately they had a 11.6 K RPM, side magnet, open frame motor that just fit and topped out at about 105 SMPH @ 12 V. For about 50 years, I have schemed to lower the speed, but nothing would fit without major sugery and a large hammer. Later CAD drawings were made and stored, in hope that a solution could be found.

Note: Adjust brightness and contrast for optimum viewing.
PLANTATION W/ TENDER

Note: Adjust brightness and contrast for optimum viewing.
PLANTATION MOTORS
Left: new
Right: old
Recently found in a Jameco catalog, the 231731CA flat can motor @ $ 2.09, and about 5 K RPM showed promise. By grinding the short shaft end down to just below the bearing bell and bending terminals down flat against the insulators, vertically positioned, the motor fit with some little room to spare. However the end mounting holes presented a problem. They would be centered almost directly over the frame side rails.
This would require milling through the floor and rails, with a difficult screw driver position and the new slots would overlap the old with no support for screw heads on the outside. After some testing, it appeared the motor could be mounted on a .032 x .5 " K & S strip screwed to the floor top. Slots could be milled through floor and rails to clear screw heads. Flat heads could be used, but their heads require relatively large counter sinking and the only ones on hand were too long, stainless steel. Grinding these to length was not appealing.
Note: Adjust brightness and contrast for optimum viewing.
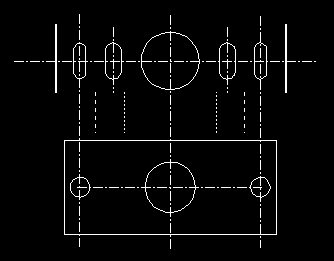
FLOOR & PLATE LAYOUT
The upper part shows the floor with heavy lines at sides. The inner slots and center hole are the original. The outer slots are the new. The lower shows the plate with new center hole. The outer circles are the screw heads. Between the two, the heavy dashed lines are the outside of the motor, while the inner are the motor mount hole centers. Not shown, the frame side rails are just inside the original slots.
After considering the small load on the motor, it was decided to try ACC. The plate was laid out by scribing a 1.125" length for support beyond the slots and some leeway. Center lines were drawn and the center prick punched. The location of the screw centers is not critical, but the floor slots should clear the outside of the motor by at least .02" for centering. I selected .48 ". With calipers use center prick to scribe screw centers. Drill center hole to clear worm, about 17/64". Carefully cut plate to length.
The next problem is to transfer screw centers from plate to floor to locate slots. There are several possibilities depending on tools available. These can be done by measurement, calculation an plotting. Easier methods involve clamping plate to floor centered side ways and square. For hand tools, first drill plate through with a small bit (#80), then clamp. Mark floor through holes with a needle, remove plate and prick punch as close to center as possible. Use this to establish slot centerline with calipers. With an X-Y table, clamp floor squarely then clamp plate to it and drill clear through both holes. Remove plate and use center finder to set. I use needles. The plate was drilled for #0 self tapping screws for better purchase. Run these in and then remove. Remove all burrs and lightly file faces to assure a flat surface.
Remove all oxide from plate and motor mounting end with a brass or stiff bristle, rotary brush. Do not use steel. Broken bristles could be attracted inside motor by magnets. Clean with acetone. Apply a few drops of ACC to plate and carefully center motor on plate. Put aside to set.
The slots in the floor can be cut with an end mill bit or with successive overlapping drill holes along the scribed centerline. Length can approximate original and width should be about .02 larger than screw OD, to allow lateral adjustment.
Check polarity of motor and solder one terminal to the rim of the can and the lead from the wheel pick-up to the side of the other. Trim down any solder build up to eliminate possible shorts.
Finish with bench testing and gear alignment. Lube and break in. Then track test and have some fun.
