What every beginner needs to know
Every beginner who wants to improve his game
should read the sections about
basic strategy, that is,
doublecrosses,
control, and the
chain rule.
Sorry, but I won't be able to tell you how to win all your games. Computer analysis has shown that 5x5 Dots (4x4 boxes) is always a tie with best play by both players.
You can record your games and send them to me, so you can show everyone some of your best games.
You should also try your hand at 6x6 Dots. You can do this on Yahoo by simply choosing the 10x10 board option, and only playing in the bottom left-hand 6x6 corner.
Finally, I suggest you try playing Go, which I find very similar to Dots, but which is a much more interesting and challenging game.
Since many people reading this site will be used to Yahoo Dots, I will use their notation, for example, the first player will be Yellow and the second player will be Green. Mathematicians have traditionally called these Dodie and Evie, because Dodie plays the odd movies and Evie playes the even moves. In books, you will also see A for the first player and B for the second player.
I have made a list of technical terms in the
glossary.
The game of Dots is played on a rectangular array of dots. The players alternate placing edges connecting the dots. When a player makes a box, he puts his name in the box and moves again. At the end, the player with the most boxes wins. If the number of boxes is equal, then the game is a tie.
On Yahoo Dots, the first player is Yellow and makes yellow boxes and the second person is Green so makes green boxes.
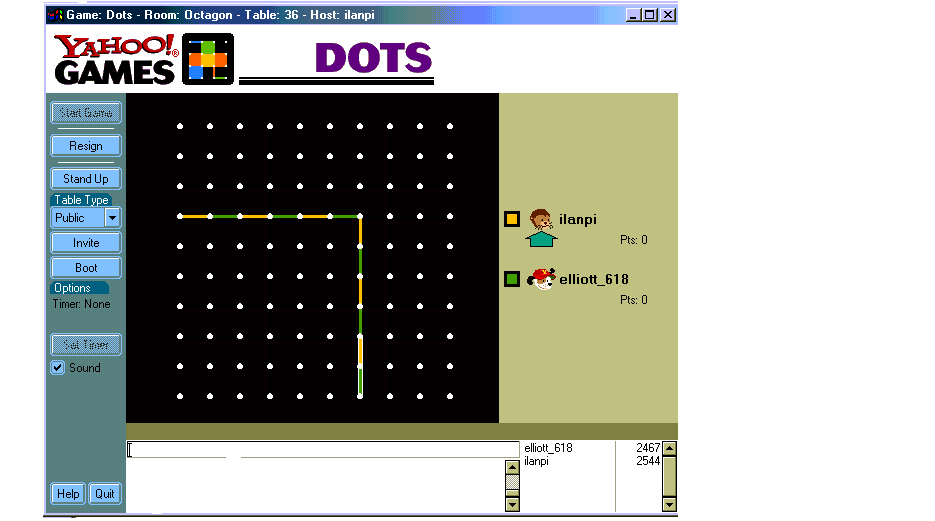
Here is an example game on the 3x3 Dots board
The players start, with Yellow moving first
On his last move, Yellow allows Green to take a box.
Green takes the box, but he is forced to move again. Any move that
Green makes allows Yellow to take all the other boxes.
Since you want to avoid moving into a chain, both sides will
play quiet moves creating long chains until one player is forced
to move inside a chain.
You might be surprised that there is a much better way to play
Dots. Learning it will allow you to consistently beat all your
friends, at least, those who don't know about it.
You start off the same, by taking the first three boxes up top.
Now you know how to keep control and win the game once your
opponent has moved into a chain. Since there is a good chance
your opponent knows how to do that too, in a good game of Dots,
the loser will usually be the one who first had to move
into a chain.
That means that to win a game of Dots, you need to know how to
force him to be the first to move into a chain. This seems to be
a hopelessly complicated problem, but Amazingly, there is a very
simple way to tell which player will have to open up the first chain.
The Chain Rule: On the 5x5 board (4x4 boxes)
Note: When I say "no matter what the choice of moves",
I mean all moves which do not enter a chain if there is another
possibility open.
Since opening up the first chain usually loses, this gives the following
simple strategy for playing Dots.
The Chain Fight: On the 5x5 board (4x4 boxes)
Important Remark:
When I use the word "chain", it is
always about a chain of length 3 or more
and I don't count chains of length 2.
You should be able to see why: It is because
the chain should always be long enough to allow you to leave the
last two boxes as a doublecross. This is not possible with a
chain of length 2 since your opponent can give
up a chain of length 2 without allowing you a doublecross.
Chains of length 1 or 2 are called "short chains".
Mathematical Remark:
The chain rule is a mathematical result,
but it has nothing to do with
the chain rule that you may be forced to study in Calculus class.
First of all, the Dots chain rule will actually help you do
something useful, win Dots games. Secondly, you won't need to know
anything about its proof to use it and win games.
Go forth and win:
So now you know the most important facts about Dots strategy.
You should now be able to go back and amaze your friends!
A Dots game can be split up into four separate parts:
My definition of endgame is not quite standard. In particular, Go
players will usually define the endgame as the part of the game when
all territories have been determined.
In Dots "a territory" means an area where at most one chain can
live.
However, 5x5 Dots is such a small game
compared to Go, that experts in that game might consider
the starting position of 5x5 Dots as an
endgame.
Mathematicians will also prefer to call the final phase
the loony phase, since every move is a loony move
or a response to a loony move, where a
loony move is
a mathematicial term describing the
Nimdots
value of a move which allows a doublecross. In other words,
every move in the final phase allows a doublecross or can play a
doublecross.
I felt it was necessary to define the endgame as I did because
learning who wins in all such endgames positions
appears to be one of the
key steps required to become an expert Dots player.
For the usual board sizes, this gives:
To master the chain rule, you will also need to take cycles
into account. In fact, a cycle counts as two chains, as far a control
is concerned, so they don't affect the chain count, at least, at the
basic level. However, cycles make things a lot more complicated so
you should probably wait and check out
the section on cycles and
control a little bit later.
The Non-chain rule: Once the number of chains is determined,
no choice of move will change which player will first have to move
into a chain or cycle.
The exact statement of the non-chain rule does require a little more
care. The rule only applies in a
normal game, that is, the players will not move into a chain or
cycle, or decline a doubletrap until the
final phase of the game (when
there are only chains and cycles left). For anyone who has read the
proof of the chain rule, this simply
says that there are no doublecrosses
till the final phase.
This will come as a relief to people whose natural greed was
thwarted by the kindler, gentler approach of the
basic strategy which gives away two boxes
per chain.
The Short Chain Rule: The player who has
lost the chain fight (the first player forced to move
into a chain) will get at least as many
short chains as his opponent during the
short chain phase of the game.
In other words, if you have been forced to first move into a
long chain, then you will either tie or get more boxes during
the short chain phase.
The short chain rule shows that it is easiest to count points in short
chains backwards from the largest to the smallest.
The short chain rule also says that in a game without any chains, it
is the loser of the chain fight, Yellow in 5x5 Dots,
who will be favored in the short chain phase. But since there aren't
any chains to snap up, he will also be favored to win the game.
For 5x5 Dots, this gives
DIAGRAM
The Zero Rule: If there are no chains or
cycles (that is,
quads), Yellow will have the
advantage. With even material, Yellow will always win, unless
there is an even number of 1-chains and also an even number of 2-chains.
For other board sizes, this rule also applies, but with
Yellow replaced by the player who needed an odd number of chains
who will have the advantage.
What happens when there are quads around? Since they don't affect
the chain count, and Yellow has lost the chain fight, he will
be forced to move into a quad first. This means that with exactly
one quad, Green will get all the points in that quad and probably
win the game.
With two quads, the players will trade quads at the end, so
Yellow will be favored, just as in the zero rule. However,
the quad trade means that three quads will again favor Green.
In Dots, it is very important to be able to determine whether
one is able to force the creation of a chain in a region of
the board. I will call this type of problem "Life and Death"
in analogy with the crucial question of
of
Life and Death in Go.
DIAGRAM
A chain has life. If you don't stop it, it will keep on growing
and take over a whole sector of the board.
It is from this point of view, a chain is similar to a live group of
stones in the game of Go.
You will need to understand life and death for a few key positions.
The most useful position to understand is the following
DIAGRAM
I have called this the 4-Corner, but
in Berlekamp's book, this Dots position is called the 2x2 Icelandic game.
Note: This section will be entirely devoted to openings for
5x5 Dots (4x4 boxes), since the final outcome of the opening moves in
this game has been evaluated rigorously by David Wilson using
computer analysis. However,
the general principles are the same for 6x6 Dots, with the goals
of the first and second player reversed, of course.
The opening is the initial part of the game in which players make
their basic strategic choices. For experienced players the opening
will consist of standard moves which they will have memorized. If you
do not know basic openings, you can find yourself in a losing position
after your first move! This is especially true for Green, who usually has
a hard time defending.
The basic strategy says that
Yellow is trying to get one or three chains while
Green is trying to get two chains.
This determines the opening strategy as follows:
One sees that the first issue of contention in a Dots game
is a fight for the center.
If Yellow manages to make a chain run through the center, then
he will most likely win and if Green manages to split the board
into two equal parts, then he will probably tie and have good
winning chances.
OK, you may have understood some of the basic issues, but you
still need to know where to play! Luckily, David Wilson has
already done a thorough analysis of all opening moves and
the outcome of the game with best play. His results are
available on his
web site. He also named some of the basic openings, and
I will follow his terminology.
The most important point is that the following opening move
by Yellow is best because it threatens to win the game right away!
Of course, this opening move is not unique, because it makes no
difference if you use one of the seven other identical versions which
are just reflections or rotations of this move.
OK, Yellow is threatening to make a second move preventing Green from
splitting the board into two and David Wilson's analysis shows that
if Green allows Yellow to make this move, then Green
will lose the game, with best play by both sides.
So Green must prevent Yellow's threat, and he has only two responses
which don't lose the game. The names "Yahoo Opening" and
"Wilson Opening" are due to David Wilson.
All other Yellow opening moves are also acceptable, but they
they do not fight for the center, so do not pose an
immediate threat to Green. I will therefore concentrate on
these openings, which are the most frequently used by
good Dots players. For an analysis of the other openings,
see
David Wilson's Dots site.
The Yahoo opening will typically continue as follows.
DIAGRAM
Here Yellow threatens to take control of the center, winning the game.
Once again, Green only has one reponse that can tie the game.
DIAGRAM
After this move, Green has successfully split the board into two parts.
A natural move by Yellow is to try to split the top part in half,
in order to obtain three separate regions.
DIAGRAM
This is the typical position arising from the Yahoo opening.
Experience seems to indicate that Yellow can force a single chain in
the bottom half of the board. It also appears that Yellow can split
the top into two regions and force Green to commit himself first in
one of the regions, and therefore win the chain fight.
A good example of this strategy is given in
this section.
However, Green can defend against this strategy without
too much trouble by making a quad and reaching a standard tie.
The Yahoo opening therefore appears to lead to quick ties, once Green
has understood how to use the quad, that is, knows how to defend
correctly even he has lost the chain fight. This ability is what
characterizes expert play, so this opening
is good practice for those aspiring to attain this level.
Once again, Yellow makes a move threatening to control the center
and win the game.
DIAGRAM
Green has only one response leading to the following position.
DIAGRAM
In this position, there will usually be a quad formed on the left,
and the players will then form chains and quads on the right.
The outcome will usually be decided by the number of short chains,
so the players must be extremely careful in their choices.
This opening is much more difficult for both players, but also
gives more winning chances to both players than the Yahoo opening.
This is confirmed by David Wilson's
perfect game, in which each side plays a move
giving his opponent the least amount of good replies.
Since 5x5 Dots (4x4 boxes) is known to be
tie with best play, any win must be due to a mistake by one of the
players. So, from a purely formal standpoint, getting good at Dots
means the elimination of all mistakes. But, for the rest of
us humans ( Dabble too), we have a lot
more basic mistakes to take care of before we can even think about
attaining perfection.
Interestingly, even the top players will make this mistake, so
don't feel too bad if it happens to you.
These errors were found in the problems given on pages 544-545
of the 1983 second corrected printing of Volume 2 of Winning Ways.
The errors relate to the answers given on page
536 of Winning Ways.
In this position, Green is threatening to sacrifice a two chain
on the left, joining two chains to make a very long 9 chain.
Since there already is another chain, this will win the game
for Green.
Therefore, as stated in Winning Ways, Yellow must sacrifice
two boxes, creating 3 long chains consistent with the chain rule.
It is correctly stated that the
second player (Green) will try to make a chain in the right
hand region. However, it is incorrectly stated that the
first player (Yellow) can prevent this by making repeated
sacrifices. In fact, the second player can force a chain
with this move, following the initial sacrifice by the
first player.
Since the second player can make a chain, the first player will not
immediately sacrifice in that region, and will instead limit the
growth of that chain to length 4. This, followed by the
suggestion in the solution of a
preemptive sacrifice
on the left will ensure a win for the first player.
A preemptive sacrifice
is natural in this situation, because the first player is already
ahead by two boxes and I showed in the
section on the preemptive
sacrifice that he now has the possibility of winning by using
this sacrifice, since it is a 6x6 board (the 5x5 board requires
a three box lead).
You have understood the fundamentals of the game and can usually
set up the correct number of chains. But are you are still losing
consistently to Dabble and the better Yahoo players?
Well, you have
probably reached the big barrier separating
good players and expert players, somewhere
between 2000 and 2200 in Yahoo ratings.
The Dots strategy that I have described so far
was simple: you try to set up the
correct number of chains corresponding to your color. However,
this strategy has limitations, and players may find that they
are winning the chain fight, but losing the game.
There appear to be two important steps required to reach the
expert level.
This step represents an important conceptual
advance: Instead of just thinking ahead to achieve immediate
goals, players must also learn to
first visualize the endgame positions they want to obtain, and
adapt their immediate move to reach that goal.
That is, the strategical emphasis changes from simply
making general moves delineating territory, into long range
moves seeking to achieve specific endgames.
I will try to explain how to learn these two steps in this section.
But, in order to assimilate it, you will also need to adapt your
play.
This may sound trite, but to get better, you will need to start playing
with better players. You may have avoided doing this before, because
it was depressing to lose all the time, but if your rating is getting
around 2000, then you should be able to do better against
Dabble and players rated about 2200, so playing them won't simply
be a source for discouragement.
Playing Dabble is now more important than ever. Dabble will consistently
be able to win with Yellow and tie with Green, despite having
lost the chain parity fight. You must study Dabble's techniques
and learn to prevent it from using them, as well as applying them
in your games.
It is also time to start challenging players rated about 2200 or higher.
You should be able to tie and even win a few games. However, players
at the 2400 level can still probably beat you every game, so don't
insist too much with them.
For example, in the above position, Yellow has managed to make
three chain, and appears to have the game locked up, since one
of the chains is already quite long. However,
Green can save the farm by moving in the unfinished chain
(he will have to be the first to move into a chain, sooner or later).
This effectively reduces the length of that chain, and leads to
a tie.
The preemptive sacrifice can easily be overlooked, and its unexpected
use can be a cause of some anxiety. These rules give some peace of
mind, since they say that you can't lose to it if
you aren't already 3 boxes down.
These rules also seem to indicate that a preemptive sacrifice is
most effective if it is played immediately after
your opponent has sacrificed some boxes in order to
win the chain fight.
In 6x6 Dots and other games with an odd total number of boxes,
it is possible to win using the preemptive sacrifice if you are only two
boxes ahead. For example, in this position, from the book
Winning Ways, Yellow is two
boxes ahead, so can use the preemptive sacrifice to win the game.
DIAGRAM
It is easy to check these rules by noting that accepting or declining
the preemptive sacrifice simply inverses the role of the players.
I give a
formal proof below for people who are interested in
seeing it.
When your opponent makes a preemptive sacrfice, you are faced with
the choice of accepting all the boxes, or leaving the last two
boxes making a doublecross.
In the first case, you simply continue with the basic strategy,
making the number of chains corresponding to your color.
In the second case, the early doublecross means that you have
made one chain and used it like you would in the
final phase. With one chain
done with, you need to make one less than you would normally.
In other words, for 5x5 Dots:
An early doublecross means a change of sides: Yellow must now get
make zero or two chains, Green must make one or three chain. This count does
not include the sacrificed chain.
Using basic algebra, let N be the total number of boxes (16 in 5x5
Dots and 25 in 6x6 Dots), Y and G be the number of Yellow and Green
boxes before the sacrifice, C the number of boxes in the sacrificed
chain. Let X be the maximum number of boxes that can be captured by
the side taking the last box in the chain. Since
X is the maximum number of
boxes the first player can attain in a Dots-and-Boxes game played on
the same board, but with the Y Yellow Boxes, G Green Boxes, and C
chain boxes removed, its value is independent of what Yellow and
Green did beforehand.
Without loss of generality, assume that
Green makes the preemptive sacrifice to win the game.
One has two possibilities:
In order for Green to win in both cases, the first Yellow
value must be less than N/2 and the second Green value
must be greater than N/2, that is
Subtracting Y + X + 2 from both these inequalities gives
Now, C must be at least 3, since chains have at least three boxes,
so one gets
Now, if N is even like in 5x5 Dots,
then the term in the middle is a whole number
so that the right and left sides must be at least two apart, that is
But if N is odd, like in 6x6 Dots,
then the middle term is half an integer and one
can only conclude
This proves the conditions for a win using the preemptive sacrifice.
The proof for ties is exactly similar.
To nibble means "to eat in small bites" and this technique can be
used effectively against an opponent who wants to get the
correct chain count at all costs.
For example, in this position Yellow seems to have attained all his
goals: With only two boxes sacrifice, he has formed a very long chain
and has prevented Green from making a second chain.
However, the game is a tie: Yellow will have to sacrifice two more
boxes to prevent a second chain, then will have to give up four more
boxes in the
short chain phase.
This example pretty well sums up the nibbling strategy:
Experienced players will note that the first method almost
always wins for Yellow when Green tries to prevent one chain
at all costs (instead of trying to make a second chain or cycle).
This is why Yellow usually wins when there is very little
space to make chains, for example, after sacrifices filling up
the center.
The second method appeals to the Short Chain
Rule which guarantees the short chain advantage to the player
losing the (long) chain fight. You must use this advantage to save
the Dots war, once you've lost the chain battle.
The theory is simple:
If you take the quad (from a one edge offer) then you give up control.
To keep control, you must decline the quad. This means:
Well, that is the theory, now for the practice. Understanding
the quad is not too hard, because the first person to move into
a chain or quad will usually move into the quad first. It then comes
down to analyzing what happens after the quad is taken. Note
that you only have to the count from that point on, since one side
or the other will have to take the quad, the rest of the moves
will be the same no matter who took the quad.
It seems to me that the quad is has a levelling effect in most
situations. The reason is that the player taking the quad will earn 4 points,
and the player giving up the quad will usually take the last chain,
so usually 4 points, so there is a fairly balanced split.
This levelling effect implies that
sacrifices must be used very sparingly
when there is a quad around. In particular, the
preemptive sacrifice cannot be used
when there is a quad, because acceptance gives at least 3 points,
yielding 7 points when added to the guaranteed 4 points in
the final phase. This almost certainly means a win for the person
accepting the preemptive sacrifice.
The basic situation with one quad
can be completely characterized completely for 5x5
Dots (4x4 boxes). One has the following rules, which assume that all
the capturing of short chains, chains, and quads is done at the very
end (no sacrifices). I will also assume that chains do not terminate
in quads (this usually gives the advantage to the winner of the chain
fight):
Two quads is also fairly easy to understand and
the situation can be characterized completely for 5x5
Dots (4x4 boxes). One has the following rules, which assume that all
the capturing of short chains, chains, and quads is done at the very
end (no sacrifices). I will also assume that chains do not terminate
in quads (this usually gives the advantage to the winner of the chain
fight):
Knowledge of these rules should make it a lot easier to solve the
above Dots problem. In Problem Q1,
Yellow wins somewhat unexpectedly by immediately
making a chain of length 4, which disconnects this chain from the
bottom row. No matter where Green moves next, Yellow will be able to
separate the bottom row into two disconnected parts, each of which is
a short chain, and so a win for Yellow, by the third rule.
Any other Yellow move will allow Green to keep the number of
short chains down to one.
In particular, Yellow can move into the position of Problem Q2.
Green now ties by moving
into the bottom edge, second on the left. This threatens
to make a join with the chain. If Yellow stops this by disconnecting
the chain, then Green makes a second chain and wins.
Kermit's lament has never touched so many hearts as in 5x5 Dots
game rooms. Indeed, the second player has a very difficult time
holding his own. Computer analysis
shows that Green only has two correct responses to Yellow's
strongest first move, whereas Yellow has absolutely no theoretically
losing move until his third turn.
A perhaps more compelling reason for Green's sorrow is that he
will usually make two chains, sacrificing two boxes in one of them,
therefore giving Yellow a two box handicap. For example, Yellow is
more than ready to sacrifice two boxes to ensure one chain, usually
winning the game if he can achieve his chain goal. On the other hand,
if Green sacrifices two boxes to ensure two chains, then he will be
already be at a four box disadvantage, due to the doublecross he will
give away at the end, so he will have difficulty winning if his chains
are not very long.
Another Green disadvantage is that the preemptive sacrifice
will always fail against a unique chain, since accepting all
the boxes leaves zero chains, which always favors Yellow,
by the zero rule.
However, the strategies outlined in this section, the
preemptive sacrifice,
nibbling, and the
quad are exactly the
ticket to help Green.
It seems that the best way for Green to save the day is to
know a number of "saving positions" and try to reach these.
The methods of this section give a few such positions which
I call "standard ties".
The standard ties have very similar counterparts which are
losses for Green, and he must be aware of these to defend
correctly. Yellow, on the other hand, will try to reach
these positions.
The last part of this tutorial is for players who
aspire to complete Dots mastery.
I will describe my conception of optimal
Dots from observation of the 5x5 Dots oracle. I will end by
explaining Nimstring strategy in terms most accessible to
Dots practitioners.
So you've finally reached the stage where you hardly ever lose
on Yahoo Dots (2400+). You may even be starting to get bored with all those
easy wins. Well, the next logical step is to play 6x6 Dots, which
will present new and interesting challenges. In particular, it will
avoid all the known openings, ties, and computer analysis of
5x5 Dots, but without the interminable and intractable games of
10x10 Dots. In fact, no one knows who the theoretical winner is
in 6x6 Dots.
It appears that the biggest difference in 6x6 Dots is the much
more important role of preemptive sacrifices. This must be due,
in part, to the fact that in 6x6 Dots, you can use it to win
a game with only a two box advantage, whereas a three box
advantage is required in 5x5 Dots, see my
proof of this result. The greater
possibility of creating chains, due to the larger playing area
increases the chance of sacrifices preventing a chain from forming,
thereby giving a player a material lead which allows him to use
the preemptive sacrifice effectively.
To play 6x6 Dots on
Yahoo Games, just choose a 10x10 board and limit your
moves to the bottom left-hand 6x6 corner.
In order to make this restriction clear, the players have
cooperated to make an enclosure around the 6x6 board.
Note that this does not change the sides: Yellow, who
start the enclosure, will also play Yellow (first player)
in the 6x6 Dots game.
When the 6x6 game is over, the loser must agree to resign the game,
as in this diagram, since the Yahoo game is not actually over.
Therefore,
playing 6x6 on Yahoo Dots requires a great deal of cooperation and
trust between the players. It is therefore limited to expert
players who are highly motivated to test their skill on this more
challenging venue.
One way of challenging yourself against less able
competition is to play
Handicap Dots.
The only direct handicap possible on Yahoo Dots is to always play
Green. This roughly corresponds to a 100 point rating difference. As
you improve, you will note that playing Green is the only way to
attract competition. Always playing Green is difficult, due to
the fact than any error against a good opponent is fatal,
while an error with Yellow can often be rescued to obtain a tie.
Continually playing second is made more stressful due to the fact
that Yellow dictates the opening, so can vary his game as he
wishes, whereas Green must closely defend against the first player's
choices and has little flexibility in his responses.
Strong players must come to terms with this handicap, especially since
the Yahoo system doesn't automatically change colors. This Yahoo
peculiarity renders Dots similar to Go in which the recognized
stronger usually plays second. One can even follow Go tradition
by having intermediate handicaps, for example, to let the weaker
player go first in two out of three games.
In any case, many players refuse to go second, so it is important for
both sides in such matches to be aware that refusal to play Green is
acknowledgement of a sizeable handicap and recognition that the
other player is stronger.
More severe handicaps are possible, such as giving your opponent some
free boxes at the end. For example, giving a one box handicap simply
means that the weaker player wins tied games, that is, "draw odds."
I recommend giving one box for every 200
Yahoo rating point differential,
and always play Green when there is an extra 100 points difference.
This type of handicap is not directly feasible on Yahoo Dots, however,
keeping box handicaps n mind will help you stay honest by always
trying to play the optimal move, that is, the one which gives you the
biggest possible winning margin.
These considerations stress the fact that Dots seems more similar to
Go than to Chess, where players try to give themselves every advantage,
usually setting up the White pieces for themselves at the beginning
of a match. On the contrary, Go practice has included letting the
weaker player move first, declaring a tie favorable to the second
player, and having the first player give a number of stones (usually 5
and 1/2) to his opponent at the end of the game. However, the Go
handicap system consisting of letting the weaker player start with
more than one stone has no direct counterpart in Dots-and-Boxes, since
Dots players do not place different types of edges, in the sense that
a player can make boxes using edges placed by his opponent.
To achieve the highest level of play, you will need to start studying
games very carefully. In particular, you will need to play
over games in order to identify mistakes or find improvements.
You can also record your opponents' games in order to find
weaknesses in their strategy.
To play over the stored game,
you first retrieve the Dabble file you previously saved
using "Load" in the "File" menu of Dabble. You then
click on the right arrow in the Dabble window to see each successive move.
The first method (Dabble with Autoplay off) is also the easiest way
to review a game you recorded using a scoresheet.
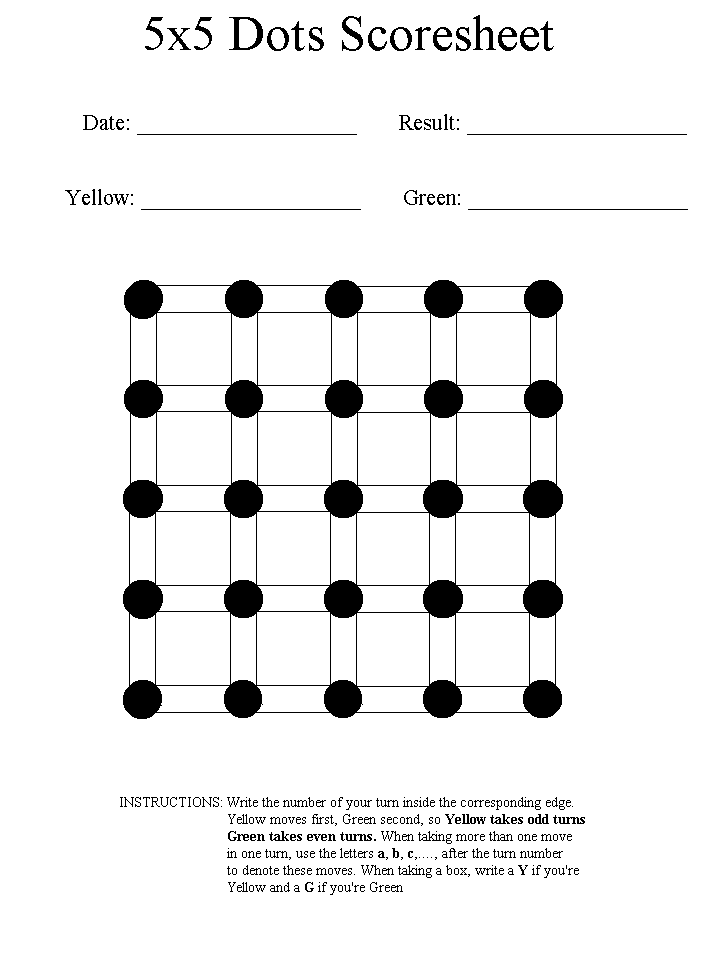
Click on this picture
and print it to make scoresheets for 5x5 Dots (4x4 boxes).
Using this scoresheet, you can record the games you play on
Yahoo Dots. You can also bind
these scoresheets together to make a book of your best games.
If you aspire to perfection,
then I recommend you consult
the
5x5 Dots Oracle. This is a program written by David
Wilson which gives all the optimal theoretical
outcomes for the opening moves. That is, for about the first
10 turns of the game, it gives, at each step, the final
outcome of the game, if both sides play perfectly.
You can use this site to analyze your openings, and see whether
you or your opponent made a mistake in the opening. You can
also test openings, and search for variations which limit
the number of good options for your future opponents.
The oracle also provides a challenge to players who have reached
the top of the Yahoo hierarchy. Indeed, lack of Yahoo competition becomes
an issue fairly quickly, so it appears that one way to
improve to the next level is to try to understand the
often obscure winning moves decreed by the oracle.
DIAGRAM
That is, you don't feel comfortable with all those unresolved
life and death issues going on simultaneously and you
always hurry up and resolve the problem. Well, if you are
consistently losing those games, then it is time for you
to get with the Nimstring Program.
Most good Dots players are men, and like any
self-respecting male, a good Dots player is afraid of
commitment. Consider the following position.
Whoever wins the battle on the top part of the board will be able
to take all 8 boxes on the bottom and win the game. Note that
chain issue has not been decided in the two regions at top,
and that the first person to resolve the chain issue in one of the
regions will lose, since the other player responds by resolving the
chain issue in his favor in the other region.
The simple way to achieve this is to simply use a mirror strategy,
copying the exact move made in one region into the other until
the chain issue is resolved in one region.
Interestingly, the chain rule doesn't come into consideration, because
the player using the mirror strategy will be always be
able to resolve the chain parity in his favor.
This is again a win for Yellow, but what is interesting about it is
that there is again a mirror strategy. That is, for each move in one
region there is a corresponding response in the other region
(possibily preceded by capturing a box) which turns the chain parity
question in the players favor.
In this sense, the two regions at the top are equivalent to each
other. In general, two regions will be equivalent if for each
delaying move (or move resolving the chain issue) in one region there
is a corresponding move in the other region which gives the same
delaying options (or move deciding the chain issue either way).
Before talking about Nimstring strategy in detail, it is useful
to understand how the delay strategy works in a position where
the chain issue has already been resolved.
So, how many move can you delay in a region where the chain issue is
resolved? The answer is that you can delay
you can delay zero moves if you must move into a chain or take the last box
(that is you can't delay at all!) in that region,
and you can delay exactly one move in the region
if there is one move left
on the board which doesn't move into a chain or force you to move
again outside the region (capturing the last box), and
When there are more moves available, the answer is given by the
Non-Chain Rule: Once the number of
chains is determined, no choice of move will change which player will
first have to move into a chain or cycle.
This means that no matter what the choice of move, the player who
will first have to move into a chain in the region
will always be determined by
the parity of the number of
turns left until someone has to move
into a chain (or take the last box) in the region.
It therefore makes sense to say that a region is
equivalent to 0 if the player to move will be the first have to
move into a chain, and equivalent to 1 if the player can move
into a position where his opponent will first have to move into a chain,
that is, he can move into a 0 position.
To repeat myself once more, the non-chain rule says that every
region in which the chain number is resolved is equivalent to
0 or 1.
Note that moving into a chain always loses the delaying battle.
This is because the opponent can then decide which side he
wants to continue the game as (strategy stealing). This is
a special case of the more general
Zero game: A Nimdots position is a win for the second
player if and only if its value is 0.
To make the theory of delaying moves clearer, one invents a new game called
Nimdots in which the goal is to force the other player to take the last
box (or move into a chain). In other words, Nimdots is played exactly
like Dots: You place edges on a rectangular array of Dots and
whenever you take a box, you have to move again, except that the
total number of boxes captured is not taken into account,
the loser is the last person to take a box.
In mathematical works on Dots, this
game is always called
Nimstring, but the two games are completely equivalent.
It is fairly clear that in the two examples of delaying strategy,
the winner of the game is the player who wins the Nimdots positions
at the top half of the board.
The game of Nimdots has a much simpler mathematical theory
than ordinary Dots because
every Nimdots position can be characterized by a single
number, its value.
As already mentioned, as far as delaying moves are concerned, every
Dots position in which the chain count is determined has value 0 or
value 1, that is:
Every Nimdots position in which the number of chains is determined
has value 0 or 1.
Recall that this simply says that deciding which player will first have
to move into a chain only depends on the parity of the number of
turns left to play in that region.
For positions in which chain parity was not determined yet,
there was the concept of equivalent positions, that
is, in which the same delaying options exist in each region.
Positions which are equivalent in this sense will be said to be
equivalent Nimdots positions and will have the same
Nimdots value.
Two Nimdots regions are equivalent if you can move into the same
equivalent Nimdots positions. So, one can see that the Nimdots value
can be computed from knowledge of the Nimdots values of all the
positions you can play into. This method of computing Nimdots values
should work, since final positions are simpler, since they have fewer
options. It may seem hard to believe that this always works, but
this way of building up values for positions is guaranteed to work
for all combinatorial games.
For example, one can try to computer the value of the region
From this position, all moves resolve the chain question, so
all moves will result in a value of 0 or 1. If you make a chain,
then the result is 0, as decided above. If you decide to prevent
a chain by sacrificing two boxes, then you leave your opponent
the last delaying move (another two box sacrifice). This means
that the second choice moves into a position with value 1.
Therefore, the options from the diagram are to move into 0 or into 1.
By definition, this position will be said to have value 2.
More generally, if you have a position in which the options are
to move into any of 0,1,2, then the Nimdots value will be 3.
However, the rule is slightly more interesting if there is a missing value:
MEX Rule: The Nimdots value of a position in which you can
move into the values A, B, C,... is the minimal excluded value
among A, B, C,....
For example, if, in a Nimdots position X, you can move exactly into
positions with values 0,1,2,4,5, then the position X has value 3.
The reason for this rule can be understood from the mirror strategy.
Consider the Nimdots position X from which you
can only move into any of the values 0, 1, 2, 4, 5. If you play that position
against any other position Y which has value smaller than 3,
then the first player can win on his
first move: If the Y value is 2, for example, then you move into
a position of value 2 from X and continue with the mirror strategy.
The same if the Y position has value 0 or 1.
However, if the Y position has value 3, then you will always
lose if it is your move. The reason is that if you move into
0, 1, or 2 from X, then your opponent will also move into 0, 1, or 2
from Y, then use the mirror strategy. If you move into
4 or 5 in X, then he will move into 3 from those positions leaving
you with a 3 and 3 and a loss due to the mirror strategy.
Finally, you can see that if the Y position has a value bigger
than 3, then you can win by moving into 3 from that position, leaving
a 3 and 3.
So, this argument shows that position X will win against every value
not equal to 3 but lose to the value 3, so X must have value 3.
This same argument always works in general.
As an example of the Nimdots computation, I will indicate how one
computes the Nimdots value of the 4-Corner.
To compute this value, one must build up a catalogue of Nimdots
values, starting with the simplest ending positions, which
all have value 0 (the player must move into a chain, or have
to move on the board). The final answer is that the
value of the 4-corner is equal 2. Since there many positions
to cover, I will only follow one branch in the large tree of
possible continuations.
The justification for the value 2 is that the possible positions
one can move into have values 0, 1, 3. The value 2 follows
from the MEX rule, since 2 is the smallest number not appearing.
DIAGRAMS
The first position has value 3, because the possible positions
one can move into have values 0, 1, 2.
DIAGRAMS
The first position has Nimdots value 2, because the possible positions
one can move into have values 0, 1.
DIAGRAM
The first position has Nimdots value 0, because it is a loss
for the player to move, he has to move into a chain.
The basic difficulty with the Nimstring Strategy is that
Nimdots values are difficult to compute. To make things harder, the
knowledge of the Nimdots value of a region is not very helpful
if you don't know the Nimdots values of all the positions you can
move into. Therefore, to use the Nimstring Strategy, it seems
that (human) players should stick to memorizing the values
of certain positions, as well as all the values of
all the positions that can be reached from that basic position.
A good start is to figure this out for the 4-Corner.
The problems involved in computing Nimdots values can be worth
the trouble, because there are some general rules which make
them easy to use.
Zero game: A Nimdots position is a win for the second
player if and only if its value is 0.
This says that in a Nimdots position, you have a theoretical win if
and only if its value is not 0. In that case, you win by moving
into a position which has value 0.
In terms of Nimdots values, the mirror strategy simply says.
Mirror rule: Combining two Nimdots positions with equal
values gives a value of 0.
This is the simplest case of a completely general rule for combining
Nimdots values.
Nimdots addition: To compute the value of the Nimdots position
X composed of the independent Nimdots positions A, B, C,..., having values
a, b, c,... you write a, b, c, in base 2 and add without taking carries.
DIAGRAM
For example,
in this position, the board is split into three separate regions.
One first computes the Nimdots value of each region.
The analysis of the 4-corner shows that the
Nimdots value of the top left region is 2 and
the value of the top right region is 3. In the bottom region, the
first player can force a unique chain, so the non-chain rule
states that the Nimdots value is either 0 or 1. Since
there are an odd number
of total Dots in the bottom,
the chain rule implies that this game is a win for the first player.
Since there are an even number of edges placed in the bottom region,
it is the first player's move, so the Nimdots value must be 1.
The three regions have values 1, 2, 3, and to compute the
Nimdots value of the whole board, one uses Nimdots
addition. Converting into base 2, one has 1 = 01, 2 = 10,
3 = 11. Adding without carries gives the result 00 = 0.
One concludes that the position is a Nimdots loss for the player
to move.
This seems to indicate that the quad is the key to Green's defence
when Nimstring considerations are not his favor. Since
Nimstring will always favor Yellow when the board is split into
three in this way, it makes sense that Yellow should try to
prevent a quad as early as possible. In particular, Yellow
can try to do this in the opening. I therefore adopted the following
"anti-quad" opening to mathter unsuspecting opponents.
This forces Green to adopt
different equalizing strategies, since this opening
effectively prevents
the standard quad ties.
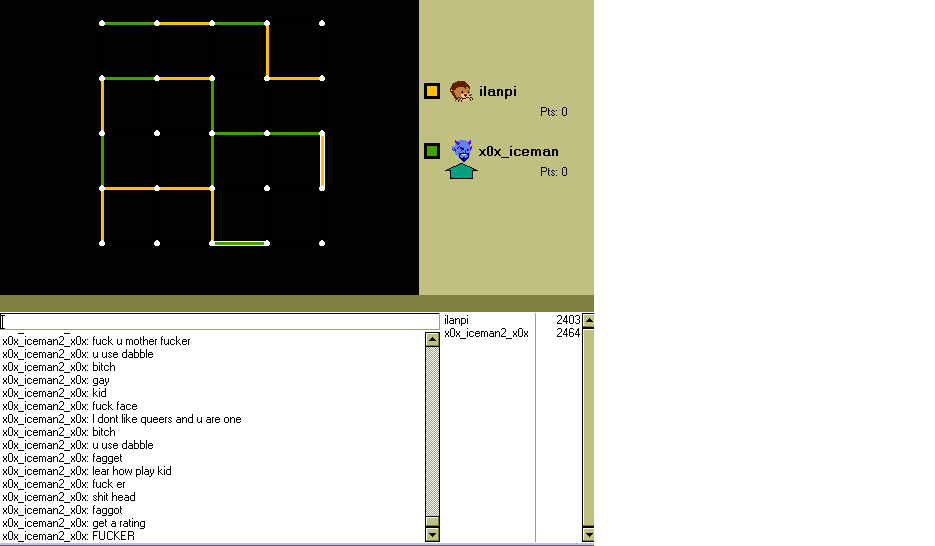
In the game ilanpi (Yellow)
versus
x0x_iceman2_x0x (Green) of February 10, 2003,
the play from the above diagram continued.
Yellow's Turn 9 also threatens to connect the two left regions
making a single chain and winning the game since Yellow will be able
to prevent a chain on the right. It should be noted that
Yellow a slightly stronger pivot
move on his ninth turn, that is, placing the edge
perpendicular and to the top left of the actual ninth move.
This carries the same threats,
but leaves yellow a stronger position on the bottom
after Green has made the same response as in the game.
As it is, Green has very few saving moves.
David Wilson's 5x5 Dots oracle shows that there
are exactly five Green moves preserving a tie, that is,
all other Green moves will lose the game, with best
play by both sides.
It is not an understatement that understanding why these moves,
and only these moves tie, remains somewhat obscure to the
human mind.
The Game continued with Yellow's Turn 11 which split the board into
three separate regions.
The Nimdots value of this position is 0, as was
previously computed.
This means that the position is a Nimdots loss
for the player whose turn it is to move. This player will have
to declare himself first in the top half of the board.
Green's 18th move must lose because it is a
preemptive sacrifice which always loses if the number
of boxes is equal, as I have proved.
A similar proof shows that entering a chain always loses the
corresponding Nimdots game, no matter what the number of boxes.
One can therefore say that Green's 18th move was the culmination
of Yellow's Nimstring strategy.
Indeed, if
Yellow obstinately continued to try to force Green to commit
himself first in the top two regions, then the game would have
been a tie. For example, the game could have continued as follows:
The Basic Strategy
Chains
Doublecrosses
Let's go back to the position.
Control and how to keep it
The doublecross is the basis of Dots strategy. Using it consistently
is called control.
For example, take this position where you are playing Green and
you managed to force Yellow to play into a chain.
The Chain rule
Getting better
Stages of a Game
All About The Chain rule
The Chain Rule for Other Boards
The chain rule is also true for all size boards, but with very
simple modifications:
The General Chain Rule:
The Non-Chain Rule
The chain rule is very simple to understand, but one of its direcct
consequences (actually, a consequence of its proof), the non-chain rule, presents
some problems for beginners (it certainly did for me) and is a source of
mistakes. It states:
Good Greed
The non-chain rule immediately implies: You should always take
a box that is offered to you,
when it isn't part of a chain, cycle, or doubletrap.
The Short Chain Rule
The greedy non-chain rule immediately implies that during the
short chain phase, the best
strategy for the players is to exchange short chains starting
from the smallest and ending with the largest. This gives
the following handy principle for computing short chain scoring.
The Zero Rule
Mathematicians and other incredibly picky
people will have noted that zero is also
an even number, so that the chain rule should also say that
the player fighting for an even number of chains should be happy
getting no chains at all. In fact, this can be a mixed blessing,
for the following reason.
Care and Feeding of Chains
The chain rule works best if there are very long chains, so
if you think you can get the right number of chains, you should
try to make them as long as possible. The next sections
will show you how to do this.
Life and death
The 4-Corner
Openings
Basic concepts
Fight for the Center
Standard Openings
The Yahoo Opening
The Wilson Opening
Common Mistakes
Forgetting who you are
The most common error, by far, is forgetting which side you are.
That is, you will play 5x5 Dots (4x4 boxes) and will make
two chains as Yellow or one chain as Green, that is, the
exact opposite of what the
chain rule says, and so a guaranteed loss.
The Doubletrap
Errors in Winning Ways
Becoming Expert
Beyond the chain rule
The Preemptive Sacrifice
Aftermath
Skip This Proof
In this section, I prove the fact that you must be at least
three boxes ahead to win using the preemptive sacrifice on
a 5x5 board, and two boxes ahead on a 6x6 board. You should
look this over only if you have an abnormal mathematical curiosity.
Nibbling
The Quad
One Quad
Two Quads
It's not Easy Being Green
Standard Ties
Standard Losses
Masters and Non-Mathematicians
6x6 Dots
Handicap Dots
Studying Games
Using Dabble
The easiest way to record and play over games is to use Dabble.
To record a game (that you are not playing with Dabble)
you first, you turn off "Autoplay" in the "Game" menu.
You then click on the sequence of moves.
When you're done with that, you save to a Dabble file (*.dbl) using
the "File" menu.
Scoresheet for 5x5 Dots
Scoresheet for 6x6 Dots
David Wilson has written a
scoresheet
for 6x6 Dots (5x5 boxes). It is best suited for recording
face to face games with two playes facing each other at a table,
for example, in a real (non-internet) Dots tournament.
Consulting the Oracle
The Nimstring Method
Beyond Life and Death
The Nimstring method will help you out if you tend to get nervous
when positions like this come up.
The Mirror Strategy
When are Two Regions Equivalent?
Interestingly, the mirror strategy method works even for two
regions which are not exactly identical. For example, in this
positon
Beyond Parity
Nimdots: The Theory of Delaying Moves
Nimdots Values
The Value of the 4-Corner
Using Nimdots Values
Nimdots and 5x5 Dots
Nimstring Strategy in Action