![]()
![]()
![]()
![]()
![]()
![]()
|
|
Setting Up the Ofna 2-Speed Clutch Assemblyby Eric Perez
Intro:The Ofna OB4 is a pro car with a budget price tag. It has many "Race" oriented features, unfortunately many of the people building the car don't have the racing backbone to make this car work on, or off the track. No offense to the newbie racers who bought this car because it was a far better deal than a Nitro RS4. You are getting a lot of car for your money. There seems to be some misconceptions as to the clarity of the instructions or the difficulty of assembly. The car is not hard to build; there are some steps that require close attention. The good news is that no hand fitting of parts was required; unlike some other Pro Level kits. Everything went together as detailed in the instructions. The kit is built in 51 step-by-step sections with pictures and some text; it assumes you know what you are doing. One of the most if not THE most difficult part of the OB4 PRO-2 kit is the assembly of the 2-speed clutch transmission. I thought more detail was needed, hence the need for this article. Let's get started! Building the New 2-Speed Clutch:
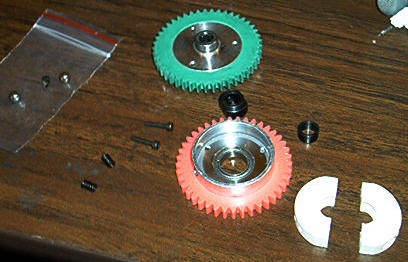
This is what the parts should look like before you start assembling the 2-speed on the car. The med size metal balls on the left hand side are called "balance" on the instructions. Funny how a handful of parts can cause so much headache.
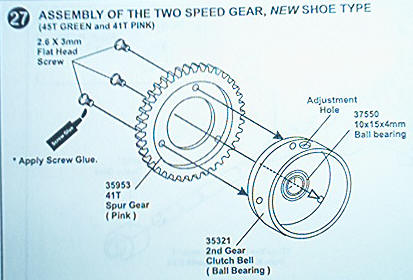
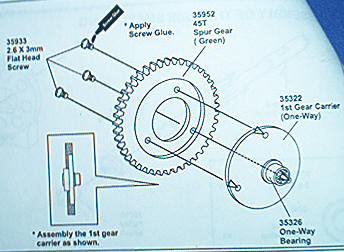
Preparation for the build:We are going to be covering steps 27-28 in fine detail. You are going to need all the components of the clutch 2-speed; they all come in one bag. You will also need the pink 41T and green 37T spur gears. Note: You could use any other spur/pinion combination that you want. The rule is 1st pinion teeth + 1st spur teeth= 2nd pinion + 2nd spur. You'll also need: A small phillips screw driver, 1.5 and 2mm allen wrenches, sand paper, thread lock and some real state on your desk. Step 27: Assembly of the 2-speed gearOverview: Step 27 covers the installation of the spur gears on the 1st speed and 2nd speed aluminum hubs. Install the spurs on the hubs with the little screws provided. The screws are small and it won't take much to strip them, if you use your good hand -so take it easy. Use a little bit of thread-lock on the small screws.
I'm not sure why people complain so much about the instructions. This appears to be quite straight forward.
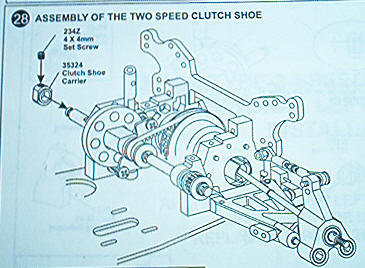
Step 28: Assembly of the 2-speed Clutch Shoe
Overview: Step 28 covers the construction of the clutch assembly and the installation of the clutch assembly on the car. The instruction tell about spacing the clutch shoe carrier 12mm from the front of the shaft and... This is the Eric version of the instructions.
Take the shoe carrier (35324) and place it on the middle of the D cut on the 2-speed shaft. Use a little thread-lock on the set screw, but don't torque it down just yet. Leave it loose enough so that you can slide the carrier on the D-cut.
Now take the clutch shoes(25324) and place them around the shoe carrier. Now take the other shoe and cover the carrier.
Now that we have the position for the carrier set, remove the e-clip slide the 2-speed hubs off and remove the clutch shoes. Tighten the shoe carrier set screw and take a break.
Clutch Shoe Preparation:Step 1
Step 2
The photo shows screws (ignore them for now) Notice how there is no gap between the shoes and the shoe carrier. You will need to sand the flat portion of the shoes until they wrap tightly against the carrier. To test the fit, place only one shoe and note it's position. Now install both shoes. If one of the shoes shifts and it's floating above the carrier then sand both shoes a bit and test for fit again.
Step 3
Note that if you follow this picture for assembly your 2-speed will be assembled backwards... This is where we prepare the shoes for the hardware. The plastic material for the shoes is great for clutches, it's not that great to thread screws on. The first step is to thread all the parts when they are readily accessible on the work bench. It helps to have good quality metric allen wrenches at this time; because the screws are somewhat delicate to say the least. Place the shoes flat side facing down and install the 3X3mm set screws. Keep the wrench parallel to the screw hole and keep downward pressure on the tool as you thread the set screw in. Stop as soon as the screw is flush with the top of the shoe. Now we thread the the M2X10MM screws on the shoes. We basically thread the screws till they reach the bottom and then we back them out. If you try to thread the screws, while at the same time compressing the spring (like the instructions suggest) then you will end up wearing the screw heads out. Besides there is no way to know when you bottom out the spring if you don't pre-thread the shoes first! Note: That a small plastic spiral will come out the shoe end as you thread the screw into the shoe, remove it with a set of tweezers. The mystery of the missing balance pieces:
These are pictures of the original 2-shoe clutch assembly that was shipped out when the new OB4 Pro V2 was released. The metal balance parts where made of a relative mild steel. They where designed to wear out instead of wearing the shoe carrier away. The older 2-speed had been put into racing service last year just in time for the 2001 Texas Biggie Gas On-Road Race, that was about a year ago. The transmission never failed except late November of the same year. What had happened was that the balance pieces had worn away and where allowing the shoe carrier to slip inside the shoes. With a little more maintenance in this area the problem could have been avoided by simply turning the 3X3mm setscrews a turn or two clockwise. Still I was able to make the adjustment between races and was able to get the car ready for the main. Now I'm a little wiser -You should be too. If you have the cylindrical balance design you need to tighten the balance screws a little every month -or two, depending on your level of nitro addiction.
My new Pro version 2-kit brought steel balls instead of the metal cylindrical balance pieces. I'm not sure what the reason for the change was; I hope it was a move in the right direction... I'll let you know how the new design works out at this years 2002 Texas Biggie Race!
Clutch Shoe Assembly:
Now you can follow the directions. This is how the shoe assembly should look like when you stare at the assembly head on (Looking straight at where the engine carburetor should be). Install the balance pieces and capture then within the shoe halves. Slide the springs on the shoes and insert the M2X10MM screws. Now tighten the screw all the way down until you bottom out the spring. Now back it up 5-turns. The assembly should look just like the picture. Balance Adjustment Now you need to adjust the air gap for the balance pieces. Take your allen wrench and turn the 3X3mm set screw until you feel the shoe rising from the shoe carrier. Back it off until the shoe will not go any lower; repeat on the other side. I've had people ask what the air gap setting does. I'll answer this question in the setting up the 2-speed section toward the end of this article.
Your 2-shoe clutch assembly should look exactly like this. Mean looking, finger crunching clutch bell is optional :)
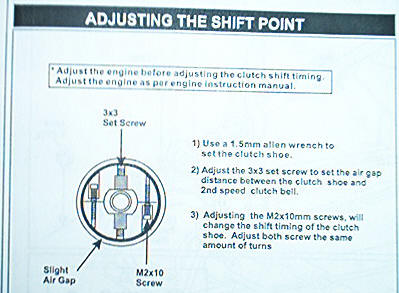
Adjusting the shift point:
This is actually the easiest part of the article. Rotate the axle until you can see the holes for the 2m screws from the top. Now insert the wrench and adjust the the spring tension. All adjustments need to be duplicated on both sides of the clutch. Tightening the screw (clock-wise) will retard the shifting (will shift latter). Loosening the screw (counter-clock-wise) will make the tranny switch to the 2-speed earlier. When you brake-in the engine ignore the 2-speed completely. Only start adjusting the clutch after the engine is fully broken-in. Setting up the 2-Speed Clutch:
At this point you need to understand the relationship between the RPM and the torque of the engine. The trick is to get the engine to shift right before the peak torque is achieved. This will allow the engine to continue to accelerate quickly after the clutch engages the 2nd speed. There is more to this than just the engine let's continue... Some thing that you need to understand is that the OB4 2-speed gearing is set to change 4-teeth. Most of the competition only changes 3 gear teeth. On the track this will allow you to have better acceleration and still pass people down the straight-a-way! With the smooth shifting tranny it's a match made in heaven. The new shoe-clutch system gives you more of a gradual transition into the second speed. There is no engine bogging or traction robbing hard change-over; instead there is a smooth transition as the clutch shoes gradually engage the 2nd gear hub. At some point the slippage will stop and the car will be fully engaged at the 2nd speed. Clutch Type 2-Speed Field Test: As I had predicted the clutch 2-speed is a little harder to setup. For the first dozen runs or so the clutch setting was very temperamental. It was all or nothing, no matter how small my change was. As the shoes break-in it starts responding better to adjustment. The bottom line is that the shifting is smooth and the car transitions into high gear without loss of traction. For High power engines the new 2-speed is definitely a step in the right direction. Wear and tear seems to be similar to the finger style, it's really too soon to tell. Whatever happens rest assured you'll be reading all about it here... One Year Trash Test:
These are one year old clutch shoes. Don't let the dark color of fuel residue and aluminum tarnish lead you astray. The shoes are virtually unworn. The only parts that show wear are the metal balance cylinders. These have been replaced with steel balls on the newer kits.
What's the deal with the air gap? I've raced the clutch 2-speed for a whole year. I changed engines and tuned pipes multiple times and re-adjusted the shift point to my liking every time. Never had any problem, shifting was always consistent. If you look at my year old clutch shoes you'll find they look almost new. This leads me to believe that since the wear is so low the air gap is really a non adjustment. I can't really think of any need for it. If you back out the screws to the balancers then the shoes will slip on the carrier. If you lower the balancers to raise the shoes from the carrier then you'll diminish the distance from the shoes to the 2nd speed hub. This is called the air gap. I can only guess at the results of this and it would mean faster 2-speed engagements. This can easily be accomplished with the 2mm screws with the springs, so it still doesn't make any sense to mess with the air gap. I'll check with the Serpent Gurus, they also have "air gaps" in their clutch systems. I'll keep you in the loop. Wrap up:The 2-speed setting will be affected by the following variables: Engine Power Curve, Tuned pipe Selection, Clutch/Spur Gearing and the track. You can't have one and forget about the rest. The engine and car must work together to form a system. Once everything is working together then you will have no more excuses. Go out there and win some races! Hope you enjoyed the 2-speed Clutch Article! Whoop some R/C car butt!!! Eric Perez Team NitroRC.com If you have any questions or would like to discuss any of the topics presented in this article, feel free to e-mail me.
|


 Now place the 1st
speed hub and connect it with the 2nd speed hub bearing. Slide the assembly on
the 2-speed shaft push on the hub carrier until the holes on the shoes are
centered with the holes on the 2nd speed hub. Secure the 2-speed assembly with a
4mm e-clip (e-ring).
Now place the 1st
speed hub and connect it with the 2nd speed hub bearing. Slide the assembly on
the 2-speed shaft push on the hub carrier until the holes on the shoes are
centered with the holes on the 2nd speed hub. Secure the 2-speed assembly with a
4mm e-clip (e-ring).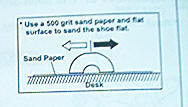 As noted in the
instructions when you mate the clutch shoes together you will notice that they
are not 100% flat. This is where you place a piece of sand paper on a flat
surface and lightly press down on the shoes and sand them flat, to get them to
mate to each other.
As noted in the
instructions when you mate the clutch shoes together you will notice that they
are not 100% flat. This is where you place a piece of sand paper on a flat
surface and lightly press down on the shoes and sand them flat, to get them to
mate to each other.  This is how the shoes
go on the shoe carrier. Note: We will not install any hardware at this point.
This is how the shoes
go on the shoe carrier. Note: We will not install any hardware at this point.