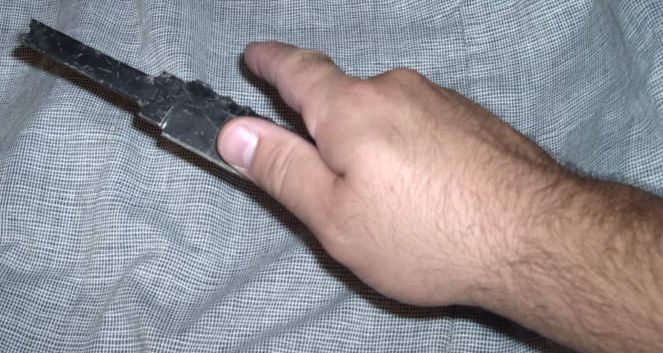

One is the way you hold the knife blade. With smaller pocket knives and ones with serrations or sharpened backs, you will need to hold the knife with the index finger off the blade (Fig 8). This will keep your finger from getting cut or from edges on the handle or thumb tab on a folding knife from catching on your hand. A good idea is to also wear a leather work glove to start. It allows the blade to slide freely from your hand as well as protecting you from burrs or serrations on the blades. If you can, it's good to grind any of the serrations or saw edges off of practice knives. It's one thing to pick something up and throw it when you have to act right then and use whatever you can. It's another to get cut in practice. If you go out and throw for a couple hours, it's likely you'll end up sliding the edge on your finger at least once. It's not worth it. In several hours of throwing, I have cut myself with the serrated edge. Since then, it's had a visit to the grinding wheel and throwing it is much more enjoyable, not to mention more reliable since I can let it slide properly without worrying about getting sliced.
Fig. 8
The best knives for throwing the way described here have one edge that is dull and relatively straight. If the end is tapered a little, it doesn’t seem to make a difference as long as the edge is mostly straight. However, if there are saw notches or curves in the dull side, this will hang up on the throw as it slides and cause the blade to go in different directions, from sideways to messed up rotations. It ends up being extremely frustrating. This isn’t an issue if you throw using a different grip with more rotations as many throwers do. It does become an issue throwing blades or spikes while choking up on the blade. The knives in fig 8b are ones that were hard steel $5 cheapies that I took for a visit to the grinding wheel. After I fixed the backs, they were much easier to throw.
Fig. 8b

Make sure your arc that you throw on, whether a long oval or a small circle arc, is in line. What I mean is that it follows a smooth path and does not jerk sideways from it throughout the throw. If you start swinging from near your ear downward, you should follow that path with your hand coming down to you side and not switching to go across your body. If you switch, the blade can be pushed sideways and the throw will not hit it’s mark.
Keep your wrist position and movement in mind throughout the throw. Small wrist movement or a limp wrist can throw off the spin dramatically, making it difficult to know what is going wrong. If you flip your wrist like throwing a baseball, it will put lots of spin on the knife and throw it off. If you pull it back, it will take spin and often end up smacking the side of the knife with only about a quarter spin. To get a slower rotation, it’s best to start the throw with a more downward (straightened) AOR. This helps eliminate flicking the wrist near the end.
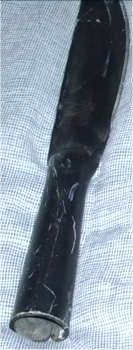
Different knives throw different with different rotation and feel. It’s best to get used to throwing a variety of different knives in learning. Figures 9 to 11 are some of the knives I used in learning. From about 15’ back, figures 9 and 11 can use an almost straight line for an arc while figure 10 needs much more of a curve to get the same rotation per distance traveled. Figure 10 is much longer, 12.5” overall with the balance point being 8.25” from one end, while figure 11 is much shorter, 8.75” overall with a balance point 4.5” from one end. Figure 11 will rotate much faster then figure 10 thrown with the same arc, choke, and AOR. From 18’ back, I needed to actually start back and extend out while moving my body forward to get a large enough arc to make it stick consistently. After awhile, it gets easier to pick something up and make a close guess on how it throws. This takes practice and experience.
Fig.
9
Fig.
10
Fig. 11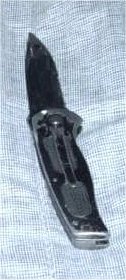

Make sure the blade slides out of
your hand. Don’t hold it tight. Just let it slip out when it’s time.
It’s not a bad idea to wear a leather glove, at least to start. This
not only lets the blade slide easier, but will protect your hand in the event of an error that may
normally cut you. When you are throwing without a glove, it helps to make sure the knife
can slip out of your hand well. I found the best way on a nice summer
day is to get some dust on your hand. A good smack in the dirt
will get your hand dusty and dry, making the dry blade slide well.
When it's wet, a wet blade and wet hand works. As gross
as it sounds, even a good hacker in the event nothing else is available will make sure
things can slide. This isn't a requirement, but drag on release can throw off the rotation
a little or prevent the knife from sliding out when it's expected, throwing off your aim.
As long as the knives you have are safe, as in not having
serrations or a blade on both sides, throwing without a glove is probably best. This
teaches you better feel as you would most likely not be wearing one
in the event you actually needed to use this skill.
In modifying your hold and throw for different knives, the size should be considered as the longest part from the BALANCE point of the knife. The rotation is around the balance point of the knife. I've found a knife about 9" overall with a balance point about 7" into it due to a heavy handle will throw like a much longer knife (regarding arc, choke, AOR) than a knife 10" overall with a balance point right in the middle. So, when considering how to throw, check the balance point. The knife in fig 11 works pretty will from about 17' back with a very elongated arc (huge circle), choked past the center point, and with a completely downward AOR as in fig 6. The spearhead in fig 10 works well from this distance with a choke about and inch from the handle, a downward AOR, and a much more normal arc as in fig 1. This is due to the actual radius of the rotating knife being much larger for the spearhead then the knife.
Arc
Choke
Angle Of Release
(AOR)
Training
Spear Type
Throws
Which Is Best?
Conclusion And Reality
Check