


Every project requires some special tools. I began using small handsaws, keyhole cutters, even hacksaw blades hand-held, to cut the pattern pieces. Over time I bought power tools, which greatly increased the effectiveness of making the required parts. I recommend at least the following;
I use only the half-inch (important: half-inch) long & one-eighth inch diameter. And I always use one-eighth inch diameter 'backing plates' (aluminum backing plates are okay, or use the steel ones if you prefer), sold for about the same price, wherever you buy rivets. These backing plates must be used on every rivet, to ensure that the flared rivet-tail will hold tight and not 'pull through' the softer material, in this case, plastic. Backing plates are cheap... it's not splurging to over-use these. Use them on every rivet where feasible. |
|
|
|
|
|
|

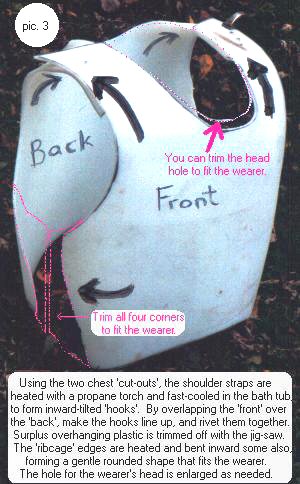
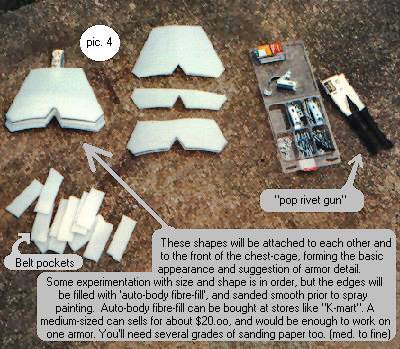
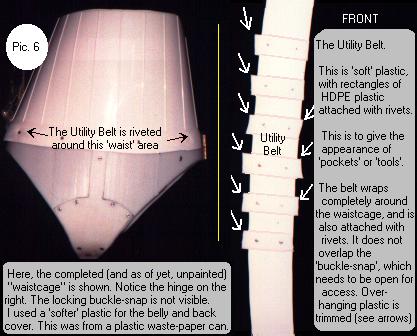
By examining these photos and the ALT-image text (hold pointer tool over photo for pop-over text), the can see some (and not nearly all) of the steps involved.
It is always best to make the parts with white posterboard first, and test-fit the part by holding it against yourself. The rolled wrist gauntlettes for instance were inspired by this procedure. And these are made with the 'softer' plastic like what is used for waste-paper trash cans as they have to roll fairly tightly. Leave enough room to get your hand through the tight end, however. -Experimentation is the key!
The Upper Thigh Covers in the lower half of Pic. 7 are made with the white 55-gallon barrel, HDPE, and thinking ahead, small belt slots are cut into the upper/outer edges or an off-set handle is riveted inside the upper cover, and you can use small black canvas/nylon dog collars to attach these to your belt when getting 'suited up' to wear your armor. These dog collars make the Thigh Covers 'vertically adjustable'. You can raise or lower them accordingly. Use a non-stetching belt or pet collar... you want this to remain relative in position, you do not want this to 'sag' while wearing it. Now, proceed to Page Three to begin viewing my next project, a Stargate SG-1 "Serpent Guard Armor".
|