
Dimensions:
Typical Used Price: US $200-450, depending on condition & accessories. (With the existence of Ebay, typical prices no longer exist, the condition, included accessories, and who is bidding, will all affect the final selling price.)
Frequency Coverage:
International model:
(The frequency coverage is marked on the back, but if it is missing, you can check the model via the Test Mode, as follows: Switch off, key-in 050251, and press "Store". the display will show *INT, PROF, or ITAL. Switch off again.) Note that some German market 500's (the Professional model) from early 1990 have the reduced frequency coverage on the type plate, but also an orange label with a Grundig part number in the corner, stating that the coverage is full, in line with the relaxing of the permitted coverage in Germany. This sticker was applied at the factory, and is genuine.
IF Filter Bandwidths: (Edge frequency to edge, not centre to edge)
Headphone Jack: 3.5mm stereo jack plug, output is rated for headphone impedance from 32 - 2K ohms.
Memory: The Satellit 500 comes with 42 programmable memory positions as standard equipment. Early, ie/ before August 1990 "professional" models (German market only) and all later models came equipped with a 156 frequency, 40 broadcaster ROM table. Details of the frequency list can be seen by clicking here.
Non-ROM equipped radios can be converted by the reconnection of a diode. There are 4 diodes indicated in the picture below. Diode numbers on the board are 505 to 508. You can check which are connected by instigating the Test mode, see section 2, Description & Specifications. A second press of the "Store" button will display a series of "1"s & "0"s in the text area of the display. These represent the connection status of the 4 diodes, in the sequence B3, B2, B1, & B0. "1" is connected. "0" is disconnected. Apparently, all diodes were fitted, but the leads for some were cut as they progressed down the assembly line, depending on which market they were destined for. A full coverage, ROM enabled 500 should show X 1 1 0. The X represents the position of the 9/10 kHz switch.
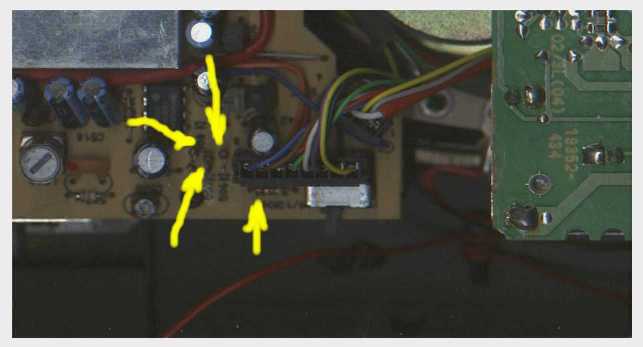
B3 is the 9kHz/10kHz selection for MW in or outside the US, and this is selected using the switch in the battery compartment. (The switch is the silver object near the centre of this picture). B2 is the ROM table enabled diode, and so this needs to be connected to make the ROM table work. B1 is the Italian market frequency restrictions, and should be connected to disable the restrictions. B0 is the 26.1 to 30 MHz restriction, and should be disconnected to enable this section of the coverage. Make the connection temporarily to check that the change required takes place, then a small drop of solder should make it permanent.
Band: When tuned within an international broadcast or amateur radio band, the Satellit will display the currently selected band (in metres).
Time: The Satellit 500 has two internal clocks, one of which is displayed at all times, except when lock engaged while radio is switched on. Press the TIME I or Time II button to choose which of the two clocks is displayed, and used by the timers.
Signal Strength: A 16 segment LCD is used to indicate signal strength, and battery charge status (for ten seconds following powerup).
LSB, SYNCH, USB: These indicators show the current mode of operation - Lower Sideband, AM Synch fine tuning, or Upper Sideband. If these indicators are all blank, current operating mode is AM Synchronous coarse tuning, (or FM, if tuned to the FM broadcast band)
IF Filter Bandwidth: This indicator shows the current IF bandwidth selected. WIDE bandwidth provides superior audio quality (more treble), while the NARROW bandwidth setting provides superior rejection of adjacent channel stations.
FM Stereo/Mono: Allows switching FM Stereo broadcasts to Mono mode. This allows the user to override the default Stereo selection when receiving weak FM signals to improve reception when using headphones, or an external speaker. The Satellit only has one internal 4" speaker. Stereo signals are available via the headphone or external speaker jack sockets on the left side of the radio. The stereo decoder will not engage while only the internal speaker is being used.
Auto: This indicator shows when the radio is setup via the timers to automatically turn on and turn off. This is useful for recording programs at odd hours with a separate cassette recorder via the LINE OUT Socket.
Sleep: This indicator
shows that the sleep timer is active, and will shut down within the next
hour. Check how long by pressing "Sleep" briefly.
Numeric Keys: These keys are used for direct frequency entry (e.g. 5-9-7-5 FREQ/m-Band will select 5975 kHz). The numeric keys may also be used to select a band of interest (e.g. 4-9 FREQ/m-Band will select the 49M band and tune to the mid-band frequency.) The numeric keys may also be used to select the desired station from the presets stored in the memory. (e.g. 3-4-MEMORY will select memory position 34, if occupied, "FREE" will display if it is unoccupied. 0-3-4-MEMORY will select the first frequency of ROM memory 34, if active on the model you have.) They are also used to enter times for the clocks and timers.
FM: This key is used to select the FM broadcast band.
AM: Select AM bands in the sequence LW -> MW-> SW ->LW -> MW -> SW etc. though the first band you come to will be the last one used if you are moving from FM, or the next one in the sequence if you are in an AM band already. The last station tuned to in each of the 3 bands will be the frequency selected. You don't need to use this key if entering frequencies directly using the numerical keypad, the radio will automatically move to the correct band for the desired frequency.
MONO/STEREO: Used in the FM Mode to override the Stereo default and select MONO mode. The stereo decoder only functions if headphones or an external speaker are connected. Useful for improving reception of noisy stereo signals. If headphones/external speaker are connected, and mono is selected, "MONO" will appear in the display.
Wide/Narrow Bandwidth: Used to select between the Wide (6.8 kHz) and Narrow (3.8 kHz) IF filters. The Wide position improves the fidelity of the signal, while the Narrow improves rejection of adjacent stations (stations 5 kHz below or above the signal of interest) at the sacrifice of some fidelity.
FREE: Displays free memory positions in increasing sequence for as long as you hold down the FREE button. If all memory spaces are occupied, FULL is displayed. Entering a memory number (to select the memory of interest) and then this button for a longer period of time will clear the space.
STORE: When pushed for a short period of time, after a one or two digit numerical entry, this button allows the user to store the current frequency to the current memory number selected. Pressing the button without a numerical entry will show any memory positions that the current frequency is stored in.
SYNCH: This button changes the tuning increment from 1 kHz to 100 Hz.
USB: This button switches the Satellit to receive Upper Sideband SSB communications, and changes the tuning increment from 1 kHz to 100 Hz.
LSB: This button switches the Satellit to receive Lower Sideband SSB communications, and changes the tuning increment from 1 kHz to 100 Hz.
MEMORY SCAN: Pressing this button allows the user to step through the frequencies stored in the memory. If the ">" side of the rocker switch is selected, the radio will begin at the current selected memory, or the first occupied position if the "memory" flag is not shown in the display, and the memory number will increase with each press of the "MEMORY SCAN>" button. If the "<" side of the rocker switch is selected, the memory number will decrease with each press of the "<MEMORY SCAN" button. Pressing and holding the button for a couple of seconds will start the auto scan of memories. If the ROM table is active, the flag will be displayed, and pressing the key will move you through the broadcasters in the ROM.
SEARCH: Pressing this button briefly will increase or decrease the reception frequency (once per press) by the appropriate increment for the band on FM, MW or LW. On SW, a short press will move the radio to the start of the next metre band in that direction. Holding down this button will begin an automatic station search within FM, or a scan within a selected AM broadcast band. Pressing the ">" side of the rocker switch will cause the radio to scan up from the current frequency, while pressing the "<" side of the rocker switch will cause the radio to scan down from the current frequency. You cannot scan a user-defined range of frequencies with the Satellit 500, you can only scan over defined broadcast bands, (e.g. 49 M Band, MW, LW.) or amateur bands, though these only scan at 5kHz steps, not 1kHz like the 700. If the ROM table is active, the flag will be displayed, and pressing the key will move you through the frequencies for a particular broadcaster in the ROM.
AUTO: This button enables the timers in the Satellit to automatically turn the radio on and off. The actual timer settings (On and Off times) must be previously programmed via the SELECT option. If the display indicates "Error" when the AUTO push-button is pressed, neither Timer is programmed. If the radio is on and this push-button is pressed, the radio will switch off, in preparation for the next timer event.
TIME I or Time II: Used to display or set the two clocks in the Satellit.
A-Z/0-9: For assigning station names to a memory position.
SELECT: For programming ON/OFF timer settings.
FREQ/m-BAND: For direct entry of frequencies or the Metre band of interest. Also calls up the current SW metre band when the station has been accessed via the memory.
MEMORY: For calling up previously stored frequencies of interest from a memory. Also calls up the current memory position when the SW metre band has been called up since accessing that memory position.
CL: To clear the last input to the radio, or to return to normal radio mode (if using SELECT).
SLEEP: Enters sleep duration
in 10 minute blocks, up to 6 presses for 60 minutes.
HEADPHONE: This jack is to allow listening to the Satellit with stereo headphones. Headphone impedance should be between 32 and 2K ohms. When headphones are used, the speaker in the Satellit is disconnected. Can also be used to make stereo tape recordings off FM.
LOUDSPEAKER: This jack is supplied for driving one external speaker from the radio (it uses a mono plug). When the external speaker are plugged into this jack, the speaker in the radio becomes the right channel of stereo broadcasts. The internal speaker remains in circuit. The Satellit 500 produces 2 x 1.5 watts into 7.5 ohm speakers.
EXT.DC: Allows connection of an external 9-12 V power source. The Positive (+) connection is the center conductor. If you plan to run the radio from this power source permanently, remove the batteries from the battery compartment, as they may leak with age and damage the radio.
RELAY: This jack allows remote control of an external tape recorder. It is also a standard 3 conductor stereo plug, with one common conductor, one normally open, and one normally closed contact. This allows the Satellit to automatically turn on an external tape recorder upon powerup.
EXTERNAL AERIAL: for connection
of an aerial terminating in a 75 Ohm (FM) or 50 Ohm (AM) plug. A switch
allows de-selection of the internal telescopic aerial, though the internal
ferrite rod aerial cannot be disconnected.
LOCKED: This switch allows
the user to lock the radio off, or to lock the radio with the current frequency
and mode settings. When the radio is locked on, the only button which still
functions is the ON/OFF switch. When this switch is on, "LOCK" appears
in the left side of the display, replacing the clock if the radio is switched
on. While on, pressing any of the other keys or turning the tuning knob
will result in the display of the "Error" message.
If you know the desired frequency that you wish to listen to, enter it in kHz, (AM) or MHz (AM or FM) on the numeric keypad and press the Frequency/m-Band push-button. The Satellit will immediately tune to that frequency. If you wish to enter the frequency in MHz, remember the decimal ".".
If you wish to tune to a certain band and scan for broadcasters, enter the wavelength of the band (in Metres) and press FREQUENCY/m-Band. Values for valid bands include the following - 90, 80, 75, 60, 49, 41, 40, 31, 30, 25, 22, 20, 19, 17, 16, 15, 13, 12, 11, and 10. When a valid band is entered and FREQUENCY/m-Band is pressed, the radio will tune to the frequency in the center of that band.
2) Set Timer #1?
Press
SELECT. Display shows --:-- or the last programmed on-time, and ON 1.
Enter
the desired turn on time, number-number:number-number.
Press
SELECT, SEL1 is displayed.
Enter
the desired memory position (e.g. 12).
Press
MEMORY to confirm.
Press
SELECT, OFF1 is displayed, with 0:00 or last programmed off-time.
Enter
the desired turn off time and press SELECT.
3) Set Timer #2?
Key
"2" and Press SELECT. Display shows --:-- or the last programmed on-time,
and ON 2.
Enter
the desired turn on time, number-number:number-number.
Press
SELECT, SEL2 is displayed.
Enter
the desired memory position (e.g. 12).
Press
MEMORY to confirm.
Press
SELECT, OFF2 is displayed, with 0:00 or last programmed off-time.
Enter
the desired turn off time and press SELECT.
Notes:
The Times set use the
Clock which is CURRENTLY DISPLAYED. Once the timers are set, they may be
activated by pressing the AUTO push-button.
If the timers are set to times which overlap, when either timer turns on (i.e. its ON time passes), the 500 switches to that timer's frequency, even if the other timer was already on. If the interrupting timer turns off before the original timer, the 500 will switch back to the original frequency and continue to play until that timer's OFF time passes.
The handbook only covers timer setting using frequencies stored in memory. However, as all manually tuned stations are stored in the respective waveband as position 0, they can be used with the timer. However, using it is even easier. tune in to the station you want to allocate to a timer. Enter the time, press SELECT, if radio changes station, it has a memory position allocated to the timer from last time it was used, press CL if this happens, otherwise, simply press SELECT again, enter the turn off time, and press SELECT again. The timer will pick up the last station that is manually tuned before switch off.
4) Copy a memory from one position to another?
Call up the memory position to be copied, so it is being received. Enter the number you wish to copy it to, and press store. This will copy all associated information, eg/ Mono/Stereo, bandwidth, mode, and Alphanumeric name tag.
5) Turn the LCD Light On/Off?
To turn on, press any
key on the numeric (Direct Key Entry) pad. CL is the best choice. Turn
turn off, don't touch any keys for 10 seconds, it will extinguish automatically.
The light will illuminate
the display full-time when the Satellit is operated off of the AC line,
6) Set the Radio to 9kHz/10kHz Reception on MW band?
Open battery compartment7) Check what metre band I'm in when a SW frequency has been called up using the memofiles?
Remove batteries, if fitted.
Use the tip of a pen, or similar implement, to move small slider switch at left end of battery opening, as indicated on diagram by switch.
Press the "Frequency/M-band" button once. The current memory position will be replaced by the metre band. To return to the memory position, press "Memory" once.
If that frequency is noisy, or is not active at the current time, you can tune to alternate frequencies that D Welle broadcasts on by pressing the "SELECT" button, > for second frequency, or < for last frequency. Using >, The second frequency displayed should now be 3995, and pressing SELECT> again and again should display 9545, 13780, and so on. Hopefully one of these frequencies will be in use and you may listen to D Welle.
If you have a wonderful memory, you may be able to remember which stations are programmed into which ROM number, but if not, either scan through them using the <MEMORY SCAN> button, or see my ROM table file here. Note that some memory positions only have 1 frequency allocated, so pressing <SELECT> will have no effect.
Station presets stored in the user programmable memory may be recalled in a similar manner, except that the <SELECT> button has no function, and memory positions that do not have any station associated with it will indicate FREE if selected. If the selected memory page is free the radio will not change frequencies.
You can store information for up to 42 broadcasters, so a Satellit 500 with a ROM Table can store up to 198 broadcasters/frequencies.
When programming user
entered memories, in addition to Frequency, the Satellit also stores information
about the current IF Filter bandwidth, and its operating mode (LSB, USB,
AM, AM-SYNCH, Mono/Stereo)
4.1.2 How can I see if the frequency I'm currently tuned to is stored in memory?
1) Briefly press
the STORE push-button.
2) If the station
is already stored, the memory number it is stored in will appear in the
display, and the name, if programmed, will also appear.
3) If the station
is not stored, the Satellit will display NEW.
If the STORE button is held down, the display will cycle through all of the memories which have the frequency listed.
4.1.3 How can I check a memory position so I don't overwrite something?
Either:
1) Access the memory
you want to use. If it is free, the display will show "FREE". If it is
occupied, the radio will retune to it. The frequency you want to store
is still held on button 0. To go back to it, return to the waveband, enter
0 & press "Memory".
2) Press and hold the
"FREE" button, all free memories will be displayed.
Note) The FREE push-button offers an easy and fast method to locate unused Page Numbers. As long as you press the FREE button, unused positions are displayed one after another beside the FREE indicator. If all memories are occupied, FULL will be displayed.
4.1.4 How can I clear a Frequency?
1) Enter the Number
of the desired memory to clear by pressing the numeric push-buttons.
2) Press the FREE
button for a couple of seconds. The display will indicate FREE and
the number of the memory page.
4.1.5 How do I Store a Radio Broadcaster on a New Memory?
1) Tune your radio
to the desired frequency, IF Filter setting, and operating mode (LSB, USB,
AM, AM-SYNCH, Mono/Stereo).
2) Enter the number
of the desired memory position by pressing the numeric buttons and then
press the STORE button for a couple of seconds. As a confirmation,
the display will show MEMORY and the number of the selected memory.
3) Once the frequency
is stored, you may annotate the station ID by pressing the A-Z/0-9 button,
and then using the tuning knob to select the first letter of the identifier.
Once you've located the first letter, press the "A-Z/0-9" push-button to
select the second letter. Using the tuning knob, locate the second letter,
and so on. You may enter up to 4 characters per identifier. When
the desired identifier is complete, press the A-Z/0-9 push-button again.
You have now identified a memory page with a particular broadcaster (or
geographical region, or country, or city, or broadcast time, or whatever
you want).
1) Select TIME I
or TIME II to display the clock of interest.
2) Enter the time
with the numeric keys (e.g. 6:30a = 0-6-.-3-0)
3) Press the TIME
I or TIME II push-button. When setting TIME I, when this push-button
is released, the clock will start running and the colon between the hours
and minutes indicator will start flashing. When setting TIME II, the seconds
are synchronised with those on TIME I.
The easy (and truthful) answer is that both are good radios, and you really can't go wrong either way. Most people would agree that the Satellit provides better audio, better selectivity, better FM performance (and stereo), and the option of Manual AGC. Its shortcomings include higher cost, and poorer sensitivity than the Sony. If you are going to try to chase distant, low powered stations the excellent sensitivity of the Sony would probably make it the better choice. If your emphasis is on a portable receiver with good sensitivity and great fidelity, the Satellit 500 is the way to go.
Ha! Bet you thought I would try to dodge that question!
2) The audio is muted when I turn the tuning knob quickly, is this normal?
Yes, afraid so. Bandscanning can be tedious with the Satellit because of this idiosyncrasy. The Sony 2010 has the advantage here also.
3) I can't store my favorite frequencies in the ROM Table. What's wrong?
You are trying to store your favorite frequencies into ROM (Read-Only Memory). ROM is programmed at the factory with a variety of frequencies. To store your own favorites, use the 42 user-programmable memory positions.
4) I intended to tune into Radio Netherlands via preset 030, but I'm receiving the Voice of America...What's going on?
Frequency allocation of shortwave frequencies are not carried out like TV or AM/FM radio stations. Shortwave Broadcasters typically share frequencies, so at different times of the day different broadcasters may be on the same frequency.
5) I had previously stored a station in memory with the IF setting in WIDE mode. Now when its recalled, it's in NARROW mode! What's going on?
If you call up a station from memory, and change the bandwidth or operating mode then the new settings are automatically stored in the memory. If you called up a station, and tuned the radio off frequency slightly then back again (Station ID has been removed from the Alphanumeric display), changing the modes or bandwidth has no effect on the memory contents.
6) Can I recharge Ni-Cad batteries without removing them from the radio?
Yes, make sure the Ni-Cads are installed in the radio correctly, and that the ACCU/BATT switch in the battery compartment is switched to ACCU. If normal Alkaline "D" batteries are in the radio, the ACCU/BATT switch should be set to BATT. Attempting to charge standard alkaline batteries may cause them to leak, possibly ruining your radio. 4Ah Ni-Cads should be used, standard ones (1.5 to 1.8Ah) will run the set for less than 10 hours on a full charge. 4Ah NiCD's take 1-2 days to charge, depending on their state. Overcharging is avoided by a circuit within the radio, as you may wish to run the radio for long periods off the external supply.
7) Is the Ni-Cad charging circuit built into the external power adapter or the radio?
The charging circuit is built into the radio. Any external power supply which provides 9-12 volts with at least 500 mA capacity will work fine. (Ensure correct polarity, negative to outer contact, positive to inner.)
8) How can I tell when the batteries in my radio are getting low?
When the Satellit is turned on, the indication BATT/ACCU will appear in the display under the signal strength indicator. The indicator will show the current condition of the batteries. When the batteries are near the low end of the solid bar under the indicator, the batteries are nearly depleted. Fresh batteries will result in a full-scale indication.
9) I'm trying to receive a shortwave station and another one is interfering with it. How do I reduce the interference?
Try off-tuning by 1 or 2 kHz, that may help. If not, select NARROW bandwidth and see if that does the job. If it doesn't, activate the Synchronous detector by pressing SYNCH. If the interfering station is below the station of interest, tune the Satellit upwards. If the interfering station is above the station of interest, tune the Satellit downwards. Try using MGC. If you have made the BFO adjustment, try using SSB mode on the side away from the interfering station. (Click here for BFO adjustment details.) You are now in the optimal configuration for receiving the signal of interest. If the station is still being interfered with, you are out of luck.
10) How can I connect an external antenna to my Satellit 500, it doesn't use a standard PL-259 connector?
A connector was supplied with the radio in some countries, but if it has been lost Universal Radio in Reynoldsburg, Ohio has a Satellit 500 antenna connector (P/N #0199) for $4.95. Their phone number is 800-431-3939. In Britain, an FM aerial Balun is widely available from Wilkinsons or Great Mills hardware shops, with an FM wall dipole and adaptor, for £2.99.
The connector is a DIN
type 45325, and is designed for use with 50 ohm or 75 ohm coaxial cable.
The Radio Shack "European TV" adapter will plug into the Satellit connector,
and effectively change the connection at the radio to a type F video/FM
connector, which is easily dealt with.
11) When tuning Single Sideband signals, the transmissions still sound like Donald Duck. What can I do to improve the sound?
Make sure you are tuned to the correct sideband (LSB or USB). For amateur frequencies below 10 MHz, LSB is normally used. For amateur frequencies above 10 MHz, USB is normally used. Commercial broadcast and Utility stations normally use USB.
Select Narrow IF bandwidth.
Tune the main tuning knob for the clearest reception. You should be able to get good quality audio if you tweak it enough. Even the Narrow IF filter in the Satellit is too broad for optimum SSB reception, which may cause problems if there are several transmitters using SSB on nearby frequencies. This is a shortcoming shared with most portables. Performance may be improved by adjusting the BFO, click here to see details of the adjustment.
12) OK, the SSB transmission sounds clear, but the signal is fading badly. Now what?
Turn the AGC control to manual and adjust it for best reception. Remember to turn it back to the Automatic AGC position when you're done.
13) How do I manually peak the pre-selector in the radio?
While the microprocessor in the Satellit adjusts the pre-selectors in the radio based on the current frequency being monitored, it may be possible to improve reception by manually peaking it. To ensure the best performance when dealing with weak signals, tune the pre-selector network by pressing the MONO push-button and keeping it pressed while adjusting the tuning knob for maximum level on the Signal Strength indicator.
14) I'm trying to listen to a very weak signal but I can barely hear it. What can I do to improve the signal?
Make certain that the DX/LOC switch on the side of the Satellit is set to DX.
Make certain that the AGC/MGC control is set to AGC.
Select Narrow Bandwidth
Peak the Preselector (see question #13)
Turn down the treble
Use an external antenna. Radio Shack's wind-up reel antenna works quite well with the Satellit 500, improving signal levels without overloading the front-end of the radio. Note that attaching the antenna to the Satellit's whip allows the whip RF pre-amp to remain in the circuit, and provides a better signal than using the EXT jack on the side of the radio. The similar Sangean ANT-60 antenna should work well also.
15) Does selecting the external antenna jack disable the internal ferrite rod antenna for longwave and mediumwave reception?
No, the external antenna jack is active for frequencies above 1612 kHz. The internal ferrite rod antenna is always in the circuit. Remember this trivia tidbit if you are trying to DX these bands with loop antennas.
16) Is there any easy way to recall the last frequency I recalled from memory?
No.
17) Is there any easy way to recall the last frequency I manually tuned to?
Yes, pressing 0 and "Memory" tunes to the last manually tuned frequency in the currently selected waveband.
18) My radio has stopped responding to all keyboard commands. What do I do?
If "LOCK" is displayed, the LOCK switch on the left side of the radio is in the wrong position. Turn it to the UNLOCKED position.
Make sure you have sufficient power to run the radio. Plug in the AC adapter and run it from the wall outlet. Does it work now?
There is no microprocessor reset button on the 500, so try removing the batteries, and leaving it unpowered for a few minutes, then re-install and try again.
19) My Satellit 500 has developed a problem, how do I contact Grundig for Service/Repair work?
In the US, contact:
Lextronix, Inc. 3520
Haven Ave. Unit L
Redwood City, CA 94063
650-361-1611
800-872-2228 from 8 AM
to 4 PM PST on weekdays.
or visit http://grundigradio.net
and look at service details there.
Elsewhere, Grundig has details of each countries dealer networks on the local Grundig website, which can be reached from the main website, http://www.grundig.com
FREE: Memory position XX is not occupied.
NEW: The frequency being stored is not yet stored in the memory.
FULL: All pages in this MEMOFILE are used.
LOCK:
The locking switch on the side of the radio is set to the "LOCKED" position.
Operation: Grundig
Owner's Manual for the Satellit 500,
members of the Grundig
Transistor Radio forum (Topica) (link on my home page) with particular
thanks to Adriano Tencati, and Grundig radio at YahooGroups members, (link
on my home page).
If you would like to contribute
to the Satellite 500 FAQ, please contact me
at grundigradioboy@hotmail.com