
Although the Owners handbook tells you how to include a preset in the timer settings, it doesn't tell you how to change back to using a manually tuned station for a timer start. It is simple to deselect the preset however. Simply press the one that is displayed in the LCD window while in timer setting mode, and it will disappear from the display. The radio will come on to the last tuned station on the currently selected waveband, which may be the preset station of course.
The two AAA batteries which power the clock/timer/memory part of the radio last a long time, so at the very least, put the "use by" date in your diary, to avoid damage to the radio by leaking batteries.
Removing the AAA batteries
from the compartment causes immediate loss of the clock/timer/memory settings,
so how do you change the batteries without losing these settings, given
that they are behind the main batteries, and thus cannot be removed without
first removing the main batteries? Simple! You power the set up via the
DC 6V input socket, TURN THE RADIO ON, and change the batteries while it
is on. The settings will remain intact.
If you select an FM station without RDS, (or one with RDS that isn't transmitting a PTY code, unlikely, but technically possible) or one that is too weak for the RDS data to be recognised, and then press the PTY key, the display will show "No PTY". If you then hit the up or down search buttons, the radio will do a search for stations having no PTY, for whichever of the 3 reasons mentioned above. This is a good way of finding stations that have no RDS, or finding weak stations without stopping on all the strong ones, which you probably have programmed into the presets anyway.
With the radio switched
on, press AUX. Enter 30652 on the keypad, then press STORE. The LCD
display will show HALLO This is js=ust to confirm you are in the test
mode.
Turning the tuning knob
up or down will cause it to count up or down from 1 or -1, all the way
to 127 or -128, when it will fly to the other end, (ie/ -128 or 127, then
carry on through the sequence again. This is a test of the tuning knob
incremental intervals, to ensure the mechanics of the tuning knob are working
correctly. One full rotation of the knob should cause an increase or decrease
of 24. The Satellit 500 & 700 use the knob to select letters for the
alphanumeric name programming, so this test is easy to check on those models,
just by programming a name.
To test all LCD segments, with the radio in test mode, press and hold FREE, all segments in the LCD display should come on.
To clear all memories and clock/timer settings, in test mode, press STORE again. This has the same effect as removing the AA memory backup batteries. Be careful! Don't do this unless you want to lose all the memory/clock/timer settings! You will now find the test and alignment frequencies used in procedures detailed in the service manual are now allocated to the presets. Don't worry, they can be overwritten in the normal way.
Should you wish to open up the coverage of a Satellit 400 Professional to 30 MHz, as oppoosed to the standard 26.1 MHz, you need to disconnect diode D23 on the processor board (The one with the LCD and keypad on it.)
American owners have long been mildly annoyed by the fact that the 400 is set to 9kHz AM/MW spacing in search mode (It tunes in 1 kHz increments manually). Fear not, Grundig did cater for you, they just didn't publicise it very well. By disconnecting the diode D18, again on the processor board, AM search tuning is set to 10 kHz, AND FM is changed to 100 kHz too, in place of the standard 50 kHz setting.
1988 models have provision for the new spacing of LW frequencies above 200 kHz (which I wasn't even aware of, as I seldom use LW, except for RTE on 252, and BBC R4 on 198) by disconnecting diode D19. This is according to the service manual. Now, it begs the question, Is the diode fitted on 1986 and 87 models? And if so, why?
One final item of interest:
On the schematic, there is a diode D24 shown in dotted print, and marked
"Amateur". Diode D23 is marked "Internat", so, was "amateur" a version
they never took to final production? And if so, why?
Removing the three AA batteries from the compartment causes immediate loss of the clock/timer/memory settings, so how do you change the batteries without losing these? Simple! TURN THE RADIO ON, powered either via the main batteries or the AC input socket, and change the AA batteries while it is on. The settings will remain intact. The six C-cells can be changed without any problem.
What a pity the radio doesn't have a sleep function. But wait! What if I set the power switch to "Autom.", (press "SET" on the 300), type in a time up to 1 hour ago, and press "S-TIME"? Yes the set comes on, and turns off 60 minutes after the time you typed in. And hey presto! You're asleep! Just remember to set the power switch to off when you wake up, or it will come on again at the keyed-in time every day until you do. Of course, you won't be able to use it to wake you up again, as you've used it's one timer setting to go to sleep with.
The aerial socket apparently
causes some problems in some parts of the world. It is a male co-axial,
of the type used on European TV's. Many shops in the UK stock female to
female adaptors, allowing the use of a standard TV aerial plug to connect
the set to whatever aerial you use.

The most power hungry
section of this model is the motor, which drives the preselector. It's
also the section most prone to wear and tear, being mechanical, and could
need restringing when the dial cord wears out. So, anything which minimizes
the use of the preselector is a good thing! One way you can achieve this
is to programme frequencies into the memories in ascending or descending
frequency, eg/ memory 1 could be 5975 kHz, memory 2 could be 6065 kHz,
memory 3 could be 6195 kHz, and so on. Then, when you go through the memories,
the drive just has to do little jumps each time. Going through all 32 memories
on SW would involve the drive covering less than the whole dial scale length,
whereas programming them randomly could involve it covering the length
of the scale more than a dozen times, a lot more wear, a lot more battery
usage.
Firstly a word of warning, please don't attempt this if you are not sure of what you are doing. I cannot take any responsibility for what you might do to your radio - if you do this, you do it under your own volition and I accept no responsibility for what may happen. Having said that, I find it hard to imagine getting in such a mess that you can't get out of it again, as long as you use the right screwdriver and only touch the trimmer/pot shown, there's no need to remove the case or warm up your soldering iron!
A word of warning! If you have tuned all your utility frequencies in off frequency to allow for the BFO offset, you will have to program them in again spot on frequency!
All we are trying to do is adjust the BFO circuit to give no hum when you use USB/LSB on an AM broadcast station. This centres the BFO circuitry and allows you to enter a frequency dead on and just select USB/LSB. Mine was just over 100Hz out so I couldn't tune the BFO to the station as, unlike the Satellit 700, there is no clarifier (Fine Tune) control.
The Radio (back view):

There are three holes in the back of the set where you can adjust what's under them. The one we are interested in is the one circled in green, within the recess that houses the elevation panel/tilt stand. Tune the radio to a strong reputable station, a frequency you can trust that will be bang on (Deutsche Welle, the BBC, RCI - anything as long as its a decent signal and one you can trust is on frequency). It's best to have the Bass turned right up, to help you hear the note better, then:
Switch to USB or LSB whichever gives you the best note.
Carefully put your jewellers screwdriver (maybe a plastic handled one would be best but it doesn't seem to have any capacitance effect) into the hole indicated, and gently locate in the slot of the adjuster.
Turn left/right until the note lowers and finally disappears. (The adjuster is fairly coarse on the 500, and you may find it impossible to get it right. I have tried a couple of times and have failed to get it spot on, but even so, it is still better to have it nearly right than way off.)
Switch to the opposite sideband mode (USB if you used LSB) and check that there is no tone there. And that's it!
Thanks to Gary Sawyer and Donald Reeve for the idea, and Adriano Tencati for further information. Note that this adjustment is also possible on the Satellit 700, but the details are different. Go to Gary Sawyers website for details of how to make a similar adjustment to that model.
To activate the test mode, key 050251 and press "Store". The set will come on tuned to LW frequency 160 kHz, with the model version (Prof/Ital/*Int) shown in the alphanumeric section of the display. Pressing "Store" will display the model diode connection status, for Diodes B3, B2, B1 & B0 respectively. This decides which model you have, and which facilities are enabled or disabled. This data is covered in the Satellit 500 FAQ elsewhere on this site, but briefly, to save you searching for it, is as follows:
B3 is the 9kHz/10kHz selection for MW in or outside the US, and this is selected using the switch in the battery compartment (1 = 9kHz, 0 - 10 kHz). B2 is the "ROM table enabled" diode, and so this needs to be connected to make the ROM table work. B1 is the "Italian market frequency restrictions", and should be connected to disable the restrictions. B0 is the "26.1 to 30 MHz restriction", and should be disconnected to enable this section of the coverage.
To test the LCD display,
you use the 5 "Call" keys, (Auto, Sleep, Time I, Time II & Select)
which select various combinations of LCD display. The Satellit 500 has
2 display driver chips for the LCD display, each having 2 common terminals
(having 2 common terminals seems a contradiction, but that's what it has!).
Pressing "Auto" shows all segments fed by common terminal 1 of driver 1,
pressing "Sleep" shows all segments fed by common terminal 2 of driver
1, pressing "Time I" shows all segments fed by common terminal 1 of driver
2, & pressing "Time II" shows all segments fed by common terminal 2
of driver 2, and you can activate the full display by pressing the "Select"
button, this lets you check if any segments are faulty, perhaps after knocking
the set while carrying it about. While in testmode, all ROM and user-assignable
memory slots are disabled, and instead, 34 frequencies are available which
are used in service alignment operations. You can call these frequencies
up using the usual memory acces methods (number keys and Memory button,
or the Memory scan button, but any frequencies disabled due to model restrictions
(Ital/Prof) are disabled in this function too. Switching off disables the
function automatically.
Manually peak the selectors in the radio when tuned to a desired AM station by pressing "MONO" and turning the tuning knob until the station sounds it's best. Re-tuning to another station by any method automatically resets the circuits to automatic peaking of pre-selectors.
Fitted rechargeable batteries, but can't get the 25 hours between charges as quoted in the instruction book? You are probably using standard retail rechargeables, capacity 1.5 to 1.8 Ah. The book quotes 4 Ah rechargeables, which are specialist high capacity items, but are available, at a higher cost, from several outlets, including Maplins on the UK. (see UK links page). However, I've had better results from 2.2 AhNiMH rechargeables, which don't suffer from the memory effect so common with NiCD's, you don't get 25 hours from them, but after some time, you don't get 25 hours from 4 Ah Nicd's either.
The ability to charge NiCD's internally is, of course, one of this radios great advantages. However, there is a potentially damaging consequence of the fact that you fit the batteries, put the cover on, and never look at them again. NiCD's can leak, and if you don't catch them in time, can seriously damage your radio. Therefore, I strongly recommend the occasional removal for inspection. About every 2-3 months would be a good idea. Look for the usual leaking battery problems, swelling, cracks, damp areas and furring around the terminals. Any sign of possible problems should be dealt with by throwing them away. I know they're expensive, but so is a major repair to a radio like this. And think of the money you've saved by not having to buy normal cells for years. Fortunately, on the 700, the two or three minutes required for such an inspection will not even need a clock reset, as it will run for some considerable time on the backup supply, and the memories are secure anyway. On the 500, battery removal loses clock, timer and last station memory settings, unless you power the radio externally while the batteries are removed.
Need a mains unit? See tip in Yacht Boy 500 section.
The aerial socket apparently
causes some problems in some parts of the world. It is a male co-axial,
of the type used on European TV's. Many shops in the UK stock female to
female adaptors, allowing the use of a standard TV aerial plug to connect
the set to whatever aerial you use.
Right
click here to download a word document for Europe, or here
for the North American version, which you can print off and keep, detailing
the RDS test mode. The document details the method of activating and reading
the RDS test mode which the set contains, but which is not detailed in
any of the instructions included in the package with the set. It's interesting
to watch the programme type (PTY) indicator change when the broadcaster
switches it between programmes. The BBC for example, on Radio's 1,2,3 &
4, change it to "01" when the news is on, and then to another code when
the news finishes. For more information about RDS, including other country
codes for those of you outside the UK or Eire, visit http://www.rds.org.uk/rds98/rds98.htm.
(The Grundig Yacht Boy 500 also has this test mode, except non discriminatory
AF facility, see below). Additional RDS
information for UK readers
For a very comprehensive
list of RDS PI & PS data transmitted by most of the stations in Europe,
visit the FM & TV DX Plaza, and go
to the RDS PI & PS page, compiled by Herman Wijnants. While you are
at the plaza, visit the FM tuner page, which lists facilities of a range
of FM-capable radios. The Satellit 700 is listed, but the RDS facilities
quoted are not complete.
Scrolling text: now has a page of it's own.
To activate the LCD test mode, key 050251 and press "Store". The set will come on as normal, but the 5 "Call" keys, (Auto, Sleep, Time I/II, A-Z/0-9 & Menu) will select various combinations of LCD display. The Satellit 700 has 2 display driver chips for the LCD display, each having 2 common terminals (having 2 common terminals seems a contradiction, but that's what it has!). Pressing "Auto" shows all segments fed by common terminal 1 of driver 1, pressing "Sleep" shows all segments fed by common terminal 2 of driver 1, pressing "Time I/II" shows all segments fed by common terminal 1 of driver 2, & pressing "A-Z/0-9" shows all segments fed by common terminal 2 of driver 2, and you can activate the full display by pressing the "Menu" button, this lets you check if any segments are faulty, perhaps after knocking the set while carrying it about. Switching off disables the function automatically. Pressing "CL" after "Menu" completely clears the LCD display. Pressing "Mono" after "Menu" on any AM band displays the message "*PWM 25V". This is the 25volt Pulse Width Modulated signal used to tune the varactor diodes in the RF tuning stages of LW/MW/SW bands. If this voltage is missing, the radio will not tune to any AM stations. The message appears to be just a reminder to the service technician, not a statement of what the actual voltage is in the radio. (Thanks to Dave White for this information.)
Unlike almost every other radio except the Satellit 500, the 700 does not use a mechanical switch in the DC input socket. Instead, the software detects a voltage there and uses the external power supply if it exists, in preference to the internal batteries. This has a couple of advantages, notably the fact that if you use the set to wake you up, it will still do so even if the mains fails. Similarly, it will continue outputting to a tape recorder in similar circumstances, though the tape deck would need to be battery powered for this to be an advantage. However, there can be one disadvantage. If the mains unit is not working for whatever reason, for example a fuse failure in the supply, it will not become obvious until the batteries fail, and if you're using rechargeables, and are about to use the set away from the supply, you are going to be stuck. To ensure the external supply is working, make sure the battery meter doesn't appear when you switch on. If it does, you are running on the internal supply. If it fails while you are listening, you won't know unfortunately, because it switches to batteries seamlessly.
Sometimes puzzled by what you hear when you change memofile or press memory scan to go back to the last memory position listened to? If you leave a memofile while it is tuned to a memory position, returning to the memofile will make the set go back to that station. If you manually tune by any method, but stay in the memofile, pressing either side of the <Memory> scan key will call up the last memory position & memo-AF used. If you manually tune by any method, and leave the memofile, returning will give you the last manually tuned station, regardless of which memofile was displayed when that frequency was tuned to, (i.e./ it may be a different station to the one you tuned to while in that memofile, if you've been tuning in another memofile). The Memory has now defaulted due to leaving the memofile while it was not in use. Pressing Memory> will give the first occupied memory position in the currently displayed memofile, <Memory will give the last occupied position in that memofile. Pressing 0 and then Memory will give the last manually tuned station on the currently displayed waveband, whatever memofile was in use when that was tuned to. Clear? I doubt it. Have a practice, and you should get the hang of it.
You can copy a memory position from one part of a memofile, taking the station name with it, but only the 1st allocated frequency. This can help sort memory positions into alphabetical order, for example. Check for a free memory position first, then call up the memory position to be copied, type in the memory position number to copy to, using the numerical keys, and press "Store" until the set confirms entry. You will now have to copy across any Alternate Frequencies, if applicable, by the usual method.
Heard
about the frequency extension on FM? Here's how to do it. You need one
empty memory position, in which you have to allocate at least one FM frequency,
and one SW frequency. An urban myth has arisen about the frequencies that
need to be used, but I've experimented, and it really doesn't matter. However,
as you are doing this to tune outside the standard FM range, it makes sense
to store the two end frequencies, 87.5 MHz to one AF position, and 108.0
MHz to another, so you can choose one when you activate the mode, because
once activated, you can't tune by any method other than the tuning knob,
or it reverts to standard coverage, and you don't want to have to dial
right across the FM band every time. Switching the set off also reverts
coverage to standard. Now, allocate any SW frequency to another AF in that
memory position. It doesn't matter what order they are in.
You are now ready to
extend the frequency range. The following has to be done every time you
want to activate the extended range. Decide which end of the FM band you
want to explore, and go to it using the memory position you've set up.
Then type in the memory position number using the numerical keys, and press
either "Free" or "Store". Using <Search Select>, move the flashing cursor
to the SW frequency position, and then press the clear key, "CL". Using
the tuning knob, you can now tune through an extended range.
Although the range now
goes down 40.3 MHz, and up to who-knows-what (I gave up) It only appears
to receive within a close range of the proper FM band, around 76MHz to
116MHz. I suspect that the software is tracking the full range of frequencies,
but the actual receiving section (detector/oscillator/IF stage etc.) falls
away because it isn't designed to cover this whole range. Personally I
have only picked up signals below 87.5MHz, these being taxi control rooms,
lorry control rooms, and the occasional conversation of unknown origin.
Its
a pity that the BFO cannot be tuned without removing the back of the radio,
unlike the Satellit 700 which has an access screw hole in the back, so
that selecting SSB on a reliable AM station wont need fine tuning, for
the BFO/fine tune knob on this model is always well off adjustment. However,
it is not difficult to do, if you want to try, follow the details here.
Firstly a word of warning, please don't attempt this if you are not sure
of what you are doing. I cannot take any responsibility for what you might
do to your radio - if you do this, you do it under your own volition and
I accept no responsibility for what may happen. Having said that, I find
it hard to imagine getting in such a mess that you can't get out of it
again, as long as you use the right screwdriver and only touch the trimmer/pot
described, there's no need to remove the case or warm up your soldering
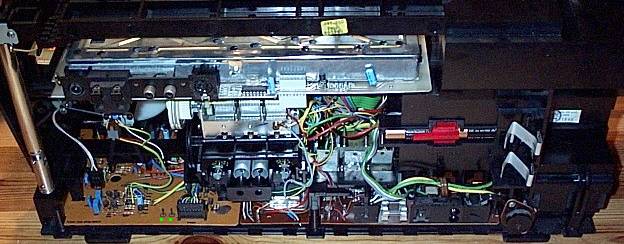
iron! Firstly, open the radio up by removing
the 5 screws that hold the back on, they are Torx # 6 screws, so you'll
need to get a suitable driver. One of the screws is under the whip in it's
stowed position. If you can't find the 5 screws, this mod is not for you!
Once the screws are out, open the radio up like a book, as the 2 halves
are joined by a ribbon cable, and the 2 speaker wires. You should now have
it laying on a soft surface, looking like this:

Next, remove the 3 screws
shown marked "B", these are Torx # 6 or 7, depending on the age of the
radio. Early ones are 6. Carefully lift the right hand edge and slide the
circuit board to the right, so the fine tune knob clears the case. You
can then tip the board over to reveal the front. You can power the radio
by AC or battery to do the adjustment. Tune the radio to a strong reputable
station, a frequency you can trust that will be bang on (Deutsche Welle,
the BBC, RCI - anything as long as its a decent signal and one you can
trust is on frequency). You might want to do this before opening the radio
up, but it's easy to work the keypad buttons even when open, just use a
pen or small screwdriver. While doing so, admire the quality of the buttons:
Not a membrane, proper, separate soldered in buttons! Set the fine tune
control to it's centre, "detent" position. Switch to USB (recommended)
or LSB. Carefully
put your jewellers screwdriver (maybe a plastic handled one would be best
but it doesn't seem to have any capacitance effect) into the blue potentiometer
next to the fine tune knob. The pot was blue in both a very early and a
very late model that I have adjusted, so I'm guessing it is blue on them
all, but you will find it between 8 and 9 o'clock relative to the fine
tune knob. Gently locate in the slot of the adjuster.
Turn left/right until the
note lowers and finally disappears. (The adjuster is fairly coarse on the
YB500, and you may find it impossible to get it right on LSB. I have tried
a couple of times and have failed to get it spot on, but even so, it is
still better to have it nearly right than way off. USB could be made spot
on on both the YB500's I've adjusted.) Switch
to the opposite sideband mode (LSB if you used USB) and tweek for the best
result, you may want to switch back and forth a couple of times to get
it "at it's best". And that's it!
Rechargeable batteries: The battery manufacturers don't make the best ones available retail, only limited capacity versions. For example: in the case of C-cells, NiCD are typically 1.5Ah these days, Industrial Grade are 2.2Ah, (Maplin who can be accessed via the UK links page do high capacity NiCD's, others may do them too.). NiMH's offer greater capacity, 1.8 Ah for retail, and 2.6 Ah for Industrial Grade. To compare, normal zinc-carbon C-cells are 3.1 Ah, & Alkalines typically over 6Ah. Now you may be wondering why I'm rabbiting on about rechargeables here, in the Yacht Boy 500 hints and tips section. Well, there is another problem with rechargeables, the voltage. The YB500 runs on 4 x AA cells, which at 1.5V each gives 6 volts in theory. Put in rechargeables, at 1.2V each, and that becomes 4.8V. As mentioned in the Specifications, the YB500 has a battery low indicator, and auto shut-off. With rechargeables, NiCD's or NiMH's, the shut-off happens within seconds of the battery low indicator coming on, and the whole thing happens within a couple of hours of freshly recharged batteries being installed. The problem is that the trigger voltages for the indicator and shut-down are too close to the output voltage of rechargeables. So you'll have to use standard batteries in the set. However, what you can also do is get a battery holder, (Depending on how portable you need it to be, you could use AA cells to keep it compact, or C or D cells for increased capacity), then wire the holder to a barrel type DC input plug of the size used on the YB500, and save money every time you use it. You can either get a 6 cell battery box, and run the set on 7.2V, or, for increased performance, and longer runs between charges, get an 8 cell box, and use a dummy cell to give you 7 live cells, giving 8.4V. (8 cells would give 9.6V, 0.6V higher than the maximum recommended input on the YB500). All parts inc. the dummy cell are available in the UK from Maplins, (see UK links page) NOTE: when using this method of powering the set, you need to set the lamp function in the menu to "0", to avoid needless drain on the batteries, as any other setting has the lamp on full time, albeit at a reduced level when the set is switched off. ADDITIONAL: I have just purchased a set of RAM (Rechargeable Alkaline Manganese) batteries for the YB500. These are only rechargeable about 25 times, but give the full 1.5 volts, and have a capacity of 2 A/h, compared with around 3 A/h for normal AA alkaline batteries. Should work out much cheaper (ie/ less than 1/3 of the cost). I will report further after I've used them a while. GRB, July 2005. Update: I've just had to recharge them, after 3 weeks of fairly heavy usage. They took a surprisingly long time to recharge, 30 hours, not mentioned on the packaging, but otherwise, so far I'd say they are a success. Browsing round the website of the manufacturer, Pure Energy, it suggests they are best not taken to full discharge, so I'd suggest recharging them as soon as the YB500's battery low warning comes on, even though, from the original factory charge, it will run a further hour and a half or so. More info soon. GRB, August 2005. Now on the 3rd charge, very pleased so far, even if they only took another 10 or so charges, they'd easily be paying for themselves. Quietly confident of a strong recommendation on these in the near future from me! GRB, August 2005.
The mains unit supplied with the set, the NR90-1, is, of course, exactly the same as the one supplied with the Satellit 500 & 700. The only change is the output plug, which is smaller on the YB500. So, if you are ever offered a Satellit 500 or 700, or a YB500, without the mains unit, but have access to a mains unit from one of the other sets, all it will need is a change of plug. Or otherwise any regulated mains unit with 9V output at the correct polarity will do. IF you have an NR90, the one that came with a Satellit 500 or 700, I can supply an adaptor plug which plugs onto the NR90 plug, and fits the YB500, so no rewing needed! The polarity is already correct. If you are interested, email me by clicking here, and I'll let you know the cost, depending where you are in the world.
As well as last station memory on all frequencies, this set has last frequency memory on the ROM table, and last ROM broadcaster memory. Having left the ROM table, you can return to it by pressing "0 ROM" until the beep and ROM appears on the display. The set remains tuned to the station it was already tuned to before pressing "0 ROM". Press "Memory" and the set will go to the last ROM station used. Whatever ROM station you go to, the set will go to the last frequency used, you can then scan up & down them from there.
You can copy memory settings
from one memory location to another. This can be useful if you want to
rearrange them into alphabetical order, numerical order by frequency, or
whatever "filing" system you decide to use. The advantage of copying is
that, if you have given the memory position a name tag, it will copy this
and thus save you having to enter it again. To simplify this, you will
need a couple of free memory positions, one as a buffer for when you are
moving things around in a very full memory, but as a minimum, one to copy
to. Simply call up the memory you want to copy, then enter the buffer number,
or new position if free, and press store. You can now clear the original
position. Simply repeat until it's all in the required order.