
There were 4 separately identified versions of the Satellit 700 at it's introduction, though 3 are believed to be functionally identical, with one of those 3 having a different version of the NR90 AC adaptor. Subsequently, a third variant of the NR90 was introduced for the GB model, but is not documented in the service manual, as the other 2 are. The versions are:
The 700 (let's call it
standard): Item code: 9.15055-8151
The 700 USA (function
as standard) Item code: 9.15055-7151 (Type plate for both of these believed
to be as picture below)

The 700 GB (function
as standard): Item code: 9.15055-6251 (Identified on the type-plate,
see picture below)

The 700 Italia (functionally
different): Item code: 9.15055-6151 (Identified on the type-plate,
see picture below)

These item numbers do
not appear on the radio. Parts of the number do appear on the box. (Note
also, the difference between the script style for the words "Satellit 700"
on the type plates shown. All GB & Italia models are known to have
this script style, all other models use the type style used on the front
of the 700)
As I said earlier, there
were also three variants of NR-90 AC adapters, identified by the item code
number (which appears on the adapter under the words Made for GRUNDIG
in China
Version 1: NR90:
Item code: 8140-601-396 (right in photo) Features several symbols for safety
info.
Version 2: NR90 USA:
Item code: 8140-601-431 (Left and centre in photo) features electric shock/moisture
exposure warning.
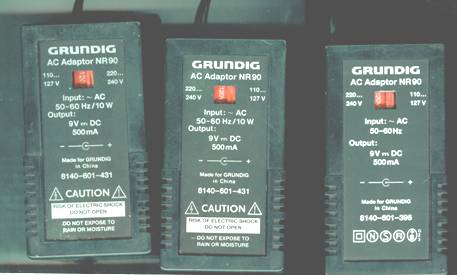
(Photo courtesy of Glen
Heath)
The above photo shows
3 NR90's, from left, as supplied with a Satellit 500 US version, centre
as supplied with a US model Satellit 700, and right, as supplied with a
European Satellit 700. I've included the 500 NR90 as it is interesting
to note that the AC voltage selector is reversed, compared with the one
supplied with the 700. On the 500's, 110-127V is on the left, whereas on
the 700's, it's on the right. It's quite likely that the change did not
take place during the change from 500 to 700, it may have happened at some
other point in time.
Version 3: NR90 GB: Item
Code: 8140-601-501 only features the "double insulated" symbol. See photo
below.

The only reason for introducing
this variant, was that a new law came into effect in the UK on February
1, 1995, all appliances sold in the UK had to have the correct plug fitted,
prior to that, European plug equipped NR90's, as variant 1 above, were
supplied (quite legally) with new Satellits in the UK, and you had to cut
it off and fit the correct plug yourself.
Serial numbers:
Although much has been
assumed and written in recent times about Satellit 700 serial numbers,
some new evidence has come to light that indicates the following:
GB models have their
own serial number sequence. My mid-late 1995 model has a serial number
of 1254, so it's likely that GB models number less than 1500 in total.
GB numbers with barcodes (most of them) are in the sequence 0129548032060XXXXx,
where XXXX is the number that denotes the actual one you are holding, and
x is a check digit.
Italia models also have
their own serial number sequence. A mid 1995 model known to me has the
number 1585 so Italia models probably number less than 1700 in total. Italia
numbers with barcodes (most of them) are in the sequence 0130052032060XXXXx,
where XXXX is the number that denotes the actual one you are holding, and
x is a check digit.
Models for other territories
(Ie/ Europe and US) are much greater in number, and I assume they are serial
numbered separately too. I believe European models have numbers in the
sequence 012954703208XXXXXx, and US models currently unknown by me.
Although the 700 Italia has different frequency coverage, (see "Frequency Coverage" below) there is no known difference between the other 3 models, though it is logical to assume that the 700 USA is a standard 700 with the USA NR90. It's also possible that the 700 USA was delivered with the MW steps set to 10kHz via the Menu button, which activates the extra 3 groups of memories in the ROM table, or that the FM pre-emphasis is different (The US used a different setting from the rest of the world). Other models were no doubt delivered with the MW steps set at 9kHz. Other than that, no functional difference is indicated between the standard, GB & USA models in the service document, I suspect it is just a grey import protection system, a bit like the Sony ICF-2010 being called the ICF-2001D outside USA. It is also possible that not all variants were available for the whole lifespan of the model.
Dimensions: (inches/millimetres)
List Price: (Typical when in production) US $450 UK £350
Typical Used Price: US $200-$800, depending on condition & accessories. (To put it another way, there is no typical price, thanks to Ebay, which attracts prices that depend on who looks at the auction, and how well the radio is presented. Also, as time passes since production ended in March 1996, the availability of really good specimens becomes increasingly scarce, with prices adjusting accordingly. Supply & demand does not favour cheap Satellit 700's, so if you want one, buy it soon!)
Frequency Coverage:
Modes Available:
IF Filter Bandwidths: (edge to edge, not centre to edge)
Headphone Jack: 3.5mm stereo jack plug, output is rated for headphone impedance from 32 - 2K ohms.
Memory: The Satellit 700 comes with one internal MEMOFILE (EEPROM) as standard equipment and this memory IC can store 2048 bytes of information. This translates to 64 station memory positions, or pages, with storage space for up to 8 alternate frequencies per broadcaster (512 Frequencies in all). The Satellit has provisions for memory expansion, and may accommodate up to 3 external MEMOFILEs (EEPROMS) in addition to the factory fitted IC, which expands its storage capabilities to 256 pages with 8 alternate frequencies per page (2048 Frequencies).
Memofile
Part Number: Xicor X24C16-P3 or Microchip 24LC16B P (8 Pin DIP
package) Both are still available at mid-2002. (The factory fitted
item is the Microchip 24LC16B P)
Band: When tuned within an international broadcast or amateur radio band, the Satellit will display the currently selected band (in meters).
Time: The Satellit 700 has two internal clocks, one of which is displayed at all times. Pressing the TIME I/II button toggles the display of the two clocks.
Signal Strength: A 16 segment LCD is used to indicate signal strength, battery charge status for ten seconds following powerup) and RDS error rate.
LSB, SYNCH, USB: These indicators show the current mode of operation - Lower Sideband, AM Sync, or Upper Sideband. If these indicators are all blank, current operating mode is AM (or FM, if tuned to the FM broadcast band) "Synch" will always be accompanied by LSB or USB unless no carrier is within synch lock range.
IF Filter Bandwidth: This indicator shows the current IF bandwidth selected. WIDE bandwidth provides superior audio quality (more treble), while the NARROW bandwidth setting provides superior rejection of adjacent channel stations.
EXT: This indicator shows that the antenna plugged into the EXT jack on the right side of the radio is selected.
LOC: This indicator shows when the attenuator in the radio's RF input circuitry is switched on, to reduce the incoming signal level in the front-end and prevent overloading.
Man/Auto gain control (MGC/AGC): Unlike many portable radios which only provide an Automatic Gain Gain Control, the Satellit 700 allows the use of either Automatic or Manual Gain Control. The manual gain settings are useful for optimizing the reception of SSB signals.
FM Stereo/Mono: Allows switching FM Stereo broadcasts to Mono mode. This allows the user to override the default Stereo selection when receiving weak FM signals to improve reception when using headphones, external speakers or the phono line-out sockets. The Satellit only has one internal 4" speaker, which takes it's feed from a mono stage in the FM tuner section, so mono/stereo switching makes no difference to the sound from this speaker, even if the stereo signal is very poor. Stereo signals are available via the various jack sockets on the left side of the radio.
MEMOFILE: The MEMOFILE (EEPROM) currently selected for use. Alternatively, ROM TABLE indicates this is selected. The Satellit 700 may have been tuned away from a memory position, but this indicator shows which file will be accessed next time you select a memory position within a currently selected file.
RDS: Indicates that the currently tuned FM station is transmitting an RDS (Radio Data System) signal.
Accu: Indicates that the switch in the battery compartment is set in the Accumulator (Nickel Cadmium Rechargeable Battery) position. This indicator should NOT be on if you are using normal Alkaline batteries, because it indicates that the batteries will be charged when AC Adapter NR90 is plugged into the radio.
Auto: This indicator shows when the radio is setup via the timers to automatically turn on and turn off. The next switch on time will also be displayed unless the radio is already on. The auto facility is useful for recording programs at odd hours with a separate cassette recorder via the LINE OUT Socket.
Sleep: This indicator
shows that the sleep timer is active, and will shut down within the next
hour. Check how long by pressing "Sleep" briefly.
Numeric Keys: These keys are used for direct frequency entry (e.g. 5-9-7-5 FREQ/m-Band will select 5975 kHz). The numeric keys may also be used to select a band of interest (e.g. 4-9 FREQ/m-Band will select the 49M band and tune to the mid-band frequency.) The numeric keys may also be used to select the desired station from the presets stored in the MEMOFILEs (e.g. 2.4 will select the station stored in MEMOFILE #2, page #4). Numeric keys are also used to enter times into clocks & timers, and sundry other functions (eg/ Copy)
FM/RDS-AF: This key is used to select the FM broadcast band or select alternative frequencies for RDS stations, if these are available. While this system has been approved by the FCC in the United States, not all stations broadcast the signals required to activate the display of Call Letter and Format information. The RDS system is widespread in Europe, yet not used at all in Japan.
AM: Select AM bands in the sequence LW -> MW-> SW ->LW -> MW -> SW etc. though the first band you come to will be the last one used if you are moving from FM, or the next one in the sequence if you are in an AM band already. The last station tuned to in each of the 3 bands will be the frequency selected. You don't need to use this key if entering frequencies directly using the numerical keypad, the radio will automatically move to the correct band for the desired frequency.
MEMO AF: Once a preset station has been called up, pressing this button will allow the listener to check other frequencies stored in that memory slot.This allows a convenient means to check for the clearest frequency currently in use if you have allocated several frequencies for a particular broadcaster.
MONO/STEREO: Used in the FM Mode to override the Stereo default and select MONO mode. Useful for improving reception of noisy stereo signals. Only affects the external outputs, the internal speaker is fed a mono signal only, and will not sound any different whichever mode is selected.
Wide/Narrow Bandwidth: Used to select between the Wide (6.8 kHz) and Narrow (4kHz) IF filters. The Wide position improves the fidelity of the signal, while the Narrow improves rejection of adjacent stations (stations 5 kHz below or above the signal of interest) at the sacrifice of some fidelity.
FREE: Displays free memory pages in the current MEMOFILE in increasing sequence for as long as you hold down the FREE button. If all memory pages in the MEMOFILE are occupied, FULL is displayed. Pressing a numeric button (to select the page of interest) and then this button for a longer period of time will clear the page (main frequency and all of the alternates). You can also clear individual frequencies in a memofile page by entering the page number, pressing "store", moving to the desired frequency, and pressing "Free".
STORE: When pushed for a short period of time, this button allows the user to store the current frequency to the current MEMOFILE page selected. Pressing the button for a longer period allows the user to store an initial frequency in a currently empty memory slot. You can then allocate an alphanumeric name for the page, unless RDS is active.
SYNCH: This button switches on the Satellit's AM Synchronous detection circuitry, and changes the tuning increment from 1 kHz to 100 Hz.
USB: This button switches the Satellit to receive Upper Sideband SSB communications, and changes the tuning increment from 1 kHz to 100 Hz. It also enables operation of the CLARIFY control on the right side of the radio.
LSB: This button switches the Satellit to receive Lower Sideband SSB communications, and changes the tuning increment from 1 kHz to 100 Hz. It also enables operation of the CLARIFY control on the right side of the radio.
MEMORY SCAN: Pressing this button allows the user to step through the frequencies stored in the currently selected MEMOFILE. If the ">" side of the rocker switch is selected, the radio will begin at the last selected page in the MEMOFILE and the page number will increase with each press of the "MEMORY SCAN>" button. If the "<" side of the rocker switch is selected, the radio will begin at the last selected page in the MEMOFILE and the page number will decrease with each press of the "<MEMORY SCAN" button.
SEARCH SELECT: Pressing this button briefly will increase or decrease the reception frequency (once per press) by the appropriate increment for the band. Holding down this button will begin an automatic station search within a selected broadcast band. Pressing the ">" side of the rocker switch will cause the radio to scan up from the current frequency, while pressing the "<" side of the rocker switch will cause the radio to scan down from the current frequency. You cannot scan a user-defined range of frequencies with the Satellit 700, you can only scan over defined broadcast bands. (e.g. 49 M Band, MW, LW.) This button will also take you to the next SW metre band, if you are not currently in one. On AM bands, the radio will stop briefly on each appropriate frequency (5kHz intervals on SW broadcast bands, 1kHz intervals on SW amateur bands, 9 or 10kHz intervals as selected for your region on MW or LW. On FM, it will scan and stop on adequate signals only. This button is also used for several functions in conjunction with the MENU button.
AUTO: This button enables the timers in the Satellit to automatically turn the radio on and off. The actual timer settings (On and Off times) must be previously programmed via the MENU option. If the display indicates **TIMER when the AUTO push-button is pressed, neither Timer is programmed. If the radio is on and this push-button is pressed, the radio will switch off, in preparation for the next timer event. Note that setting the Lock switch to ON disables the timers.
TIME I/II: Used to display or set the two clocks in the Satellit.
A-Z/0-9: For assigning station names to a page of frequencies within a MEMOFILE.
MENU: For invoking the menu options - MW spacing, ON/OFF timer settings, turning the LCD display light On/Off, turning the error warning beep On/Off, or copying MEMOFILES.
FREQ/m-BAND: For direct entry of frequencies or the Meter band of interest. Also calls up the current SW metre band when the station has been accessed via a memofile, and when held down will skip the radio through SW metre bands in ascending order.
MEMORY FILE: For calling up previously stored frequencies of interest from a MEMOFILE. When held down will also display the memofile chip's assigned name if you have given it one.
CL: To clear the last
input to the radio, or to return to normal radio mode (if using STO or
MENU).
These outputs are intended to drive an external amplifier or a tape recorder. These outputs should NOT be used to hook up a low impedance device such as a speaker.
HEADPHONE: This jack is to allow listening to the Satellit with stereo headphones. Headphone impedance should be between 32 and 2K ohms. When headphones are used, the speaker in the Satellit is disconnected.
LOUDSPEAKER: This jack is supplied for driving two external speakers from the radio (it uses a stereo plug). When the external speakers are plugged into this jack, the speaker in the radio is disconnected. The Satellit 700 produces 2 x 1.5 watts into 7.5 ohm speakers.
EXT.DC: Allows connection of an external 9-12 V power source. The Positive (+) connection is the center conductor. If you plan to run the radio from this power source permanently, remove the batteries from the battery compartment, as they may leak with age and damage the radio.
RELAY: This jack allows
remote control of an external tape recorder. It is also a standard 3 conductor
stereo plug, with one common conductor, one normally open, and one normally
closed contact. This allows the Satellit to automatically turn on an external
tape recorder upon powerup.
CLARIFY: Used to fine-tune Single Sideband transmissions for optimum audio quality.
LOCKED: This switch allows
the user to lock the radio off, or to lock the radio with the current frequency
and mode settings. When the radio is locked on, the only button which still
functions is the ON/OFF switch. When this switch is on, pressing any of
the other keys or moving the tuning knob will result in the display of
the "LOCKED" message. Note that turning the lock on disables the timers,
so the radio will not come on, even if programmed and set to do so. As
confirmation of this, when the lock is turned on, the "Auto" flag, and
on-time, displayed in the LCD, both clear from the display. The lock switch,
when pushed the opposite way, also switches on the lamp behind the LCD
for approximately 10 seconds.
If you know the desired frequency that you wish to listen to, enter it in kHz, on the numeric keypad and press the Frequency/m-Band push-button. The Satellit will immediately tune to that frequency. If you wish to enter the frequency in MHz, enter the "." at the appropriate place, the rest of the frequency and press Frequency/m-Band.
If you wish to tune to a certain band and scan for broadcasters, enter the wavelength of the band (in Meters) and press FREQUENCY/m-Band. Values for valid bands include the following - 90, 80, 75, 60, 49, 41, 40, 31, 30, 25, 22, 20, 19, 17, 16, 15, 13, 12, 11, and 10. When a valid band is entered and FREQUENCY/m-Band is pressed, the radio will tune to the frequency in the center of that band.
2) Set Timer #1?
Press
MENU
Press
"Search Select >" or "Search Select <" until TIMER 1 is displayed.
Press
MENU, ON1 is displayed.
Enter
the desired turn on time, including the decimal.
Press
MENU, STATION is displayed.
Enter
the desired memory position (e.g. 1.12). If an alternate
frequency
is desired, press MEMO-AF until it is displayed.
Press
MENU to confirm, OFF1 is displayed.
Enter
the desired turn off time and press MENU.
Press
CL to exit MENU mode.
3) Set Timer #2?
Press
MENU
Press
"Search Select >" or "Search Select <" until TIMER 2 is displayed.
Press
MENU, ON2 is displayed.
Enter
desired ON time, including the decimal.
Press
MENU, STATION is displayed.
Enter
desired memory position (e.g. 1.12). If an alternate frequency
is
desired, press MEMO-AFuntil it is displayed.
Press
MENU to confirm, OFF2 is displayed.
Enter
desired turn off time and press MENU.
Press
CL to exit MENU mode.
Notes:
The Times set in this
menu use the Clock which is CURRENTLY DISPLAYED. Once the timers are set,
they may be activated by pressing the AUTO push-button.
If the timers are set to times which overlap, when either timer turns on (i.e. its ON time passes), the 700 switches to that timer's frequency, even if the other timer was already on. If the interrupting timer turns off before the original timer, the 700 will switch back to the original frequency and continue to play until that timer's OFF time passes.
4) Copy a MEMOFILE
(EEPROM)?
Press
MENU
Press
"Search Select >" or "Search Select <" until COPY_ is displayed.
Enter
number of MEMOFILE to copy frequencies FROM. The contents of this
MEMOFILE will be written to the MEMOFILE in position (slot) #4.
Press
MENU to confirm.
Copying
progress is indicated by advancing asterisks.
COPY_
is displayed when copying is completed.
Press
CL to exit MENU mode.
5) Set the LCD Light
to be either On or Off when externally powered?
Press
MENU
Press
"Search Select >" or "Search Select <" until LAMP is displayed.
Press
MENU to toggle the lamp off/on.
Press
CL to exit MENU mode.
The light will only illuminate the display full-time when the Satellit is operated off of the AC line, and the bulb will burn out after a few years of continuous use, so it probably isn't a good idea to run it all the time. You can still use the lamp switch on the side when externally powered, even if Off has been selected.
6) Set the Radio
to 9kHz/10kHz Reception on MW band?
Press
MENU
Press
"Search Select >" or "Search Select <" until 9kHz or 10 kHz is displayed.
Press
MENU to toggle the tuning increment.
Press
CL to exit MENU mode.
7) Check what metre band
I'm in when a SW frequency has been called up using the memofiles?
Press
the "Frequency/M-band" button once. The current memory position will be
replaced by the metre band for a few seconds, then the memory position
will return.
If that frequency is noisy, or is not active at the current time, you can tune to alternate frequencies that the BBC broadcasts on by pressing the MEMO-AF button. The frequency displayed should now be 3975, and pressing MEMO-AF again and again should display 5975, 6045, 6180, and so on. Hopefully one of these frequencies will be in use and you may listen to the BBC. Note however, that the ROM was programmed in 1991, and many frequencies are no longer in use by the broadcasters they've been allocated to. However, given the 700's memory capacity, this isn't a problem. Broadcasters current frequencies are generally available on the internet, allowing you to store all the frequencies for your favourite broadcaster in you part of the world). In addition, Grundig started programming stations into Memofile 1 at the factory at some point in time, probably 1994. For more information on this, see the ROM table page.
If you have a wonderful memory, you may be able to remember that the following stations are programmed into MEMOFILE 0, but there is an easier way.....so don't despair.
0.1
DW Deutsche Welle,
Germany
0.2
DW Deutsche Welle,
Germany
0.3
ROEI AUT Radio Austria International
0.4
SRI SUI Swiss Radio International
0.5
RNED HOL Radio Netherlands
0.6
RFI F Radio France International
0.7
RAI I Radiotelevision Italy
0.8
BBC WS G BBC World Service
0.9
BBC WS G BBC World Service
0.10
RMWS URS Radio Moscow (defunct)
0.11
RMWS URS Radio Moscow (defunct)
0.12
NHK J Radio Japan
(3 more memory positions
exist when using 10kHz AM spacing)
The easy way to locate the station of interest in a MEMOFILE is to key in "0.1" and MEMORY FILE, and then use the MEMORY SCAN rocker switch to scan up or down until you find the desired broadcaster. Then, press the MEMO-AF push-button until you locate the clearest signal.
Station presets stored in the MEMOFILE 1...MEMOFILE 4 EEPROMs may be recalled in a similar manner, eg/ press "1.2" then the MEMORY FILE button and the radio will tune to memory position 2 in MEMOFILE 1. Memory pages that do not have any station associated with it will indicate *FREE if selected. If the selected memory page is free the radio will not change frequencies. If you press the MEMO-AF push-button and the message *NO AF is displayed, no alternate frequencies are available for the current memory page.
Unfortunately, storing new frequencies in a Satellit 700 is not quite as straightforward as recalling them. To fully understand how the MEMOFILES work, you need to understand a little about how the memory in the EEPROM is organized....
Station Name (8 Chars) Alternate Frequencies ---------------
PAGE 1
Broadcaster #1
FREQ1 FREQ2 FREQ3 FREQ4
.... FREQ8
PAGE 2
Broadcaster #2
FREQ1 FREQ2 FREQ3 FREQ4
.... FREQ8
PAGE 3
Broadcaster #3
FREQ1 FREQ2 FREQ3 FREQ4
.... FREQ8
.
.
. .
. .
. .
.
.
. .
. .
. .
.
.
. .
. .
. .
PAGE64
Broadcaster #64 FREQ1
FREQ2 FREQ3 FREQ4 ....
FREQ8
You can store information for up to 64 broadcasters for each MEMOFILE installed, so a Satellit 700 with all MEMOFILE sockets populated can store up to 256 pages of broadcasters, with a total of 2048 frequencies.
In addition to Frequency,
the Satellit also stores information about the current IF Filter bandwidth,
and its operating mode (LSB, USB, AM, AM-SYNCH) on AM bands. On FM, it
will store mono, if selected, and also the RDS station name if one exists.
If the RDS signal is present, it will not let you overwrite the name.
Note that when we recalled
the BBC in the earlier example, it recalled FREQ1 by default when we entered
"0.8" and MEMORY FILE. The Satellit always recalls the frequency
stored in the first occupied frequency position (FREQ1 in the previous
table) when used in this manner, and the MEMO-AF push-button is used to
tune to alternate frequencies. If FREQ1 is empty, it will tune to the first
occupied slot in that position.
Note that you can organize the pages in whatever manner you prefer, listing by broadcaster is merely one example. You could as easily label a page as "Europe" and store 8 favorite broadcasters on that page. You might also find it appealing to store frequencies based on UTC broadcast times.
4.1.2 How can I see if the frequency I'm currently tuned to is stored in memory?
1) Select the desired
MEMOFILE to check (e.g. 3. MEMORY FILE) If Satellit retunes to a memory
frequency, select waveband you were tuned to and press 0 followed by Memory
File to return to frequency being checked for.
2) Briefly press
the STO push-button.
3) If the station
is already stored in the current MEMOFILE, the page number it is stored
in will appear in the display.
4) If the station
is not listed in the MEMOFILE, the Satellit will display *NEW.
If the STO button is held down, the display will cycle through all of the pages in the MEMOFILE which have the frequency listed. Note that the Satellit only checks the current MEMOFILE for the frequency when you do this.
4.1.3 How can I check a memory position so I don't overwrite something?
1) Select the desired
MEMOFILE to check (e.g. 3. MEMORY FILE)
2) Enter the desired
page number to check (e.g. 4)
3) Press Store
briefly. The Alphanumeric section of the display will now show eight characters
for the eight alternative frequencies for this page, which will either
be "*" meaning a frequency exists there, or "-" meaning empty. When "*"
is showing, the frequency of that position will be shown in the display,
but the radio will still be receiving the frequency it was tuned to when
you selected the memofile currently displayed, this may be a memofile selected
frequency, or the last frequency tuned to, depending on what that memofile
was set to when it was last de-selected.
Note) The FREE push-button offers an easy and fast method to locate unused Page Numbers. As long as you press the FREE button, unused Page Numbers in the current MEMOFILE are displayed one after another beside the *FREE indicator. If all memory Pages in the current MEMOFILE are occupied, *FULL will be displayed.
4.1.5 How can I clear all the Frequencies associated with a station?
1) Select the desired
MEMOFILE (e.g. 3. MEMORY FILE)
2) Enter the Number
of the desired memory page to clear by pressing the numeric push-buttons.
3) Press the FREE
button for a couple of seconds. The display will indicate *FREE and
the number of the memory page. WHEN YOU DO THIS, THE COMPLETE MEMORY
PAGE IS CLEARED!
4.1.6 How can I clear individual Frequencies?
1) Select the desired
MEMOFILE (e.g. 3. MEMORY FILE)
2) Enter the Number
of the desired memory page by pressing the numeric push-buttons and then
FREE briefly.
3) Use the "SEARCH
SELECT>" and "<SEARCH SELECT" controls to move the cursor to the various
alternate frequencies. (The frequency is displayed for each alternate frequency
as you move the cursor)
4) When you locate
the frequency you wish to clear, press the FREE push-button until a '-'
appears at the cursor position.
5) Press CL to
clear the display and return to Radio mode.
4.1.7 How do I Store a Radio Broadcaster on a New Page?
1) Tune your radio
to the desired frequency, IF Filter setting, and operating mode (LSB, USB,
AM, AM-SYNCH, Mono).
2) Enter the number
of the desired memory page by pressing the numeric buttons and then press
the STO button for a couple of seconds. As a confirmation, the display
will briefly show *MEMO and the number of the selected memory page.
3) Once the frequency
is stored, you may annotate the station ID by pressing the A-Z/0-9 button,
and then using the tuning knob to select the first letter of the identifier.
Once you've located the first letter, press the "SEARCH SELECT >" push-button
to select the second letter. Using the tuning knob, locate the second letter,
and so on. You may enter up to 8 characters per identifier. When
the desired identifier is complete, press the A-Z/0-9 push-button again.
You have now identified a memory page with a particular broadcaster (or
geographical region, or country, or city, or broadcast time, or whatever
you want). For FM stations with RDS, this last step is not possible, the
radio will automatically store the station name for you. Also, if you take
the radio to another location where a different broadcaster is using that
FM frequency, or the FM station changes its name, the radio will display
the name from memory until the RDS data has been received, then it will
change the display to the new name. The name in the memory will not be
overwritten, you will have to re-store the frequency to do that.
4.1.8 How do I store a Frequency in an Alternate Frequency Position?
1) Select the desired
MEMOFILE to use (e.g. 3. MEMORY FILE)
2) Tune to the
Frequency of interest.
3) Set the desired
IF Filter setting, and operating mode (LSB, USB, AM, AM-SYNCH, Mono).
4) Select the desired
page you wish to store the frequency into by using the numeric keys.
5) Briefly press
the STO push-button.
6) The display
will show the current memory page, with hyphens (---) denoting free alternate
memory positions, and asterisks (***) denoting memory positions already
in use. The cursor (current position) will flash.
7) Use the "SEARCH
SELECT >" rocker switch to select a free alternate location. (If
you elect to press STO push-button when the cursor is flashing on an alternate
frequency with an asterisk, that stored frequency will be overwritten with
the new one).
8) Press the STO
push-button and the frequency is stored.
9) Press the CL
button to return to normal Radio mode.
The first non-blank frequency
on a memory page will be the frequency the Satellit tunes to when the memory
page is called up with "#.##", MEMORY FILE.
1) Select TIME I/II
to display the clock of interest.
2) Enter the time
with the numeric keys (e.g. 6:30am = 6-.-3-0)
3) Press the TIME
I/II push-button. When this push-button is released, the clock will
start running and the colon between the hours and minutes indicator will
start flashing.
The easy (and truthful) answer is that both are good radios, and you really can't go wrong either way. Most people would agree that the Satellit provides better audio, better selectivity, better FM performance (and stereo), and superior SSB operation than the Sony (smaller tuning intervals), and the option of Manual AGC. Its shortcomings include higher cost, poorer sensitivity than the Sony, and a Synch detector that tends to rumble. If you are going to try to chase distant, low powered stations the excellent sensitivity of the Sony would probably make it the better choice. If your emphasis is on a portable receiver with good sensitivity and great fidelity, the Satellit 700 is the way to go.
Ha! Bet you thought I would try to dodge that question!
2) The audio is muted when I turn the tuning knob quickly, is this normal?
Yes, afraid so. Bandscanning can be tedious with the Satellit because of this idiosyncrasy. The Sony 2010 has the advantage here also.
3) I can't store my favorite frequencies in MEMOFILE 0. What's wrong?
You are trying to store your favorite frequencies into ROM (Read-Only Memory). ROM is programmed at the factory with a variety of frequencies, most of them for European listening locations. To store your own favorites, try using MEMOFILE 1. (Or MEMOFILEs 2, 3 or 4 if they are installed).
4) I intended to tune into Radio Netherlands via preset 0.5, but I'm receiving the Voice of America...What's going on?
Frequency allocation of shortwave frequencies are not carried out like TV or AM/FM radio stations. Shortwave Broadcasters typically share frequencies, so at different times of the day different broadcasters may be on the same frequency.
5) I had previously stored a station in MEMOFILE 1.4 with the IF setting in WIDE mode. Now when its recalled, it's in NARROW mode! What's going on?
If you call up a station from memory, and change the bandwidth or operating mode then the new settings are automatically stored in the current MEMOFILE position. If you call up a station, and tune the radio frequency off slightly and back again (Station ID has been removed from the Alphanumeric display), changing the modes or bandwidth has no effect on the MEMOFILE contents.
6) Can I recharge Ni-Cad batteries without removing them from the radio?
Yes, make sure the Ni-Cads are installed in the radio correctly, and that the ACCU/BATT switch in the battery compartment is switched to ACCU. The ACCU indicator on the LCD should light up if the switch is set for Ni-Cad batteries. If normal Alkaline "D" batteries are in the radio, the ACCU/BATT switch should be set to BATT, and the ACCU indicator on the front panel should NOT be lit up. Attempting to charge standard alkaline batteries may cause them to leak, possibly ruining your radio. 4Ah Ni-Cads should be used, standard ones (1.5 to 1.8Ah) will run the set for less than 10 hours on a full charge.
7) Is the Ni-Cad charging circuit built into the external power adapter or the radio?
The charging circuit is built into the radio. Any external power source which provides 9-12 volts with at least 500 mA capacity will work fine.
8) How can I tell when the batteries in my radio are getting low?
When the Satellit is turned on while powered by the internal batteries, the indication BATT/ACCU will appear in the display under the signal strength indicator. The signal strength indicator will indicate the current condition of the batteries. When the batteries are near the low end of the solid bar under the indicator, the batteries are nearly depleted. Fresh batteries will result in a full-scale indication.
9) I'm trying to receive a shortwave station and another one is interfering with it. How do I reduce the interference?
Simply off-tuning by 1 or 2 kHz may help. If not, select NARROW bandwidth and see if that does the job. If it doesn't, activate the Synchronous detector by pressing SYNCH. If the interfering station is below the station of interest, tune the Satellit upward until the USB indicator comes on. If the interfering station is above the station of interest, tune the Satellit downward until the LSB indicator comes on. You are now in the optimal configuration for receiving the signal of interest. If the station is still being interfered with, you are out of luck.
10) How can I connect an external antenna to my Satellit 700, it doesn't use a standard PL-259 connector?
A connector is supplied with the radio, but if it has been lost, US residents can try Universal Radio in Reynoldsburg, Ohio has a Satellit 700 antenna connector (P/N #0199) for $4.95. Their phone number is 800-431-3939.
The connector is a DIN type 45325, and is designed for use with 50 ohm or 75 ohm coaxial cable. The Radio Shack "European TV" adapter will plug into the Satellit connector, and effectively change the connection at the radio to a type F video/FM connector, which is easily dealt with.
In Europe, the connector is widely available, being the same as a female TV antenna connector.
11) When I switch my Satellit 700 into Synch mode, there is an annoying low pitched rumble. How can I reduce or eliminate this problem?
Detune from the station's carrier frequency by 100 Hz either direction and see if that reduces the problem. You may also want to turn down the bass control. You may not completely eliminate the problem, it is a known shortcoming in the design/alignment of the Satellit 700.
12) When tuning Single Sideband signals, the transmissions still sound like Donald Duck. What can I do to improve the sound?
Make sure you are tuned to the correct sideband (LSB or USB). For amateur frequencies below 10 MHz, LSB is normally used. For amateur frequencies above 10 MHz, USB is normally used. Commercial broadcast and Utility stations normally use USB.
Select Narrow IF bandwidth.
Tune the main tuning knob for the clearest reception, and then use the Clarifier control on the right side of the radio to fine-tune for optimum audio. You should be able to get good quality audio if you tweak it enough. Even the Narrow IF filter in the Satellit is too broad for optimum SSB reception, which may cause problems if there are several transmitters using SSB on nearby frequencies. This is a shortcoming shared with most portables.
13) OK, the SSB transmission sounds clear, but the signal is fading badly. Now what?
Turn the AGC control to manual and adjust it for best reception. The LCD display will indicate "MGC" when you are in Manual. Remember to turn it back to the Automatic AGC position when you're done.
14) How do I manually peak the pre-selector in the radio?
While the microprocessor in the Satellit adjusts the pre-selectors in the radio based on the current frequency being monitored, it may be possible to improve reception by manually peaking it. To ensure the best performance when dealing with weak signals, tune the pre-selector network by pressing the MONO push-button and keeping it pressed while adjusting the tuning knob for maximum level on the Signal Strength indicator. (*PR-SEL will appear in display while you do this)
15) I'm trying to listen to a very weak signal but I can barely hear it. What can I do to improve the signal?
Make certain that the DX/LOC switch on the side of the Satellit is set to DX.
Make certain that the AGC/MGC control is set to AGC.
Select Narrow Bandwidth
Peak the Preselector (see question #14)
Turn down the treble
Use an external antenna. Radio Shack's wind-up reel antenna works quite well with the Satellit 700, improving signal levels without overloading the front-end of the radio. Note that attaching the antenna to the Satellit's whip allows the whip RF pre-amp to remain in the circuit, and provides a better signal than using the EXT jack on the side of the radio. The similar Sangean ANT-60 antenna should work well also.
16) Does selecting the external antenna jack disable the internal ferrite rod antenna for longwave and mediumwave reception?
No, the external antenna jack is active for frequencies above 1612 kHz. The internal ferrite rod antenna is always in the circuit. Remember this trivia tidbit if you are trying to DX these bands with loop antennas.
17) Is there any easy way to recall the last frequency I recalled from a memofile?
Yes, press the MEMORY SCAN push-button once.
18) Is there any easy way to recall the last frequency I manually tuned to?
Yes, pressing 0 and FREQ/m-Band tunes to the last manually tuned frequency in the currently selected waveband.
19) My radio has stopped responding to all keyboard commands. What do I do?
If *LOCKED is displayed when a button is pushed, the LOCK switch on the left side of the radio is in the wrong position. Slide it to the UNLOCKED position.
Make sure you have sufficient power to run the radio. Plug in the AC adapter and run it from the wall outlet. Does it work now?
If it doesn't, the Microprocessor RESET push-button is located just to the left of the MEMOFILE sockets on the lower right side of the radio. Open the cover and press this button with the tip of a pen or pencil, or the pointed end of the supplied memofiles pliers, and see if the radio responds. Pressing this button will NOT affect the stations & frequencies stored in the MEMOFILES, however it will clear the clocks, last tuned station, and TIMER OFF and ON settings.
20) My Satellit 700 has developed a problem, how do I contact Grundig for Service/Repair work?
In the US, contact:
Lextronix, Inc. 3520
Haven Ave. Unit L
Redwood City, CA 94063
650-361-1611
800-872-2228 from 8 AM
to 4 PM PST on weekdays.
or visit http://grundigradio.net
and look at service details there.
Elsewhere, Grundig has
details of each countries dealer networks on the local Grundig website,
which can be reached from the main website, http://www.grundig.com
*RDS-Q : Displayed when the RDS data error rate mode is selected. The actual error rate replaces the signal strength indication, if all 16 indicators are lit the error rate is 0%, if 8 indicators are lit the error rate is 50% etc.
*NO AF : No Alternative Frequencies are available for this broadcaster.
*PR-SEL : The pre-selector may now be tuned manually with the tuning knob for best reception.
*MEMOXX : This frequency is already stored in memory location XX.
*FREEXX : Memory position XX is not occupied.
*NEW : The frequency being stored is not yet stored in the current MEMOFILE.
*FULL : All pages in this MEMOFILE are used.
*NO MEMO : The current MEMOFILE is erased or has no entries.
*LOCKED :
The locking switch on the side of the radio is set to the "LOCKED" position.
**TIMER : No On/Off times are programmed.
**TIME : Time of day or On/Off times are not entered correctly.
**FREQ : Frequency was not entered correctly.
**M-Band : The Shortwave band was not entered correctly.
**MEMORY : The Stations memory position was not correctly entered.
**ROM TAB : When
MEMOFILE 0 is selected, the STO and FREE keys do not function normally.
MEMOFILE 0 is Read Only Memory and may not be altered.
Operation: Grundig Owner's Manual for the Satellit 700
Postings to the rec.radio.shortwave
newsgroup and e-mail from the following
fine folks:
George Snyder
gjs@camb.inmet.com
David Thorn
dthorn@kodak.com
Prof. Ulrich Bottler
ubottler@roxi.rz.fht-mannheim.de
Steve Higgins, who created
the FAQ file from which I produced this. Steve has now sold his Satellit
700 and hence no longer actively supports the radio. We still thank him
for his sterling work in producing this document.
Thanks to George Snyder
and David Thorn for reviewing Rev 1.0 of this FAQ.
If you would like to contribute
to the Satellite 700 FAQ, please contact me
at grundigradioboy@hotmail.com