
| QuickLinks | Home | GA-586HX | Hot-Swap | AP5T-3 | Q3Test/TNT2 | PA-2012 | H/W-Hack | JiuZhaiGou | Wallpaper |
As usual this is the essential first step. I browsed Deja.com to search the alt.comp.periphs.mainboard.fic and alt.comp.periphs.mainboard forums, and looked through the FIC PA-2012 Support Page for any relevant info, files and documents. Then, I fired up my multimeter and began an intense study of the mobo itself, tracing leads and jumpers, and measuring resistors.
I found a few posts in the newsgroups discussing the PA-2012 and the K6-2 and K6-III CPUs. Some people complained that it didn't work and that the mobo became unstable. A few people claimed their PA-2012 worked fine with the K6-2.
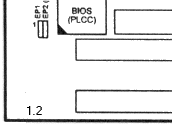
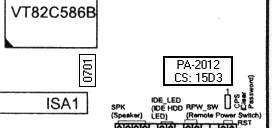
There seems to be 2 revisions of the PA-2012; revisions 1.1 and 1.2. Revision 1.2 may be the more common one. Besides the revision number at the bottom-left corner, there are also some other markings near the VIA South-Bridge chip (VT82C586B). Specifically, the mobo I had showed "0701" and "CS: 15D3".
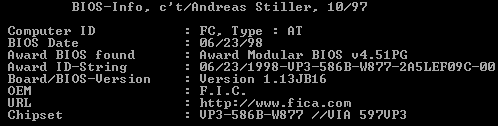
The latest version of its BIOS is AWARD BIOS Version 1.13JB16 dated 06/16/98. See the FIC PA-2012 BIOS page for more info. According to FIC this BIOS has CPU ID for the K6-2, but does not mention the K6-III.
I flashed the BIOS by following the procedure recommended by FIC :-
This is what the CTBIOS utility reports :-
4. Set the clock multiplier and bus frequency
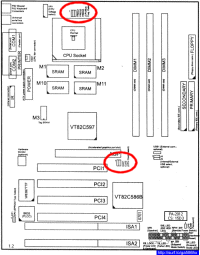
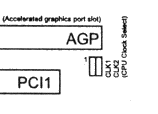
The clock multiplier is controlled by jumpers FREQ1, FREQ2 AND FREQ3. The bus frequency is controlled by jumpers CLK1 and CLK2.
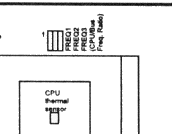
This table shows the clock multiplier settings :-
| K6-2/K6-III Clock Multiplier |
BF0 | BF1 | BF2 | FREQ1 | FREQ2 | FREQ3 |
| 2.5 | 0 | 0 | 1 | 2-3 | 2-3 | 1-2 |
| 3.0 | 1 | 0 | 1 | 1-2 | 2-3 | 1-2 |
| 3.5 | 1 | 1 | 1 | 1-2 | 1-2 | 1-2 |
| 4.0 | 0 | 1 | 0 | 2-3 | 1-2 | 2-3 |
| 4.5 | 0 | 0 | 0 | 2-3 | 2-3 | 2-3 |
| 5.0 | 1 | 0 | 0 | 1-2 | 2-3 | 2-3 |
| 5.5 | 1 | 1 | 0 | 1-2 | 1-2 | 2-3 |
| 2.0/6.0 | 0 | 1 | 1 | 2-3 | 1-2 | 1-2 |
This table shows the bus frequency settings :-
| Bus Frequency | CLK1 | CLK2 |
| 55MHz | 2-3 | 2-3 |
| 60MHz | 2-3 | 1-2 |
| 66MHz | 1-2 | 1-2 |
| 75MHz | 1-2 | 2-3 |
These are the settings I tried :-
| CPU Frequency | Clock Multiplier | Bus Frequency | FREQ1 | FREQ2 | FREQ3 | CLK1 | CLK2 |
| 366MHz | 5.5 | 66MHz | 1-2 | 1-2 | 2-3 | 1-2 | 1-2 |
| 400MHz | 6.0 | 66MHz | 2-3 | 1-2 | 1-2 | 1-2 | 1-2 |
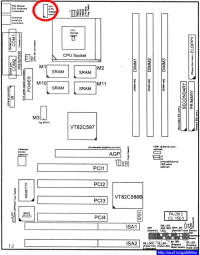
The PA-2012 has a bank of jumpers called VR1 that controls the amount of core voltage supplied to the CPU. It consists of 5 sets of 2-pin jumpers.
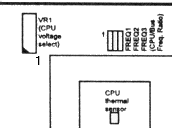
This table shows the different core voltage settings :-
| VR1 | Core Voltage |
| 1-2 | 3.3V |
| 3-4 | 3.2V |
| 5-6 | 2.9V |
| 7-8 | 2.8V |
| 9-10 | 2.1V |
The last position, VR1(9-10), is specified to be 2.1V. FIC included this setting to provide support for the K6-266 and K6-300 CPUs. Unfortunately, according to FIC, these CPUs were not tested with the PA-2012. Well, the rest is history, because when AMD released its K6-266, K6-300 and subsequent K6-2 CPUs, they required 2.2V core voltage. This effectively left the PA-2012 owners, who had hoped for an easy upgrade path, high and dry. This is also probably the reason why some of these owners have had unstable results when trying to run the K6-2 on their PA-2012 mobos.
It looked like I couldn't depend on the 2.1V setting, and so would have "make" my own 2.2V and 2.4V settings to get it to run the K6-2 and K6-III in a stable manner.
The area around VR1 consists of 5 pairs of jumper pins and 5 surface mounted resistors, one for each jumper position. The jumper pins and resistors are connected as shown in this diagram.
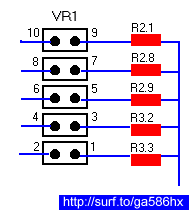
Using my multimeter, I measured the resistance of each resistor and the actual core voltages with VR1 jumpered. These are the results :-
| VR1 | Resistor | Actual Core Voltage(V) | Resistance(KW) |
| 9-10 | R2.1 | 2.139 | 2.871 |
| 7-8 | R2.8 | 2.865 | 1.368 |
| 5-6 | R2.9 | 2.983 | 1.260 |
| 3-4 | R3.2 | 3.298 | 1.043 |
| 1-2 | R3.3 | 3.374 | 1.000 |
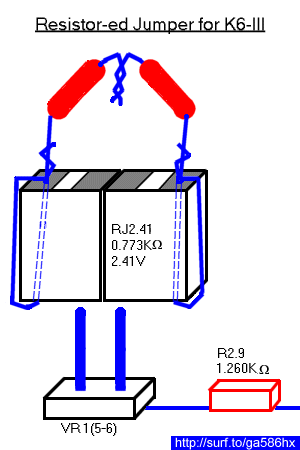
From observation, I would have to add resistance in order to obtain the desired 2.2v and 2.4v. With some trial and error, I got these readings :-
| VR1 | Resistor | Resistance (KW) |
Added Resistance(KW) |
Total Resistance(KW) |
New Core Voltage(V) |
| 5-6 | R2.9 | 1.260 | 1.170 | 2.430 | 2.26 |
| 5-6 | R2.9 | 1.260 | 0.773 | 2.033 | 2.41 |
To add resistance, I used Resistor-ed Jumpers (RJ) similar to those I used for the AP5T. Each one is made up of 2 jumpers and 1 or more resistors. I made one for the K6-2 and one for the K6-III.
For the K6-2, I used a RJ
with resistance of 1.170KW and
added it to VR1(5-6). This gave a total
resistance of 2.430KW and a core voltage of 2.26V.

For the K6-III, I used a RJ with resistance of 0.773KW and added it to VR1(5-6). This gave a total resistance of 2.033KW and a core voltage of 2.41V.
Important Note :
Newer versions of the
K6-III use a 2.2V core voltage instead of 2.4V. See the K6-III
Core Voltage page for more
info.
7. Cross 'em toes and boot 'er up!
At bootup, the BIOS detected the K6-2 as a K6-2 366MHz.
For the K6-III, I tried it with System BIOS Cacheable=ENABLED and it worked. This is unlike the GA-586HX and AP5T, which hanged unless System BIOS Cacheable was set to DISABLED. The PA-2012 booted without problems, but detected the CPU as a K6-400MHz. Evidently FIC did not include the K6-III CPU ID in the BIOS.
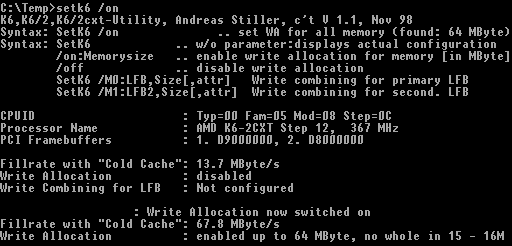
I tried the SETK6V2 (setk6v2.zip (157.0KB) or Website) to see whether the BIOS enables Write
Allocation. It does not.

However, Write Allocation can still be
enabled by running the SETK6V2 utility.
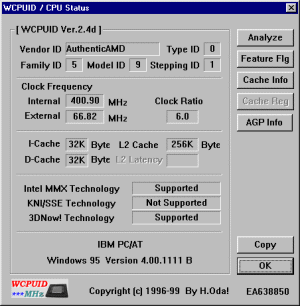
These are what WCPUID utility (wcpuid.zip (57.6KB) or Website) reported :-
K6-2 366MHz (66 x 5.5)
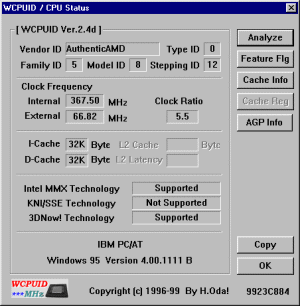
K6-III 400MHz (66 x 6.0)

To test the entire system stability, I ran Winstone 98 in "demo" mode. This mode runs through the benchmark, reboots and then starts all over again. I ran it this way for more than 4 hours.
It worked great!! :)
| QuickLinks | Home | GA-586HX | Hot-Swap | AP5T-3 | Q3Test/TNT2 | PA-2012 | H/W-Hack | JiuZhaiGou | Wallpaper |
|