Back to Part 3
Tuners
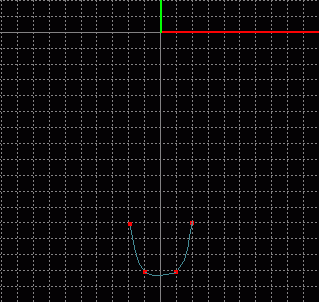
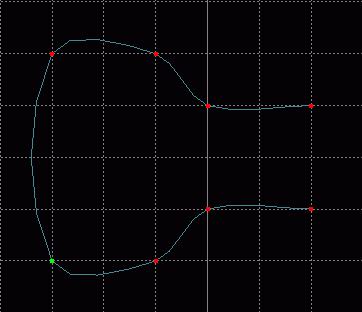 Select that temporary patch_obj created earlier for modeling the top of the neck. Rename it guitar_tuners and change the color to a silver-gray. The reason I keep placing the word guitar at the beginning of the patch name, is that I may use this object in another scene someday and this way all of the guitar patches will be grouped together in the Dialog Window. Switch to a Front view, Show Only Select Object and draw the outline of a tuning knob with grid spacing .25 and select Grid Lock - All (do not connect the end points).
Switch to a Right view, Select - All and Extrude the outline 1 grid space along the Z-axis. Now switch to a Perspective view and with Grid Lock set to None connect corresponding points including the end points this time. However, connecting the corresponding end points creates a spline completion along the wrong spline. I wanted it to appear as if there was a four point circle at the end of the tuner, but it appears as if the tuner is a stretched half cylinder on the end instead. This would have happened even if the points had been connected before extrusion. The reason why is that the first spline to be completed is the first spline created. The first spline created was the outline, the second was the connecting spline of the extrusion. If we leave the current curves as they are and create new connecting curves to the same corresponding endpoints the next spline created will be completed. After the secondary curves have been added, use the  Select Curve tool and the
  Delete Select Curve tool to remove the curves completing the first spline.
 Select and
  Peak the curves of the flatter part. Square Select the 4 points (realy 8, looks like 4 in Ortho) that make up the flat part and switch to a Right view. Scale only in the Z-axis until the points are positioned half their original distance apart. Choose Select - Inverse from the menu so that only the points making up the rounded portion are selected. Scale these points along only the Y-axis until they appear more circular, but do not make them too small.
 Show All Objects, Select - All points of the tuner, and make sure you are in a Front view. That tuner knob is almost as large as the head, it needs to be scaled in all axes until it is about the correct proportionate size (it should be a little less than 1/8 the entire head which is about 1.5 grid spaces). Translate it in any axes needed to line it up on the upper left of the model about two grid spaces from the top. You may want to switch to a Right view as well and make sure the tuner is not inside the head but below it. Save current progress. guitut09.hmp
Gears
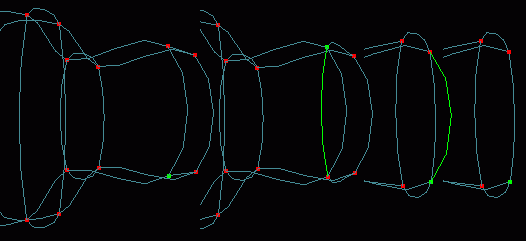
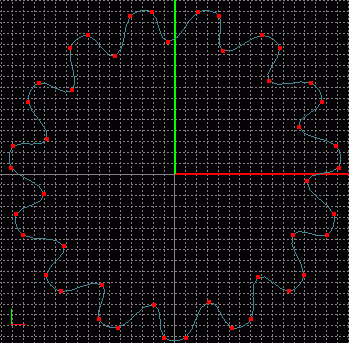
 Go back to the temporary patch_obj made earlier, rename it guitar_gears and change the color to the same as the tuners layer. The gears will be constructed of many patches and may take up needed memory, however, they may not always be necessary for a scene and this way their layer can be left out of export and the absence of the unseen gears will save memory. Change Grid Setting to .05 with Grid Lock - All selected and in a Front view draw the outline of one gear prong. I drew the bottom most prong and placed it the same distance from the origin as the desired radius of the gear in preparation of an array operation.
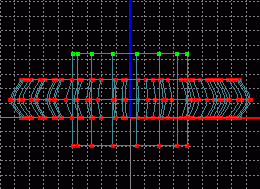
Select Grid Lock - None, Select - All points and choose Edit - Copy from the menu. Choose Edit - Array and create 14 copies rotated 24 degrees about the Z-axis. Assuming you also drew the bottom most prong, start with the right most point of its outline and translate and weld it to the next closest point. Continue in this manner with every other point in the array to get a slightly slanted outline like in the picture.
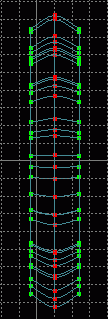 Switch to a Right view and with Grid Setting set to .1, Select - All points of the new gear outline and extrude twice along the Z-axis a little less than one grid space each time. Select - None and, using the
  Square Select tool two times, select only the right most and left most extrusions.
  Scale the selected points in all axes about 1 grid space.
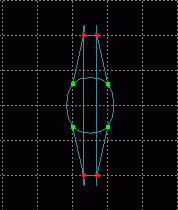
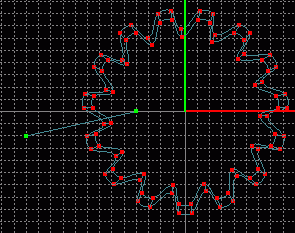 A circle needs to be inserted in the middle of this gear outline so that a hole can be made in the middle and that we may have something for corresponding points to actualy correspond to. Staying with the idea that 4 point patches are always best, we would need a 15 point circle. Since that Clip Shape is not available under Model - Insert it must be created. In a Front view, turn Grid Lock - All on, use the
  Add Point tool to draw a line starting 4 grid spaces from the origin ending 2 grid spaces down from the origin on the Y-axis and as far away from the gear model along the X-axis as you wish.
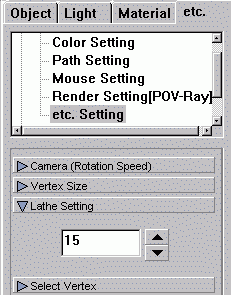 One point of the newly added line should still be selected. Select - Connected and (if it is not already opened) open the Dialog Window by choosing Window - Dialog Window from the menu. Click the etc. tab and in the white option area click the + beside Configuration then choose etc. Setings and type 15 in the entry field for Lathe Setting which will appear in the gray expanding options area.
 With both points of the line selected, click the
  Lathe tool to create an odd conic shape. Select - None then use the Square Select tool to select the lower set of points and press the Delete key. Select a point on the remaining circle using the Square Select tool and Select - Connected. Choose Model - Rotate from the menu and type 90 in the X field. In a Top view Translate the circle along the Z-axis until it lies slightly below the gear outline. Extrude the circle and translate the extruded portion along the Z-axis until it lies just above the gear outline.
Remain in a Top view and Select - None. Use the Square Select tool to select the top circle of the extrusion and the top most gear outline. Choose Model - Align Points and make sure the only box checked is the one in the Z-axis row. Since the circle needs to be aligned with the top of the gear and it is currently above it on the Z-axis the points need to be aligned at the minimum Z value. Click the button under the Min column in the Z row and then click OK. Select - None and use Square Select to choose the bottom circle of the extrusion and the bottom gear outline. Use the Align Points option under Model on the menu to align the points at the Max value of the Z-axis. Save current progress. guitut10.hmp
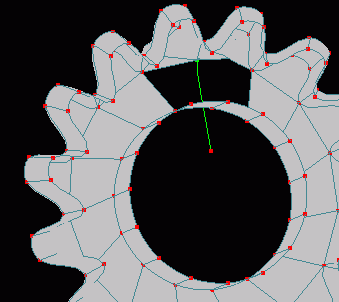 The hole needs to be connected to the outer gear to form a face. However, one of the faces will always be pressed against the guitar's head and therefore does not need to be created, so connecting splines only need to be added on one side (the side that points away from the guitar). Connecting splines also need to be added between the points of the gears prongs on this same side. Switch to a Perspective view and Pan and Rotate the camera until the view is comfortable enough for you to add and weld points to create connecting splines between corresponding points. You may need to readjust the view several times during the process. It is also helpful to turn on and off Show - Surface in the View window at necessary intervals to note your progress. Although it is helpful to leave Show - Surface on when connecting points, the surfaces can sometimes obstruct points and make it impossible to weld correclty and the Surface must be turned off. Also problems can sometimes arise from Grid Lock being left on All or some axes being turned off so always check these settings first to avoid difficulties. Remember to create the spline away from the model and drag back toward. Select the proper curve and Peak when needed as soon as you make the weld to save time selecting points and curves later on.
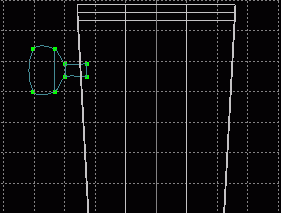
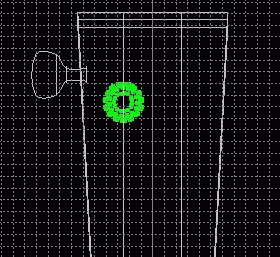 In a Front view Select - All points and Translate the gear up to the head of the guitar. Once the gear is near the tuning peg, click the Scale tool and in the Y and X axes only scale the gear to about 4 grid spaces across (with grid setting at .1). Switch to a Right view and Scale in only the Z-axis to about 1.5 grid spaces. Translate the gear until its point closest to the tuner's position on the X-axis lies about 1 full grid space from the tuner and about 1 grid space down from the closest end of the tuner. Also switch to a Right view and make sure the gear does not lie within the head of the guitar. Save current progress. guittu11.hmp
Tutorial created by Jonathan Lee Dec. 31, 2001. Updated Jul. 13, 2002 for version 2.8.1.
Submit question, comments, or ask for further instruction from draven2561@hotmail.com
Part 5
Home