
One of the most appealing features of HTML is also one of the most frustrating to beginners - without reason: forms. Why are forms so neat? Because they give your visitors a chance to interact with you. Why are they so frustrating? I dunno...they're easy!
Okay... how do forms work? Well, you can think of forms as a form (pardon the pun) of e-mail; when your visitor clicks the SUBMIT button, the form is transmitted to your site's server, which forwards the form results to you via e-mail. This action is cauised by the <FORM ACTION> tag; forms for my page would have the FORM ACTION tag coded as follows:
Before I tell you about the tags used to create forms, I'm going to tell you about the pages that forms appear on: they're web pages just like any other - you can have backgrounds, use colors for text, imbed images, and do pretty much anything you can do on a "regular" page - because it is a regular page!
I'm sure you've seen forms on the web - in fact I know you have, because you had to fill one out to get your GeoCities homestead! So what are all the pieces, you ask? I'll tell you, I say!
Form input may be collected using a number of field formats called INPUT TYPEs:
There are two common attributes for all input types:
Now for the specific input types and their unique attributes.
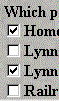
Checkboxes allow the visitor to select one or more options from a list. For example, checkboxes might be used to ask you visitor which of your pages they visited - like my example, taken from our own survey form. I list all the pages in our site and ask our visitors which page(s) they visited; the use of the CHECKBOX input type allows the visitors to "check off" more than one option from my list.
Here's the code for part of the checkbox section of our survey form:
<B>Which page(s) did you visit?</B><br>
<input type="checkbox" name="visited home">Home page<br>
<input type="checkbox" name="visited Lynne's pictures">Lynne's picture page<br>
<input type="checkbox" name="visited Lynne's stuff">Lynne's 'stuff' page<br>
<input type="checkbox" name="visited RR">Railroad page<br>
<input type="checkbox" name="visited CY">Camden Yards<br>
It should be noted that there is no logical connection between all the above choices - that is to say, the members of the list for which checkboxes are provided are not tied together by a common parameter. Let'e look more closely at one of the above checkbox lines to see what's there:
Okay.... let's see: the input type="checkbox" is obvious - it says that this field is a checkbox. The name parameter, as indicated previously, is the name that will appear in the form response beside the visitor's reply, and Home page is the text that will appear beside the actual checkbox on the form.
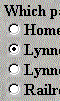
Radio buttons restrict the visitor to only one choice from a list. For example, radio buttons might be used to ask you visitor what planet they're from, or if they like moldy bread in their soup (yuck!). Obviously - especially for the moldy bread question - the visitor will have one distinct answer.
Okay - so why are they called "radio buttons"? Because they act like the tuner selection buttons on car radios where you push one in and whichever one was in before pops out; only one button can be in at a time, because the radio can only tune in to one station at a time - just like you want your visitor to select only one answer at a time.
Here's the code you would use to ask your visitors, what planet are you from?
<B>What planet are you from?</B><br>
<input type="radio" name="planet" value="venus">Venus<br>
<input type="radio" name="planet" value="mars">Mars<br>
Radio buttons are a little different, codewise, from the checkbox becuase the different options in the list are related to each other by virtue of the fact that they all have the same value in the name parameter. This is why the radio button, unlike the checkox, has the value parameter. It is the text specified in the value paramter for the choice the visitor makes that will be passed in the posted form when that "button" is pushed. For instance, in the above example, if the visitor clicked the radio button labelled Venus, the form response sent to the site would say Venus beside the field identifier planet.
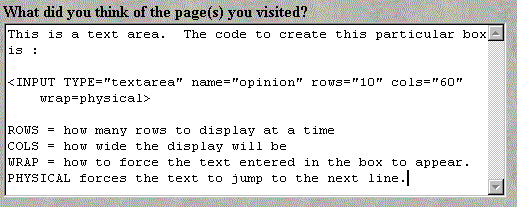
The text in the above box pretty much tells it all...except to say that the rows and cols parameters only indicate how much data will be displayed on the form page; the amount of data that may be entered by the visitor is infinite.
A little more about the wrap parameter, too. Another option is virtual; this also forces the text to wrap on the form page when entered, but when the text is sent in the form response it is NOT wrapped, but is sent instead as one long line (if wrap=physical is specified the text is sent with line breaks as it appears on the form page).

These are pretty straight forward - only one attribute for each button:value. This is totally cool because it allows you to label the buttons anyway you wish. Unfortunately you can't use images, only words - but it can be any word or phrase you want, not just SUBMIT or RESET.
The code to create SUBMIT and RESET buttons that I used for this example is:
    <INPUT TYPE="submit" value="Your Message Here">
    <INPUT TYPE="reset" value="Oh, forget it!">
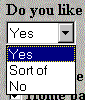
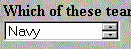
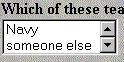
The last input type we'll discuss is the SELECT box, where you give your visitor a list of options to choose from. This is much like a CHECKBOX or RADIO BUTTON lists, except that it only takes up one line on the fom page.

|
The SELECT box looks like a TEXT box, except that there is a little arrow to the right of the window. |
|
when your visitor clicks on the arrow - or in the window - a list of options appears over whatever else is on the page |

|
when the visitor clicks on an option, the list disappears and the option they clicked on appears in the window. |
To create the box in the examples above, I used the following code:
	<B>Do you like college football?<B><BR>
	<SELECT NAME="like-football">
	    <OPTION>Yes
	    <OPTION>Sort of
	    <OPTION>No
	</SELECT>
Coded in this manner, the SELECT input type acts like a RADIO BUTTON input type, allowing only one option to be selected from the list.
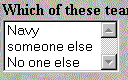
There is a way to allow the visitor to select more than one option from the list: just insert the MULTIPLE parameter in the <SELECT> tag.
The use of MULTIPLE causes the browser to display a window with all the options available. To limit the number of lines displayed on the form, use the SIZE=n parameter to force the browser to display a certain number of lines. NOTE that the value of the SIZE parameter should be greater than 1, otherwise you get a really strange-looking, single-entry window with two dinky arrows where there should be one big arrow.
The code to create a box where the visitor may select mutiple items is :
<SELECT NAME="field-name" MULTIPLE SIZE=n>The n is the number of options to be displayed in the SELECT window when the form is displayed, not the number of items the visitor is allowed to select.
Here are examples of the different ways to code the MULTIPLE option of the SELECT tag:
|
When MULTIPLE is specified with no SIZE parameter, all the options for that SELECT are listed in a box |
|
If you specify SIZE=1 you get a strange-looking window that will confuse your visitors (they won't know if there are more options or not, and they'll only see one at a time) |
|
but if you sepcify a size grteater than 1 and less than the total number of options available, the form will display a window containing as many options at a time as you specify, plus a scroll bar to indicate to the visitor that there are more options. |
If you use the MUTIPLE parameter of the SELECT tag, ADVISE YOUR VISITORS how to make multiple selections (they may not already know):
 the second of two parts
 and more cool stuff...honest!
 Back to Navpooh's Home Port
 Back to HTML tutorial index