|
|
Welcome to Heritage Pastimes Scrapbooking! These are a few of the pages that we have been working on, and some of the supplies that we have used. Click on each of the underlined links to see the materials used, and make your own wonderful pages!! ... And please let us know what you are working on (via the link at the left). We would love to share your ideas too!! ... Have Fun!! |
|

T. Moss, Oshawa, ON
"Strasburg Railroad" ~ Peek and Pull Pages
These pages were done on 12 x 12" cardstock using Pumpkin Heritage Cardstock with accents of Mocha Brown and Cinnamon Cardstock cut in squares and shapes to look like a train.
Peek and Pull pages are an excellent idea for crammed pages with too many photos or just the need for a little creativity!

Peek and Pull: On the left side, a piece of folded cardstock has been attached to the background with a photo on the front flap and another underneath. On the right side, a slit has been cut in the background paper, just behind the top of the train edge, and a matted photo is inserted between the layers of cardstock. Place a piece of adhesive under the background page at the bottom of the train to prevent the matted photo from slipping between the layers.
|
|
Black and White Photographs
Create your own Heritage with Black and White photos. All it takes is a little Acid Free Black Cardstock, some Heritage papers, and a few notes. Remember to include ANY information that you know about the photos.
|
|
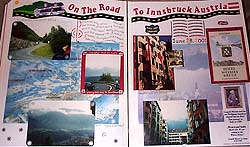
D. Lasko, MI, USA
"On the Road":
These pages were done on large 12 x 15" pages.
Include background papers or even maps of the travelled area (best copied onto Acid Free paper) to add interest and flair to your pages.
Here, corners are rounded on photos, and headlines were used to title the pages.
|
 |
|
|
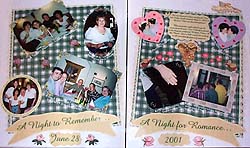
D. Lasko, MI, USA
"A Night to Remember"
These pages were again done on large 12 x 15" paper with a decorative footer and background paper. Edges were rounded using rounding scissors/punch. (Finger nail clippers also work well!)
|
|
|
|
D.Cyr, Oshawa, Ont.
Supplies:
12 x 12" Plum Country Red Heritage Cardstock;
Trim and frame photos in Black Cardstock leaving extra room around photo to punch "film strip" effect;
Use ruler to space holes;
And use regular hole punch for "film strip" effect around photos and to add decoration between photos on page;
Add journalling around photos.
|

|
|
|
D. Lasko, MI, USA
"Castle Linderhof":
Done on 12 x 15" pages and decorated with
bright geometric shapes of yellow and green cardstock.
Shapes are effective and easy to do around letters in title.
|

|
|
|
D. Lasko, MI, USA
"Castle Neuschwanstein":
Done on large 12 x 15" pages.
Rounded or Oval photos add variety to the page. Arrange other photos separately around cropped photos or cut rounded shapes into the sides of other photos as seen here.
Effective cut out of castle in lower left corner, with the cut out piece used in upper left center!
|

|
|
|
Scrapbooking is not just for Photo Albums
Try your own scrapbooking ideas to create fabulous greeting cards. What a wonderful and constructive way to use up all those double prints and extra bits of paper!
Use acid free materials, starting with an 8.5" x 11" sheet of cardstock, folded in half. Scrapbookers can transfer finished cards right into the pages of their photo albums as completed "half pages". Makes for wonderful keepsakes!
|
|
|
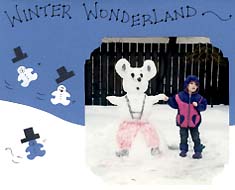
Winter Wonderland
Supplies:
Royal blue and white cardstock, adhesive, acid-free pen, scissors
Crop your photo and add it to a "snowscape" cut from the white and blue cardstock. The snowmen were made using a teddy bear paper punch (the ears were trimmed off afterwards) from scraps of the same cardstock. Be sure to write details of the photo in an acid-free pen to allow for scrapbooking your card as a future keepsake.
|
 |
|
|
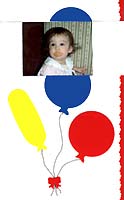
Happy Birthday with "Peek" Window
Supplies:
White cardstock (for card), cardstock of various colors (for decorative elements), rubber stamps and inks, adhesive, acid-free pen, scissors, utility knife
This makes a really cute Birthday card for young or old. Fold a sheet of white cardstock in half. Adhere a photo to the inside of the card making sure the subject is centered. Add any matting using other colors of cardstock or paper. Measure 1" below, 1" above and 1" to each side of the image. Transfer those measurements to the front of the card to determine where the "window" will line up with the inside image. Cut two horizontal slits in the card, centered and parallel to the top of the card, about 2" apart. Join these two slits with a vertical slit down the middle. Fold back the pieces to create a "peek" window. |
 |
 |
Add decorations to the front of your card around the "window". In our example, die cut balloons were used with pen markings for the string, and a paper punch bow to bring the strings together. A "Happy Birthday" was stamped using acid free inks and embossed to give a glossy shine. |
|
The edge of the card was trimmed using Fiskar Fancy Edged "Ripple" Scissors and a strip of red cardstock was attached to the underneath as trim. Inside, the photo was trimmed with four black triangular pieces, resembling photo corners. And an embossed, rubber stamped, note matted underneath. Be sure to write details of the photo on the front or inside flap of your card in acid free pen to allow for scrapbooking your card as a future keepsake.
|
 |
|
|
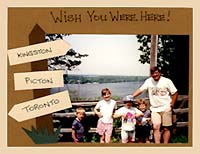
Wish You Were Here
Supplies:
Neutral colored cardstock (for card), cardstock of various colors (for decorative elements), adhesive, acid-free pen, scissors
Create the base of the card by gluing a slightly smaller sheet of cardstock to a darker, larger sheet. Add a cropped photo off center and decorating is easy... Dark brown post, with pointed end; cover bottom with sprig of grass or paper punched flowers; add signs to the post indicating direction and destination. "Wish You Were Here!", "Remember When...", or "Thank You For The Visit". |
 |
|
|
Submit your ideas!
Do you have some interesting examples of your own scrapbooking? Would you like to share them with others? Just scan in your piece and attach it to an email with your name and city of residence. While we can't use every submission, we'd like to refresh this page with new ideas every now and then.
Scanning instructions:
Scan your piece so that the finished file size is no more than 4.25" x 5.5" at 72 dpi (so if your piece is an 8.5" x 11" page, scan it at 50% of actual size). Save the file as a JPEG (.jpg extension on the filename) and attach it to your email message sent to: heritagepastimes@bigfoot.com |
|
|

