Lets build...First thing we need to do is create a new folder somewhere on your harddrive, desktop or on a zip disk and name it something like Website or WWW. This folder represents your Root folder and will be a mirror image of your Root folder where your space is on your web server. This folder will contain all of your HTML documents and will also contain other folders which will contain your images, multimedia and other files. So now that you have created a Website Folder go ahead and launch whichever HTML Text Editor you have choosen to use and make sure a New Blank Document is created. Most HTML code requires Start Tags and End Tags. A Start Tag declares a function the End Tag declares the end of the function. The First peice of code that any HTML document contains is the declaration that this is an HTML document. This is accomplished by typing <HTML> This is your Start Tag. The last thing on your page should be your End Tag. </HTML> Notice the End Tag has the forward slash ( / ) in it. This is what tells the browser that the tag has ended. So now that we have an HTML document we need to decalare the basic parts of the page. They are the HEAD section and the BODY sections. The HEAD section contains mostly information that Browsers don't display except for a special Tag for the TITLE of the page. This is what will display at the top of a page of your web browser. Notice at the top of my page it says "10 Days to HTML". The BODY section contains the actual stuff you see on your web page. So anything you want a Web Browser to display make sure it goes between the Body tags. So if you're following along your page should look like: <HTML> <HEAD> <TITLE> </TITLE> </HEAD> <BODY> </BODY> </HTML> Now in reality you should understand that web browsers see HTML code as one single continuous line of code and only recognize 2 blank spaces. But for us Humans its easier if we break up our code a little so its easier to follow. Try to get in the habit of breaking up your code everytime there are new tags. It just makes it easier for you to read and therefore easier to find your mistakes when you need to debug certain sections. Be very careful. HTML code is "mostly" case sensitive when it comes to letter size ...also a space in the wrong place or a forgotten quotation mark can screw up your whole day. So break your code up so you can see the sections better <HTML> <HEAD> <TITLE> Your title goes here </TITLE> </HEAD> <BODY> stuff the browser displays goes in here </BODY> </HTML> So go ahead ...put your website title inside the Title tags and inside the body section where I wrote stuff the browser displays goes in here replace it with Hello World!! Like below: <HTML> <HEAD> <TITLE> Hello World !!! 10 Days to HTML </TITLE> </HEAD> <BODY> Hello World!!! </BODY> </HTML> Then save your document as index.html and make sure it ends up inside the Folder we created named Website. Now its time to view our first webpage. If you used Simpletext or Notepad to create this document like I did you need to launch whatever browser you will be using. I chose Netscape as my prefered browser and remember I don't have to be online to view my pages. If you're offline and you launch your browser it may try to have your modem dialup your internet connection but you can can switch your modem off and tell it okay when it gives you the warning about couldn't make the connection. Then from your File Menu pull down to Open page in Navigator or Open File if you use Explorer and point to wherever your Website Folder is located then point to index.html and open it. If you are using an HTML editor there may be a preview button which launches your browser for you. You may need to configure it the first time you use it and tell the editor which browser to use. Voila !!! Hello World!!!You have arrived.  If you didn't get the Hello World!!! message check your code and make sure all the tags and spellings are correct. Now before we go on just a word about why we named this document index.html and not something else. Every ISP is going to have a different way to name the first document in a website. What they do is assign a default name internally within their system that tells Browsers looking for webpages where to start. After all it could be quite confusing to a browser if it gets to the folder where your pages are stored and there are a couple of hundred documents. So instead of picking a page at random the system knows that index.html is the start page on our system. In actuality you should check with your ISP to find out what this first document actually needs to be called. In many cases it is index.html or index.htm but it can also be home.html or home.htm on some systems and commonly on Windows NT sytems it is default.htm, default.html or default.asp. Again check with you ISP's technical department or their website FAQ sheet to find out what this needs to be. For our tutorial we will use index.html as our start document.It is also very important to remember that document and file names are case sensitive and that you should not use special characters to name your documents such as ? or &. Use only letters, numbers or common signs like the underscore bar(_). Names should not contain any spaces. "my document.html will not work but "my_document.html" will work. The other thing to know is that when naming your documents be descriptive. Some older computers may only be able to recognize 8 letter names with three letter extensions (ex document.htm) but most computers now recognize longer names. These names should not be abbreviated when at all possible and should reflect the content of your website. For example Joe who makes golf balls needs to name his first document index.html but the rest of his documents should be called something like golfballs.html, tees.html, links.html and not page1.html, page2.html etc. The reason for this is that Web Search Engines read all of the information on your pages when they are cataloging your website info. By naming a page golfballs.html it increases your chance to be listed in a golfball category rather than if you named your page.. page1.html. Kind of makes sense.. So lets try to spruce up our basic Hello World page. Inside each Tag you can define Variables that effect that specific tag section. Lets concentrate on the variables for the BODY section. Inside the Body section there are 5 major variables that you can declare that affect overall appearance of your website they are
You can Click here for a Color Code Chart So lets play with our variables. They should be placed inside the Body Start Tag and make sure there is one space between variables. <HTML> <HEAD> <TITLE> Hello World !!! 10 Days to HTML </TITLE> </HEAD> <BODY TEXT="#000000" BGCOLOR="#FFFFFF" LINK="#0000FF" VLINK="#5511CC" ALINK="#FF0000"> Hello World !!! </BODY> </HTML> Your Hello World page should now appear with a white background, black letters, and since don't have any links as of yet we won't see the other colors until we write some code defining links.  So now lets get down! Lets get funky! Lets do something else with the type to position it on the page. One easy thing to do is to center the Text at the top of the page. This is accomplished by using Center Tags around the text - think of it as nesting the text. There should be a Center Tag before Hello World !!! and an End Center Tag after it. <HTML> <HEAD> <TITLE> Hello World !!! 10 Days to HTML </TITLE> </HEAD> <BODY TEXT="#000000" BGCOLOR="#FFFFFF" LINK="#0000FF" VLINK="#5511CC" ALINK="#FF0000"> <CENTER>Hello World !!! </CENTER> </BODY> </HTML> Save your changes and then use your browser to view the change. The text should position itself at the top center of your page. Lets introduce a new Tag. This one doesn't have an end tag. It stands alone. It is the Line Break Tag <BR> It forces the browser to display the next line of text on a new line. Simply hitting your return bar doesn't work because once again the browser is seeing one long line of code and it needs a Tag to tell it to go to the next line. So after the Hello World line of text add a <BR> tag or two if you want to go down two lines and type your name. <HTML> <HEAD> <TITLE> Hello World !!! 10 Days to HTML </TITLE> </HEAD> <BODY TEXT="#000000" BGCOLOR="#FFFFFF" LINK="#0000FF" VLINK="#5511CC" ALINK="#FF0000"> <CENTER>Hello World !!! </CENTER> <BR> Your Name Here </BODY> </HTML> Save your changes and use your browser to view your page. You will see that your name is displayed one line down from the Hello World!!! line and back on the left hand side since we didn't specify where we wanted it. So introducing the <P> tag. The <P> tag works like the <BR> tag by forcing the text to start a new paragraph but we can also define some variables inside the The <P> tag which specifies where the text should align. Try adding the <P> tag before your name and add the variable align="right". Dont forget the End </P> after your name. <HTML> <HEAD> <TITLE> Hello World !!! 10 Days to HTML </TITLE> </HEAD> <BODY TEXT="#000000" BGCOLOR="#FFFFFF" LINK="#0000FF" VLINK="#5511CC" ALINK="#FF0000"> <CENTER>Hello World !!! </CENTER> <BR> <P align="right">Your Name Here</P> </BODY> </HTML> Click here to see what it should look like. So you can also tell it to align="left" or align="center" inside the <P> tags... and you are asking why would I want it to align it left if it does it by default and the answer is that it comes in handy when doing more complex page layouts involving Tables or Frames. Try it again telling it to align it in different ways. A more complete list of variables can be found in the glossary of this web site. Don't forget to use <BR> tags to make the space greater between lines <HTML> <HEAD> <TITLE> Hello World !!! 10 Days to HTML </TITLE> </HEAD> <BODY TEXT="#000000" BGCOLOR="#FFFFFF" LINK="#0000FF" VLINK="#5511CC" ALINK="#FF0000"> <CENTER>Hello World !!! </CENTER> <BR> <P align="right">Your Name Here</P> <BR><BR> <P align="left">Your Name Here</P> <BR><BR> <P align="center">Your Name Here</P> </BODY> </HTML> Save your changes .Click Here to see what it should look like. Another newer Tag we can use to position elements on a web page is the <DIV></DIV> (Divided Area Tag) Keep in mind that this is an HTML 4.0 tag and may not work with some older browsers. There are some cool new things that can be done with this tag which we will explore later on. You can give it align variables just like the <P> Tag such as <DIV align="right">Positions text to the right</DIV>. The DIV Tag can be used not only to position Text but also images, tables and other elements So this is getting interesting ... We've found that we can move text to different locations on a page. It's now time to see that these positions are viewed relative to each individual users browser and monitor size. So open your page up again in your browser and resize the browser screen by grabbing onto the square in the lower right hand corner of your browser and make the window half the size of your monitor. 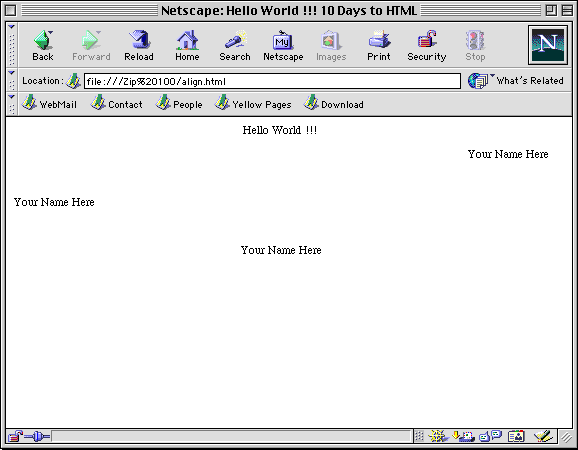  You will see the position of the text remains in the center or positioned left or right but moves with the browser window. This is a very important thing to consider because unlike most graphical layout programs the positioning of text is not absolute. It displays in a varied way that is relative to each individual users browser window. This is one reason design your pages for a small window (640x480 pixels) and it will simply expand with a larger monitor size. However if you cram-pack a webpage with information that fits the supersized 21 inch monitor and then someone views it with a little monitor everything will be jumbled together and not display how you have envisioned it. It will take on a life of its own and become the ugly monster we all dread. So now lets set some Tags and Variables that will affect the text size, color and font type. In the early days of web browsers there was one way to display text size. The <H> Tag(Heading) was born. Again there needs to be a start tag and end tag which nests the text which is to be affected. Size <H1> is the largest text size and an <H6> tag would make it considerably smaller. Try it on some of our text. <HTML> <HEAD> <TITLE> Hello World !!! 10 Days to HTML </TITLE> </HEAD> <BODY TEXT="#000000" BGCOLOR="#FFFFFF" LINK="#0000FF" VLINK="#5511CC" ALINK="#FF0000"> <CENTER>Hello World !!! </CENTER> <BR> <H1><P align="right">Your Name Here</P></H1> <BR><BR> <H3><P align="left">Your Name Here</P></H3> <BR><BR> <H6><DIV align="center">Your Name Here</DIV></H6> </BODY> </HTML> Save your changes and Click Here to see what it should look like. Once again the actual size a viewer sees is relative to their browser and monitor. Each monitor has a different resolution and in each web browser can be assigned to display at large size if you need glasses so each users hardware and software will effect the actual size that appears. So remember there is no absolute - only a constant set of variables. Another way to set text size is with the <FONT> Tag. If you use the <FONT> Tag to assign size you should do away with the The <H> Tags. And once again the <FONT> Tags should nest the text that is to be affected. Also make sure that all tags mirror each other and that you dont mix up your code for example <P align="right"><FONT>Your Name Here</FONT></P> is an example of "well formed" code <FONT><P align="right">Your Name Here</FONT></P> is not. I have reversed the <FONT> and<P> tags and they are no longer mirror images nesting the text. This last line may appear broken in some browsers and the text may not display between this code. Some browsers may see it fine but it is safer to write clean code. In newer languages such as XML it is mandatory that all code be "well formed". So lets give some of your text some Font variables inside the tag. Three common variables are
The COLOR variable will overide the TEXT variable you designated in the <BODY> Tag near the top of your document. In effect you could make every single word a different color however obnoxious this might appear on a website. The FACE variable you should be careful with. The specified FONT STYLE must exist on the users machine in order for it to display in that style. So you should use safe FONT STYLES which exist on most IBM and Mac systems. You could tell it to display in Comic or Sand Font Style but if it doesn't exist on the end users machine (and believe me its not a real common type style) then the users specified default type style will be all they see. Also keep in mind that even though you specify a safe type style the end user can still overide your specified type style with their own browser preferences using a Type Style from their machine. So you ask why bother then specifying the FACE attribute? Because most users don't know they can overide your settings and simply use the Browsers default settings. Play with some FONT variables <HTML> <HEAD> <TITLE> Hello World !!! 10 Days to HTML </TITLE> </HEAD> <BODY TEXT="#000000" BGCOLOR="#FFFFFF" LINK="#0000FF" VLINK="#5511CC" ALINK="#FF0000"> <CENTER>Hello World !!! </CENTER> <BR> <P align="right"><FONT SIZE="5" COLOR="#FF0000" FACE="Arial, Helvetica">Your Name Here</FONT></P> <BR><BR> <P align="left"><FONT SIZE="3" COLOR="#11AA44" FACE="Times">Your Name Here</FONT></P> <BR><BR> <P align="center"><FONT SIZE="1" COLOR="#A61076" FACE="Universe">Your Name Here</FONT></P> </BODY> </HTML> Save your changes and Click Here to see what it should look like. By default if you don't specify a FONT SIZE it will display at size 3. There are many other Tags which can also affect TEXT. Try nesting some of text with these tags <B>Bold</B> - results in Bold <I>Italics</I> - results in Italics <U>Underline</U> - results in Underline <blink>Blink</blink> - results in <strong>Strong</strong> - results in Strong <cite>Citation</cite> - results in Citation <TT>Teletype</TT> - results in Teletype There are other variables and tags not mentioned here. Not all of these tags are supported by all browsers but the majority of them are in at least newer versions of Web Browsers. Also an important thing to know is that not all keyboard symbols are supported. There are certain browsers that may display an & sign if you simply type it in. But there are whole lot of special symbols that should be used in place of these symbols. By typing & in your HTML code a & will display in all browsers. (don't forget the semi-colon) Also there are special symbols such as copyright signs © which need special code such as © to display a © symbol. Also be aware if you are stripping out text from a Word Document or other text program that not all symbols are ASCII compliant. Curly Apostrophes and quotation marks will display weird symbols on a webpage. A long dash is not a dash, etc. If you see weird symbols appearing or the letter l showing up where there should be an apostrophe ...check your code for Optional Special Characters. Be very careful of this when grabbing text from programs like Microsoft Word or other layout programs which do support these alternative punctuation and special symbols. |