 |
Making Dark Cork "FOOTBALL" Style Decoys |
| |
Making Dark Cork "FOOTBALL" Style Decoys |
 |
 |
 |
 |
 |
 |
As stated in the intro, this lesson is designed for the first time carver and more specifically a first time carver that has purchased a decoy kit from one of the number of companies that supply them
Buy your kit from whichever company you like the best, but make sure to ask for a copy of the pattern that kit is based on! It will make your life much much easier. If you are in need of a pattern there is quite a number now available online
What follows is based on the use of dark cork. Should you wish to use tan cork, simply omit the bottom board and the filling step and just seal the bird and go to paint.
| We will be making a "tail down" bird, which is a simple effective pattern for a gunning diver decoy. With this in mind the first thing you will need to do is round off the end of your cut out to what looks right to you. Use a handsaw, rasp and a little sand paper. |  |
 |
Next comes the bottom board, some people love em, some hate em. If you are the later skip this step. I use 1/4" plywood in this step, but the choices are limitless. Using a good waterproof glue such as Epoxy, or Polyurethane glue, attach the bottom board and let it sit overnight to cure. |
| With the board attached, sand it flush with the base of the cork and put a slight radius on the lower edge, just enough to break it. |  |
 |
To continue on you will need a handsaw, a rasp, some sandpaper of various grits, a long screw or lag bolt and washer and some chalk. |
| First things first, scribe a line down the center of the block. In lieu of chalk I use a scrap of drywall and just cut a bevel into the face. |  |
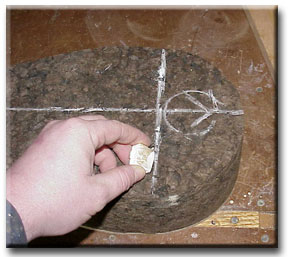 |
Locate where your head should be and outline it. Use the pattern for this. If you don't have a pattern half way between the nostrils and eyes lining up with the front of the breast is a good place to start. You'll know what looks right. scribe a second line just behind the head by about 1/2" |
| Now scribe your first "Do not cross" line, about 1" above the base. This line will stay here until the very last steps of the carving process. |  |
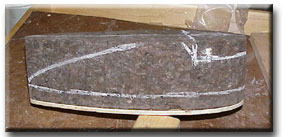 |
Now add the shelf for the head, about an inch down, and the line for the shoulders where they meet the shelf. The back tapers starts about the halfway point and is an arching line that stops at the lower "Do not cross" line. |
 |
 |
 |