


 | |
Camp Hat Flashlight
Materials:
1.5V flashlight bulb
AA size battery
Film canister & lid
Pill bottle to fit inside film canister (or 2nd film canister)
5 x 12 cm piece of aluminium from a disposable pan
Small piece of yarn or string
Corrugated cardboard
Duct tape
Scissors
Craft knife
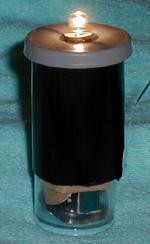
It Works!
|
 |
| Pattern for conductors - Print & Cut! |
|


