
[INDEX]
[<<]
[>>]
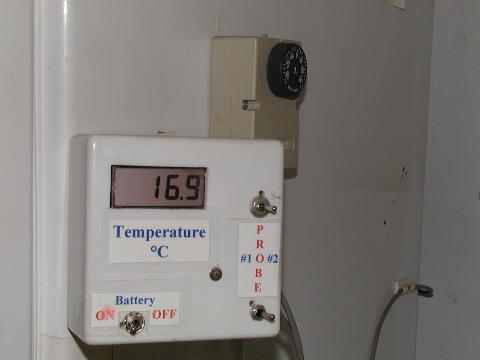 |
A closer view of the temperature readout unit and the temperature controller.
The controller simply interrupts the neutral line at a temperature set by the dial (+30°C to -30°C).
The readout unit has sensors (I'll tell you exactly what they are when I remember !) attached into some circuitry that a clever brewing friend set up for me. You can get similar things at most electronic hobby stores. The sensor basically reads a zero volt output at 0°C and will give 10 mV for every 1°C change in temperature. So the readout is essentially telling you "mV divided by 10". Simple. Get to that hobby shop !
I have two sensors going in (probe #1 and probe #2) and I flip between them using the switches. I use two switches to switch between the two sensors. The one switch swops the input to the readout over. The other switch changes the offset resistor value, used to correct for actual zero and boiling points.
One sensor tells me the temperature in the fridge, accessing it from a little hole towards the upper right corner. The other is used to thread into that geyser thermocouple pocket I use for my fermentor. It tells me the temperature dead centre in my fermentor during fermentation. I'd definitely recommend having something like that because the (air) temperature in the fridge is always a few degrees off what the beer is. This is especially true during the early-mid stages of fermentation (when you need to control it the most) because the yeast generates its own heat through its metabolism (just like we do !).