(Dec 2008) This page is now augmented by a theory page , and a theory free "how to" page.
The Desire for Flatness
For a long time I have been the owner of a English Stanley #3 with a surface ground sole (done by a friend with access to the necessary, very expensive machine). It is the plane I always turn to for accurate work (e.g. flattening the soles of wooden planes, in a bizarre piece of recursion)This made me interested in flattening the soles of my other planes, but I don't own a surface grinder. And I've never been able to make the abrasive sheet on glass technique work. I've always ended up with convexity. Non uniform abrasive wear and the build up of swarf tends to result in slower cutting in the middle of the abrasive. This results in convexity of the workpiece. I wondered if I was rocking the plane as I pushed it, but I got the same results even when a small (#76) plane was held perfectly vertical using my sharpening jig
Scraping - the Answer?
On reading up on how real metal workers generate flat surfaces, it appeared that the "one true way" was by scraping. Stephen Thomas, posting on Badger Pond gave advice on making the scraper, basic technique, a few "wrinkles" and refinements and a very nice "one sheet of paper" digest.
Equipment Gathering
Inspired, I started buying engineer's scrapers as and when I saw them, and finally fell across some engineer's blue (OK, the stuff is cheap, and still available, but this is genuine "vintage" blue!)
There is something of an art to getting a uniform layer of blue of the desired thickness onto glass (I'm told a real surface plate is easier), but since I learnt how to french polish a while back, it's no big deal.
If you have a "real" surface plate, you won't care about that bit :-)
Scraping: I have around 7 scrapers, mainly "half round" types. They blunt quickly in use (4 - 8 cycles). I sharpen the whole lot in "batch mode". I have had no success with the controlled strokes technique - I just "scribble" away blue metal.
I attempted to convert a file into a scraper (as advised in various sources), but couldn't persuade this homemade tool to cut at all.
Anyway, I scraped a couple of small tools (a no-name copy of the #102, and a Record #76, similar to the #90j, ) Went OK, but was slow.
Scraping is Slow
When I saw this post by Forrest Addy on Badger Pond I realised my problem. Scraping is a good way to make a flat surface (say 1 thou from mean plane) into a very flat surface (less than a thou).It's an ineffective way to make a curved surface (say 5 thou convexity) flat. Of course, engineers just use big machines - planers, shapers, millers. Any of these will give you your initial flatness.
But I am a humble woodworker, with none of these devices.
However, I did like the "colour the highest points and remove them" technique. It felt like it just had to give the right result
Just File it
I just needed a faster metal removing technique. Actually, it's obvious - use a file. A small, double cut file really hogs off metal nicely, and doesn't need sharpening like a scraper.The difficulty is getting a file to remove metal in a locally defined (i.e. blue) area. This is achieved by using a convex file. These are not obvious in the market place, but a file with a tapered end has convex surfaces where the taper starts. Triangular tapered files are common, and square ones also exist. The problem with a triangular file is when you press down it, you're pressing on an apex, which is uncomfortable; a square or flat file is much nicer.
I recommend a fairly large square file (8" or better), although I used a saw sharpening file (that I already had) for my first go.
You'll also need a "file card" to keep the teeth of your file cleared; the iron filings that normally aren't a problem are "glued" to the file by the greasy engineer's blue.
In conjunction with a nice thick layer of marking compound, which makes the high spots obvious (actually high areas if you use enough a thick enough layer of blue), I can hack off metal quickly, and I've worked a modern Stanley #5 (utility standard jack plane, Jeff) to sub thou flatness in a couple of hours.
Hold Still!
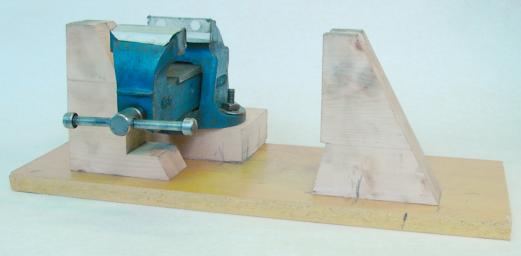
The final piece of the puzzle is work holding. You'll be doing an awful lot of "spot - cut" cycles, even with an aggressive file. The first time I played at scraping, I just improvised, with a few 2x4 offcuts and a 'G' clamp. But repeated assembly of this byzantine construction soon told me that I needed something that worked quicker and easier.So I bashed together (i.e. termite barf and nails were involved) a jig, centred around a second hand Record #1 vise.
The casting sits firmly on 2 wooden pillars. These position the casting at a fixed height. The vise, mounted on a spacer block to get the necessary height, is aligned so that it's jaws are inline with the pillars and 3mm below the sole. The closing force of the jaw is thus applied across the sole, and is not trying to snap off the cheeks.
With this arrangement, vertical forces are resisted by the pillars, and width-wise forces resisted by the presence of the vise jaws. Only longitudinal forces (which are low) are resisted by friction with the jaws, and this means that remarkably little jaw pressure is required.
The upshot is that the casting is very securely and safely held, and yet can be removed or replaced in seconds. This makes the repetitive cycles more tolerable.
If I were making another holding jig, I'd use far smaller pillars - the forces on them are purely vertical, so even a simple dowel would probably suffice.
The End?
I became aware whilst flattening a Record #04 that as I got closer to flatness, strange things were happening; fortunately, I was forearmed by some of the advice linked to above - I knew that I was approaching the accuracy of my reference. Either my glass is not flat, or it's flexing. In either case, my plane is as flat as I can get it. If I get a better reference (a real surface plate) I may have to (finally) break out my scrapers to finish the job. For the moment, I just used some AlZi paper to put a rust-resistant shine on the sole, and stopped.Oh, and do the planes thus treated work better? I think so.

Reactions, Additions and Feedback
Roger Nixon
...posted a large and well illustrated article about his experiences with a process similar to the one outlined here, using small scraps of abrasive sheet for the final localised metal removal. I would emphasize this in his write up:At this stage, the scratch pattern from the sanding belt was covering the whole plane sole but the surface plate was still indicating a hollow down the center of the plane...His approach to a holding jig uses more easily/cheaply obtainable materials than mine, but looks equally effective. I think his blue was too thick though. To quote from Stephen Thomas' article
A complete covering of blue on the work surface never means that it is flat. It only means that you have too much blue (too thick) on your reference to accurately discover or discern the true condition of the work.
Ted Shuck
...has also tried this, and sent my a nice report. It's a little too long to include here, so I gave it a page of its own
"Woodburn Bob" on woodcentral
...posted the tale of his restoration of a Spiers infill. He was well on the way to a flat surface made by techniques similar to those on this page when...I'll confess that I then cleaned off my granite surface plate and put down a 9 X 12 sheet of 120 grit SiC dry-wall screen. I was very gentle in taking 10 or 20 passes. As always, when I rechecked the result of that kind of extra effort, both by straightedge and by spotting, I had severely degraded the flatness and was well on my way to replacing the formerly flat surface with a dome.