![]()
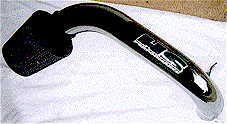 |
OK, these aren't the best pictures in the world, but you will get the idea. When the pipe arrived, I unpacked the box and took inventory. What I got was the pipe, a 3"-to-3" silicon connector with clamps, and a super-nifty Hotshot license plate frame. There were no instructions of any kind in this kit. That's not really a problem.... |
With this tube, the factory elbow between the VAF and the throttle body remains, but the factory air box must be removed. Since most of us have already replaced our air boxes with conical filters, the job is already half-way done!
Simply remove the filter or air box attached to the front of the VAF. Then slide the connecting tube over the front of the VAF, put the clamp on it and tighten it. I did it this way so that I could push in the VAF plenum to ensure that it was not rubbing due to the clamp being too tight. Slide the other clamp over the connecting tube then grab the pipe (do not attach the filter yet) and fit it in the open end of the connecting tube.
| Now, you will need to fit the attached
brace over the bolt that was used for the factory air
box. You can't miss which one it is, the bracket goes
right to it (just behind the distributor). Slip the brace
over the top and then hand tighten the nut. Make sure
that the end of the pipe is still in the connecting tube.
Carefully push the the pipe inward as far as it will go
and tighten the loose clamp over it. Tighten the nut on
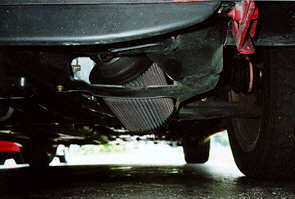
the brace. Now get under the car and install the filter to the bottom of the tube. I found it easier to remove a few screws and pull down the splashguard to give some room for movement under there. The photo at the right shows the approximate way that the tube is situated when installed on the car. |
 |
As you can see (kind of), the Hotshot
tube connects to the front of the VAF. From there, it
turns downward and once it nears the splashguard, it
angles slightly backward so that the K&N filter hangs
just below the splashguard (see photo above/right for the
general shape). This is exactly what makes it a cold air
pipe. Cold (ambient temperature) air is sucked in by the
pipe instead of air inside the engine compartment that is
being heated.   |
|
 |
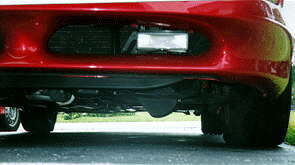
As you can see in this photo, the filter
hangs well below the splashguard. This is excellent for
picking up cold air, but unfortunately it is also
excellent for picking up water, especially if your Probe
is lowered. I live in South Florida (rain capital of the US!), and have not had any problems with this yet. Driving in the rain isn't a big worry, but I do try to avoid big puddles. |
| This photo will give you a better idea
of how low the filter hangs under the car. Friends say
that they can see it in their rear view mirrors when I
drive behind them! What about performance, you ask? Well, this is simply the best intake that I have had. Power is noticeably increased over the Akimoto tube. Where I merely "caught" second before, I now "spin" second! |
 |
| To prove it, I again have the time slips! I have run my fastest time date with this intake. My best run before installing the HS tube was with the 2nd Akimoto setup....the ET was 15.36. I have only had one night at the track since installing the cold air pipe, but I managed to break that ET, three times that night and set my new best! I had a 15.42, a 15.34, a 15.31, and a 15.29 that night. I should note that the only changes I have made to this PGT is the intake. Otherwise the mods are limited only to the GReddy cat-back. Everything else is 100% stock! | |
Is this the last intake mod that I will make? NO! There's one more to look at!
![]()
![]()
![]()
This site is made possible by Geocities.