In case you're wondering why I post my build-alongs on several pages instead of just
putting it on one page so you don't have to keep clicking around, it's because there
are a lot of pictures and some people still use dial-up and have old computers with
low RAM.
The last English longbow took 10 pages. This time I'm going to
do it in five pages! Oooo!
The story behind this bow
In case anybody wants to know, today Saturday, June 9, 2007. As I'm writing this,
my new English longbow is cooking in the
hot box. That gives me some time to transfer my pictures from the camera to
the computer and start my write-up.
I stopped making bows back in August (well, actually I've made one since then), but
a friend of mine asked me to make an English
longbow for his daughter's birthday which is in October. She's into Renaissance festivals,
and things like that, so he wanted something authentic. I made the mistake
of telling him that if he really wanted an authentic English longbow, it would have to be
made of Yew. I told him Yew was too expensive, and I would come up with some kind of
substitute. He insisted on making it out of Yew, and he was going to buy me another Yew
staff for myself as payment.
The problem is that my skills aren't that great, and I'm just too intimidated to try
to make an ELB out of Yew. It would be a huge waste if I messed it up. So I'm going to
use a substitute. When I finish it, I'm going to send him pictures and let him
decide if he wants it or not.
The materials
Do you remember my first ELB out
of hickory and Osage? I had hoped the hickory backing and Osage bow would mimic the
colour of Yew sapwood on the back and heartwood on the belly. At the time, the Osage
was bright yellow and didn't look at all like Yew. The Osage has since then darkened up
quite a bit, and it does look kind of like a Yew ELB now.
I discovered, though, that Osage, while being great in compression, is just too heavy
for this design. Osage is better for short bows. For longer bows, Osage is too heavy
which slows the bow down and creates a lot of handshock.
I wanted to try some juniper. I used to have a perfectly straight-grained piece (which
is extremely rare), but stupid me, not knowing what I had, used it to make a bow rack.
I haven't been able to find a good long straight-grained piece of juniper since then.
I originally thought juniper would be too soft and brittle for an ELB and that it wasn't
good in compression, but I read somewhere that it has very similar properties to Yew. I
knew it was light, so I figured it would probably be a lot better than Osage or anything
else I might try. But, alas, I couldn't find any.
So I'm going to make this bow out of pecan and maple. I wanted to have a hickory backing,
but I haven't been able to find hickory lumber anywhere.
The Hardwood Barn, where I usually get my wood,
has these huge gigantical pieces of hickory, but I just don't have the facilities to cut
it down to size. I met John Beecroft at Canton trade days, and he told me he got a
bunch of hickory at Austin Hardwoods in Dallas, TX. I went to check it out, but all they
had was pecan.
Pecan is in the hickory family, but from what I've read, it doesn't have the same bow-friendly
qualities as other hickories have. Still, I had looked for a long time and decided to
settle. It was too difficult to sort through the stack at Austin Hardwoods in Dallas,
but I found a fairly straight-grained piece at Precision Hardwoods in Austin, TX.
This will be my first attempt at making a bow out of maple. I've used maple in handles
before, but not limbs. Hard maple is supposed to be the best, but I have no idea what
kind of maple this is. I got it at Gulf Lumber here in Tyler, TX, and it was just labled
"maple." We'll see how it does.
Preparing the backing
If you're going to use any kind of wood for a backing, the grain has to be absosmurfly
straight. The whole purpose if having a backing on any bow is to prevent splinters from
lifting. Having bad grain on a backing is about like not having a backing at all, so
it defeats the purpose.
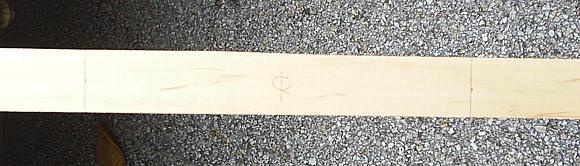
<---Over here to the left is a picture of two
pieces of wood. The one on the right is my pecan and the one on the left is my maple.
The grain on the pecan isn't perfectly straight, but I think it
will do. I'm going to make this bow between 30 and 40 pounds, so it should be just fine.
By the way, I just learned how to post pictures and write text beside it. It's a space
saver, and it might even have other uses.
The maple is just a little over an inch wide. I figured the pecan might warp a little
when I ripped it, so I decided to cut it a little wider than an inch. Sure enough, it
warped. --->
I went ahead and cut a piece about 1/8" thick with the band saw to use as a backing.
You don't want to go any thicker than that with a wood or bamboo backing.
At this point, you could use a lam grinder to grind the backing down and get all the
tool marks out of it. I didn't use a lam grinder, though. I just used my belt sander
with a wooden block to hold it down. I got all the tool marks out of it.
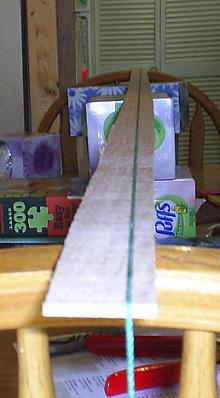
That warpage would just never do, so I decided to use the string method to get it
straightened out. I made a mark at the center of the length and a mark at the center
of the width, and a + at the intersection.
Then I ran a string along the length with squeeze clamps hanging off each end. I made
small little adjustments on each end so that the string would run through the + in
the middle and still be pretty even on both ends.
I made pencil marks on both ends under the string. I had about enough room on either
end to make the tips a little more than 1/2" wide. I measured out an 8" handle area in
the middle, and then used the aluminum yard stick as a straight edge and draw pencil
lines from the tips to the handle area. I highly recommend getting an aluminum yard
stick because they don't warp like wood, and they're great for long straight edges.
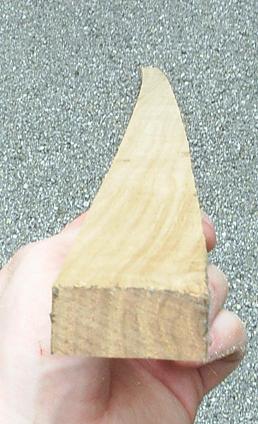
Then I cut that out (the part in red) with the band saw and sanded to the lines with the belt sander.
Here is the result:
It's much better now, huh?
Preparing the maple
I don't remember if I told you this or not, but I'm making the bow six feet long.
Paul's daughter is around 5'6" tall, so
I figured six feet will be plenty of length. Long bows are supposed to be long,
after all!
I started with a piece of maple 6 ft 7.5 in long. I cut 7.5" from the end with the worst
grain and used that as a handle. I didn't glue on a riser section on the
last ELB because ELB's are supposed to bend through the handle.
But I didn't really like the feel of a bendy handle, and it was hard to make the
handle round and comfortable without weakening it. So I'm gluing on a riser section
so I'll have a little more flexibility to make the handle comfortable.
But first, let me tell you the dimensions of the maple and how I went about tapering it.
After cutting off the 7.5" from one end, I was left with a six foot piece of maple that
was 3/4" thick and 1.25" wide. It will probably be a little more narrow than that when
I'm done with it.
Then I found the center point and measured 4" on either side, giving me an 8" handle
section.
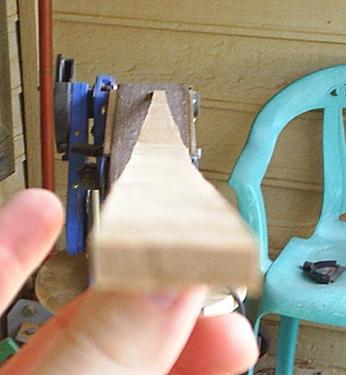
I measure about 1/4" (maybe slightly more) from the back on each end of the maple and
drew a straight line along the 3/4" side from the handle section to the mark on the
end. Kind of like this:
You may find it difficult holding your straight edge against the edge of the maple and
drawing that straight line because your straight edge rocks while you make the attempt.
There are two ways to get around that. The easiest way is to use a lovely assistant to
hold one end of the straight edge while you hold the other and draw the line. I haven't
had a lovely assistant since February of this year, so I just used a squeeze clamp to
hold the straight edge in place while I drew the line.
After band sawing off the area in red, I used the flat part of my belt sander to get
the tool marks out. You see, unless you can cut a perfectly straight line with a band
saw, you're going to have a few dips. Those dips will become hinges when you bend
the maple. That's true even when you're just gluing the thing up. If you sand until
you get all the tool marks out, it will be perfectly flat, and it will bend evenly
when you glue it up.
The glue-up
Before gluing up, I want to make sure all of the surfaces to be glued have been sanded
with a pretty rough grit. I use 40 grit on my belt sander, and it creates a good
gluing surface. So I sand the back of the maple. One side of the pecan backing has
already been sanded to get the tool marks out. I also sand that 8" area on the belly
of the maple, and I sand the 7.5" block I'm going to glue on to the belly.
After doing a dry run, I put a 2x6 on my kitchen counter for a table and put some
hy-top plastic wrap on it. Don't use Sam's Choice!!! I layed the backing on it
and the maple so the side I was going to glue would be facing up.
I used smooth-on for this glue-up. Just a spoon of the glue and the hardener was all
it took. Be sure not to use one spoon for both because then you'll inadvertently mix
them.
I mixed them up with a wooden stick, then used that stick to glob on the glue, then
used a seam roller I got at Lowes to spead the glue. Be sure to put the glue on both
sides to be glued. That ensure you won't have any dry spots.
I put the backing on the maple and pressed down all along it. Then I glued on my 7.5"
handle piece. I wrapped the whole thing up in the plastic wrap and put it on my
form belly down.
My form is just a 2x4 I got at a construction site dump. The only problem with using
a 2x4 is that they sometimes warp, and that can cause your bow to be misaligned. If
you decide to use a 2x4, let it sit around a while before you use it. Mine is pretty
well seasoned and doesn't warp. It warped a little in the beginning, but I used my
belt sander to straighen it back out.
I put tape on the limbs to prevent the backing from sliding around while I put clamps
on it. Then I used three 3" c-clamps to clamp the handle to the form.
Once that was all set and everything was lined up, I put some wooden blocks under
each end. That gave me a little over an inch of reflex. I wanted some reflex because
as I tiller the bow, it will take some set. I'm hoping when it's tillered, the bow
will be close to straight.
After the blocks, I put a whole bunch of squeeze clamps on there.
Then I put that in the hot box and let it cook for six hours.
When it's done, I unplug the hot box and leave it in there to
cool off until the next day.
 <---Over here to the left is a picture of two
pieces of wood. The one on the right is my pecan and the one on the left is my maple.
The grain on the pecan isn't perfectly straight, but I think it
will do. I'm going to make this bow between 30 and 40 pounds, so it should be just fine.
<---Over here to the left is a picture of two
pieces of wood. The one on the right is my pecan and the one on the left is my maple.
The grain on the pecan isn't perfectly straight, but I think it
will do. I'm going to make this bow between 30 and 40 pounds, so it should be just fine.
 The maple is just a little over an inch wide. I figured the pecan might warp a little
when I ripped it, so I decided to cut it a little wider than an inch. Sure enough, it
warped. --->
The maple is just a little over an inch wide. I figured the pecan might warp a little
when I ripped it, so I decided to cut it a little wider than an inch. Sure enough, it
warped. --->

 That warpage would just never do, so I decided to use the string method to get it
straightened out. I made a mark at the center of the length and a mark at the center
of the width, and a + at the intersection.
That warpage would just never do, so I decided to use the string method to get it
straightened out. I made a mark at the center of the length and a mark at the center
of the width, and a + at the intersection.


 I used smooth-on for this glue-up. Just a spoon of the glue and the hardener was all
it took. Be sure not to use one spoon for both because then you'll inadvertently mix
them.
I used smooth-on for this glue-up. Just a spoon of the glue and the hardener was all
it took. Be sure not to use one spoon for both because then you'll inadvertently mix
them.

