By Sam HarperAnother English Longbow build-along
Shaping the handle
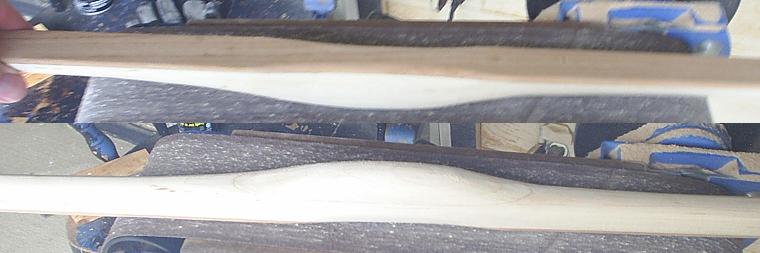
I only keep the handle square so it will sit in my tilling stick properly and not roll around. But I wanted to have the handle just be kind of a bump on the belly. Having the bump allowed me to round out the handle area without weakening it. I rounded the back, too.
I used the belt sander and a rasp to shape the handle.
Horn tips
I got a bunch of horn tips from John Beecroft. He has a booth at Canton on first Mondays trade days. He sent them to me in a box which I stuck in the closet for a while. One day, I had a look at them, and there were little black bugs all over them, so I took them outside. Hopefully, they haven't put a lot of holes in them.
Here are a couple of the horn tips.

I wanted to use a black one and a white one just to be different. First, I cut off just enough of the horn so I'd still have a little hole.
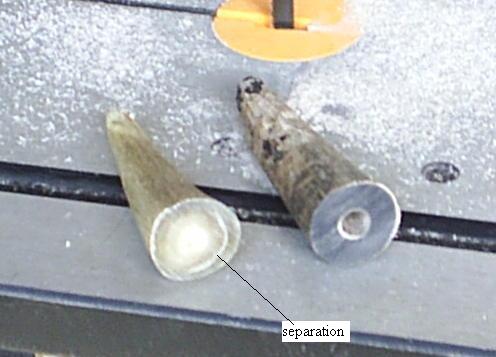
Horn doesn't smell good when you cut it. The white horn had a wee bit of separation, which I've pointed out in the picture since the picture isn't all that clear. I wasn't too comfortable with that, so I got another horn and cut it. Here's the two good ones.

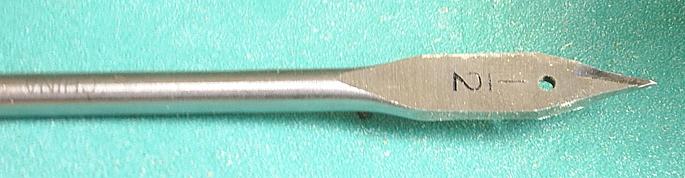
Now I wanted to drill a cone-shaped hole in the horns. In my last ELB build-along, I did it the hard way, but this time, I did it the easy way. I went to Big Lots and got a 1/2" spade bit for 79 cents. Then I went to my friend Mark's house and borrowed his bench grinder. I wraped the bit in masking tape, drew lines to continue the points at the ends, and then used the bench grinder to grind the bit into a 'V' shape.
I did this last year, so I can't show you my actual stuff. Instead, I downloaded this picture and drew on it to illustrate what I did.

Here is my actual V-shaped drill bit.
You shouldn't grind it perfectly square. It needs to have a cutting edge, so you have to grind it at sort of an angle. The tip part should already be ground at the right angle, so just use that as a guide when you grind it. Here's an illustration to show what I'm talking about.

Here's a look at mine.

It'll get hot while you grind it, and that will soften the metal a little, so keep a cup of water by you and dip the bit in the water frequently while you're grinding. For some crazy reason, I was intimidated by this procedure before I tried it. I had never ground anything metal before. But it turned out to be very easy. I went back to Big Lots and got two more just so I'd have some extras to use or give away. You HAVE to wear goggles while you're doing this, by the way. Otherwise, you could get hot metal sparks in your eyes.
I chucked the bits in my drill, held the horn in my hand, stuck the tip of the bit in the hole that was already in the horn, and I drilled until the V was completely submerged in the horn. Then I drill just a hair farther. Here's a look at the holes I made.

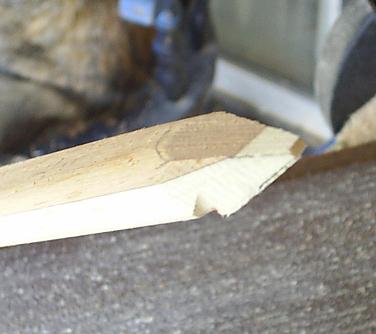
Now I had to shape the bow tips to fit in the V-shaped holes in the horns. First, I found the center on the tip and made a pencil mark. Then I placed the spade bit on the tip with the tip lined up with the pencil mark. Next I traced the bit with a pencil. Finally, I used the disk sander and belt sander to sand down to the line.

I did the same thing on the sides and ended up with this.
From here, I use my rasp and file to file the corners round. Some of the notches were still showing, so I decided to move the tip in 1/8 of an inch. That took care of the notches.
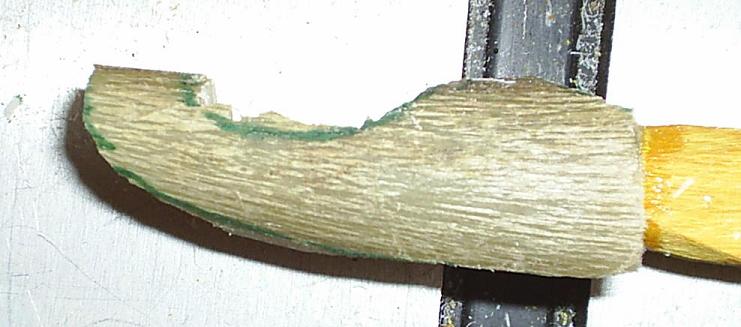
I wanted to make a perfect fit, and I couldn't find any suggestions on the internet, so after racking my brains, I finally decided to try an experiment. I used a green sharpie to colour the inside of the white horn. I put the horn over the tip and twisted it. Here's what happened.

 The high spots on the bow tip got coloured green because they made contact with the inside
of the hole. The uncoloured parts didn't touch the inside of the hole. So all I had to do
was file away the green parts and try again. I did this a few times, and eventually
I got a good fit. I could tell I had a good fit because most of the tip got coloured in
green.
The high spots on the bow tip got coloured green because they made contact with the inside
of the hole. The uncoloured parts didn't touch the inside of the hole. So all I had to do
was file away the green parts and try again. I did this a few times, and eventually
I got a good fit. I could tell I had a good fit because most of the tip got coloured in
green.
Before gluing it together, I made sure I had filed away all the green. I'm going to use the white tip on the other side, too, so I glued the black horn on this end.
I've heard about people having tip overlays and things pop off after using 5 minute epoxy, so I don't use that. I use another epoxy that also comes in a double-barrel syringe, but it takes more like an hour to cure. I've used it before for tip overlays and never had any problems, so that's what I used this time.
Be sure to put glue on both sides and twist the horn when you put it on. That'll get glue all over the surfaces.
To add a little pressure, I used my bookshelf. I just hung a couple of books over the book shelf and set them on the bow to keep pressure on the tip.
Before gluing the other tip on, be sure to run the bit in it again to get that green
ink out of there. It'll just take a little.
The next step was to go to google and find as many pictures as I could of horn nocks to give me some ideas. Here's some pictures I stole from other web pages. If anybody complains that I stole them, I guess I'll just have to delete them.
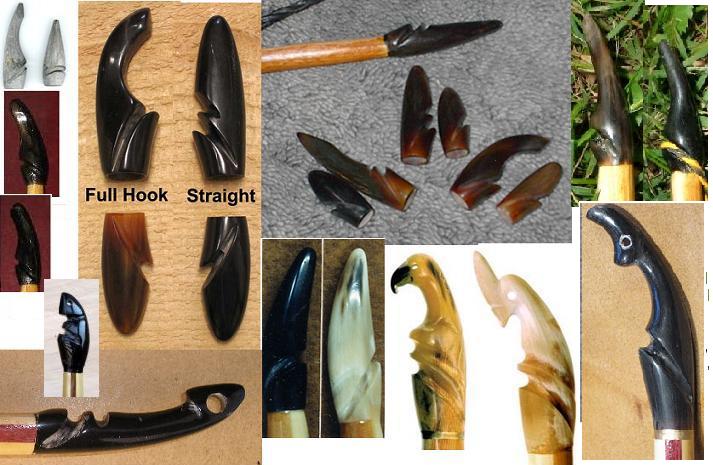
From looking at a bunch of English longbows, I've gotten the idea that the bottom one is always just sort of stubby and boring so you can rest it on the ground, and the cool decorative one goes on the top limb. The problem is I can't remember which end of my bow was going to be the top limb. I erased the arrow as I was shaping the handle. I've got to shape the nocks a little before I can string it again to check the tiller. What a bummer!
Besides these, I also looked a chess pieces--particularly for the knight. I thought it might be neat to carve a horse head.
I also decided to take that other horn tip--the one that had the separation problem--glue it to a stick of wood, and use it for practice. I've never carved horn nocks before, and I don't want to mess them up.
Oh dear! It's July 31. I need to pay my rent. brb
Okay, I'm back. After looking at a bunch of horn nocks and knights, I traced my horn onto some paper and drew different designs in it. Here's my horn glued to the stick and some of my drawings.

See the two horses on the left? I decided not to do those. I figured I'd start with something more simple, like that hook on the bottom right. I drew the side profile on the horn with my green sharpie and then tried to cut it out with the bandsaw.
Then I drew a line down the middle and traced the front to back profile and cut that out with the band saw, too.

Things were kinda square at this point, so I used the belt sander to round it up a bit.

There's only so much you can do with a big ole belt sander, especially with that hook, so I used my dremel tool with a sander to work on it some more

There's only so much you can do with a big ole dremel tool sander doohicky, so I used a rattail file to work on that hook some more, and the area where the wood meats the horn.


Then I cut my nocks, starting
with the triangle file to
establish a cut, then with
the rattail file.
You're supposed to be able to buff it to make it shiney, but I don't have anything to buff it with. Maybe if I had one of those little buffer attachments with my dremel tool, I could use that. But I just sanded it and sprayed some Deft on it. Here's the end product.

Horn is easier to work with than antler, I've discovered. Antler is like rock. This turned out to be easier than I thought it would be. I don't think it's going to be as easy when I do it with the bow, though. You see with this horn glued to the stick of wood, it was easy to twist and turn in my hand as I worked with it. It won't be so easy when I've got a whole bow attached to the horn I'm working on. It makes me think maybe I should start shaping my nocks before gluing them on.
to be continued...