
Now let's prepare the limb laminations.
Making limb laminations
This could be as easy as taking a stick of wood 36" long, 3/4" thick, and 1.5" wide, cutting laminations out of it, and grinding them. But to kill three stones with one bird and prevent me from having to do a separate build along, I'm going to show you how you can jazz up your limbs a little. I'm going to do spliced limbs. This is my second time doing spliced limbs, but it's my first time doing interesting spliced limbs. The first time, I simply cut the splices at a 45 degree angle. This time, I cut some curves.
I'm using zebra wood and blood wood for my laminations. I'll use a bamboo core, but lemme talk about the cool stuff first. I take a stick of bloodwood and a stick of zebrawood, both of the above dimensions. I put a few small spots of Titebond II on there to glue them together.
A little dab'll do ya. This is just so you can cut them together without worrying about them sliding apart and ruining your perfect cut. You want to be able to simply pry them apart after you cut them, so not too much glue. Clamp them together.
Let that sit over night. The purpose of cutting them together is soes you can get a perfect fit no matter how erradically you cut them with the band saw.
Now decide where you want your splice to be--in the middle, near the tips, near the riser, etc. I'm doing mine closer to the tips. Scribe a line along the center of the lamination.

See that line? I know it's hard to see because of the glare, but it's there if you should care to sit and stare. This line is just a guide. I'm going to cut a curve to the line, follow the line down a bit, then curve back out the other side of the wood.
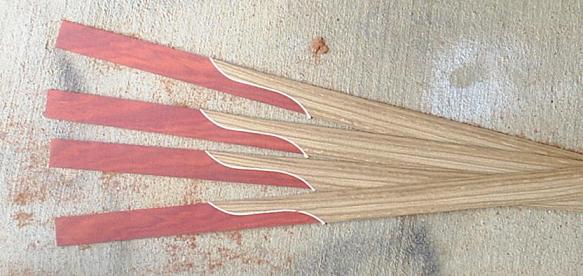
And there we go. Now I can just pop them apart since I didn't use but a dab of Titebond II, and switch the pieces.

Now I can make two sets of lams instead of just one. It's important if you're doing curved spliced to use an accent strip of wood to account for the kerf of the band saw. Otherwise, your wood will be misaligned, which is not a problem if your wood is wider than 1.5 inches. If you're just doing a 45 degree (or whatever) straight line splice, you don't need an accent.
I'm going to use a thin piece of maple for an accent. Here's a look at the dry-run.
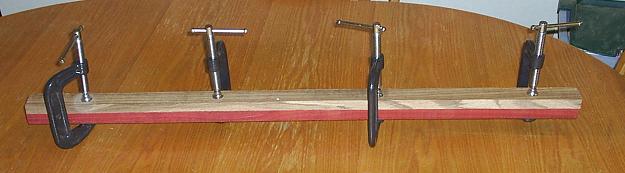
If you're doing a 45 degree (or whatever) splice, it's very important that you have something holding the ends of the wood. Otherwise, when you apply a clamp to the joint, the wood will slide apart. What I do is glue everything up on another straight stick of wood to keep everything aligned, and I clamp a piece of wood to each end so that the wood to be glued fits between them and is prevented from sliding apart.

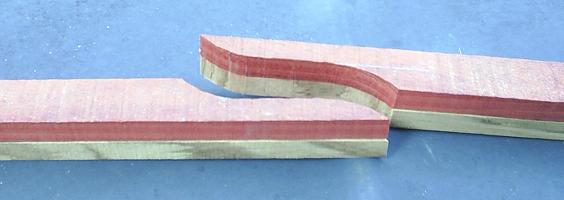
I'm doing that for my splices, too. I was just thinking, though, that there's a way to cut your splices so that you don't have to worry about them sliding apart when you clamp them together. Instead of cutting a curve to a straight line and to a curve, you could do an S-shape.

Do you see how with this design the limbs wouldn't slide apart when you clamped them together?
Anyway, when I glue this up, I put wax paper around it so I don't glue it to that board. I also put a piece of wood on top and a clamp on that to make sure both pieces of wood are aligned. I didn't take a picture of that, though, so you'll just have to visualize.
I glue this up with Smooth On and stick it in the hotbox for six hours. After that, I cut the laminations out on the band saw. But first, I break off those pieces of maple and sand those edges so it'll slide smoothly along the band saw table. I also sand just a little on the glue joint just to remove any glue that's sticking out so it will slide along the rip fence.
I've got a friend who could probably get six laminations out of this, but I with my feeble skills do well to get four, which is what I want. I want the two outter pieces to be slightly wider, though, since there's that glue that got squeezed out the sides and possible misalignment. I want to leave a larger margin of error on the outside two laminations. So I just cut the thing down the middle. Then I put the inside cut against the rip fence and cut them both again, giving me four laminations. They're pretty thick, too. That's okay. It's better to be too thick than too thin. That gives me lots of room to grind them enough to get the tool marks out and everything.
The next step is to grind them, but before you grind them, you need a lam grinder, don't you? But you're a poor bloke who lives in an apartment and can't afford to buy a Performax thickness sander, and you lack the skill to build a really cool lam grinder or the money just for a motor and bearings. Whatcha gonna do?
That's easy enough. You can make a lam grinder out of a belt sander. I probably would not be making fiberglass bows if Cambo from The Leatherwall had not shown me this. Mine is a bit more crude than his because I have a serious lack of wood-working skills. I'll show you some pictures, though, so you can figure out how it's made and do a better job than me.
Here it is all rarin' to go.
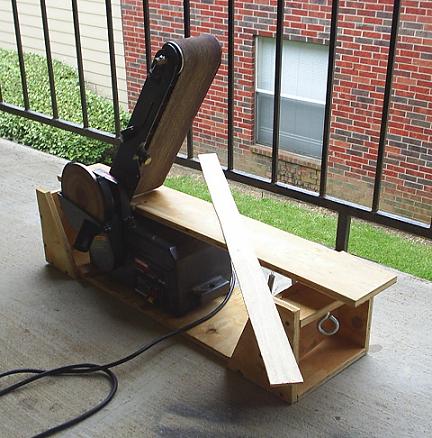
It's just a box I set my belt sander in. The table goes between the body and the sanding arm. I have the sanding arm raised at an angle. You can't see it, but there's a block of wood sitting under the back of the belt sander. I use that to square everything up when I put it in the box. Now let's look at some different angles. There's a hinge in the back for the table.

An improvement would be to put two small hinges on there sort of skewed. That would elminated any play.
At the other end, there's an eyebolt that raises and lowers the table.

Look closely at this picture. There's a little nut glued on that board over the hole I drilled in it, and that's what the eye bolt is threaded through. Also, there's a bottle cap glued to the underside of the table. That's so the eye bolt doesn't grind its way through the table.
On the inside near the back, I have these springs.

Those provide counterforce to the screw, preventing the table from bouncing, and also reducing any rocking that might happen.
It is very important that your table is square with the bottom of that sander. Otherwise, you'll have a thick side and a thin side to your laminations. I square mine up by putting the sander in there and raising the table almost until it touches the sander. That way, the gap is very clear. Then I adjust that wood under the sander, and/or move the sander around, or use shims or wood wedges or whatever until I get it all lined up.
Just to make sure lest my eyes decieve me, when I grind laminations, I run them through forward and backwards. That makes both edges go through each side, ensuring that one edge isn't thicker than the other edge. Of course that doesn't work with tapered laminations, because you can only run those through one way. Well, I take that back. You could always just grind one side, flip it over, and grind the other side. That would have the same effect.
Anyway, there's some other things you need to know about grinding laminations. First, use 40 grit sanding paper. Using a rough grit like that will produce a good gluing surface. Plus, it's faster.
Second, you must slide your laminations through at a constant speed. If you do the stop and start dance, you'll have gouges and grooves from each time you stopped. That means you don't want it to be a struggle to push your lams through. It's much better to make several easy passes then just a few hard passes. Just turn the screw a half turn or so each time you're ready to go thinner.
Third, to make sure each laminations is the same thickness, I do each one, one after the other, at the same thickness. Also, I run them each through twice before I go to the next one. The second pass is always easier and takes care of any grooves you might've accidentally made the first time.
Fourth, wear a respirator. Grinding lams creates a whole lot of sawdust, and you'll have your face right in it.
Grind at least until you get all the tool marks out. I start by having the roughest side facing up, which always turns out to be the outside with the glue and misalignment. I also start with the thickest piece, but I run the others through anyway, just to be sure. Once I have all the tool marks out of one side and mostly out of the other side, I start making tapered laminations.
My first two or three bows used all parallel laminations and turned out just fine. Tapered laminations distributes the flex better and gives you a better looking profile, I think. This is unnecessary, but lemme tell you how I make tapered laminations.
First, I just bought some tapered laminations from Three Rivers Archery. I got the cheapest ones they had, and they had a .001 taper. That means the laminations is .001 in thinner with every inch in length. Now you just put that tapered lamination under your parallel lamination, and run it through the grinder, thin side first. This is what happens.

Now your lamination has the exact same taper as the one under it. Pretty neat, huh? And if you want a .002 taper, you just put two .001 tapered laminations under it. I'm just going to do a .001 on each of my laminations. That will give me a .002 taper on each limb.
You might want to know the exact thicknesses I'm using for my lams. Knowing that is supposed to give you predictable draw weights. But lam thickness is one of many variables which can be use to predict results. Other factors affecting draw weight include limb length, riser length, width, and profile. The only way to use lam thickness to predict results on a new design is to experiment. So grind lams however you feel like, measure the thickness, and record them. Keeping a record of a few different glue-ups will give you an idea of what to expect.
I don't measure my lam thicknesses. I just eyeball it. So far, I've been able to get pretty close to what I'm shooting for, and if I can't, I'm able to tiller until I do. But for the purposes of this build along, I measured my lam thicknesses. The tapered laminations are measure from the thickest end. Here they are:
taper lams: 5/64" or .078"
bamboo lam: 9/64" or .141"
fiberglass: .050"
Here's my lams all ground and ready to go.
Well, not quite ready to go. Two are going to go on the belly, and will ride up the fades. The other two will go on the back and will need to be spliced. Before I splice them, though, I want to make sure I have them oriented the way I want them. I lay them on the form like I want to have them glued up. Then I lable them with a pencil to tell me where they go later.
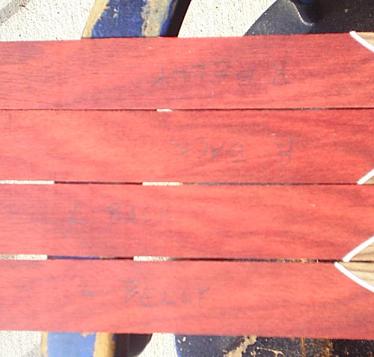
Those pencil marks will go on the inside against the bamboo core, so they don't show through the glass. In case you can't read that, they say:
R BACK
L BACK
R BELLY
L BELLY
That helps me keep everything straight.
To splice them, I first hold them together and grind them on the disk sander.

That gives me the same angle on both of them so they fit together.

Then I glue them together. If you don't glue them together, they will separate when you clamp down on the riser, and that will cause a gap. To glue them together, I use 2 ton epoxy.

It comes in a double barrel syringe. I suppose you could use the 5 minute epoxy, too, but I like this other stuff because it gives you lots of working time. You've got 30 minutes, and it's supposed to be cured in two hours and at full strength in eight hours. Two hours is enough to glue it up. I suppose you could also use Smooth On. Don't use Urac or Titebond II, though. You want something that dries clear.
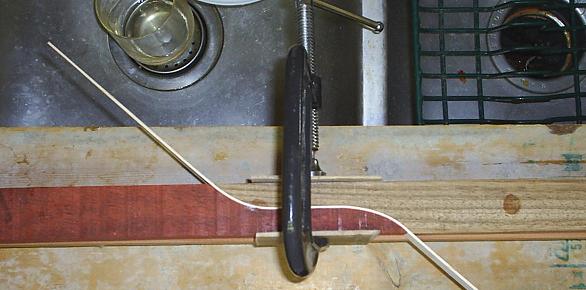
Since the laminations are so thin, I don't want to have to sand that glue joint too much if at all. So I want everything to be nice and flat. I do that by clamping the joint between two flat sticks of wood.

I wrap wax paper around it so I don't glue it to either piece of wood. That one on the bottom is long and straight. I use that to make sure my lams are lined up when I glue them together. As long as you unclamp that in about an hour or two, the wax paper won't stick to it. If you use Smooth On, though, the wax paper might stick to it.