
Now lemme explain how I fixed the problem.
How I fixed the problem.
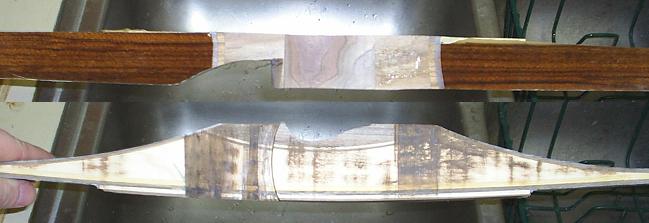
That little glue spot was only on one side of one limb, so I figured if I just narrowed the whole bow on that side, it would fix the problem, and not cause any misalignment. This is just an exaggeration of the basic profile of the bow and how I cut off one edge, making the whole bow more narrow, but not changing the alignment or anything.
I put a piece of masking tape all down the back on the side with the glue. To get the line perfectly even all down the side of the bow, I taped a pencil to a chop stick so that the chop stick would ride along the side of the bow while the pencil tip drew the line on the back.

Oh the cleverness of me! After I drew the line on the masking tape, I cut it out with the band saw and then sanded to the line. Not only did it fix my glue problem, but it also caused my splices to be centered in the limb better. Two stones with one bird! I love it when everything comes together!
Doing the handle
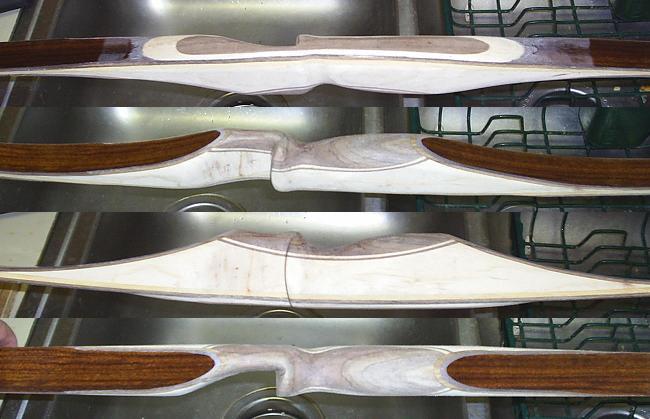
The next thing I did was cut an arrow shelf with the bandsaw. Stupid me cut past center like I told you not to do earlier, and now you can see the glue line from where we glued the two pieces of maple together. The secret is exposed.
Then I radiused the shelf with the disk sander on my belt sander. After that, I drew a curve where I wanted to cut out my contour and cut it out with the band saw. Here's what it looked like so far:
Do you see all that black stuff on the side? That's the burn from the band saw blade because after cutting a lot of glass with it, it's completely worn out and dull. These burn marks will come out with sanding and rasping though.
Next, I shaped the handle first using the belt sander to get it roughly rounded, then rasps to fine tune it, then a file to smooth out the tool marks left by the rasps. Here's how it looked then.
Checking alignment
Now I cut the nocks, but nothing to see there that you haven't seen in Making an Ipe Bow, part 5. Then I string it up and check the alignment. Once I'm happy with the alignment, I narrow the tips to where they are 1/2" at the beginning of the overlays, making sure to take the same amount from each side so it stays in alignment. I use the belt sander to narrow the tips. Once the tips are narrowed, I check alignment again. If that's alright, I go ahead and shape the tips with the belt sander and a file. When I give the tips their final shape, I cut them shorter. I leave them long enough to use a stringer, though.
Sanding the fiberglass
Now I sand the fiberglass. That's right, you have to sand the fiberglass. I don't know why, but you do.
Fiberglass is nasty stuff. If it gets in your clothes, and you put your clothes in the laundry, you could be itching for a month. To prevent that, I have a designated long-sleeve shirt that I never wash. I just put it on over my t-shirt, put on gloves, and put on a respirator, and do my work. When I'm done, I turn the shirt inside out and stow it somewhere for the next time I do fiberglass.
Sanding fiberglass can be tiresome, so I start out by using my cool inflatable drum sander I showed you earlier, and I use a 120 grit sanding sleeve on it. It sometimes leaves a line down the middle of the bow that isn't sanded, and I go over that by hand with 100 grit sand paper. Here's what it looks like after being sanded:
Pretty cloudy, huh? After I get it completely cloudy, I string it up and check the tiller.
Tillering
One of the nice things about fiberglass bows is that it requires practically no tillering at all. You can just string it up and pull it back. Usually, the first time you string it, it's already tillered. Sometimes, you might want to weaken the top limb just a tad to get a positive tiller. You can do that by tillering from the sides with your belt sander. Be sure to round the corners, by the way.
As for me, I use my cool inflatable sanding drum. That way, I can tiller from the back and belly, and I can change draw weights. Being inflatable, it's much smoother than a belt sander. I don't think I'd want to use the belt sander on the surface of the glass.
Sanding the rest of the way
After it's tillered, I continue to sand the fiberglass by hand. I use 220, then 400, then 1000 grit. After that, it looks like this:

And then after putting a finish on it, it looks like this:

But we're getting ahead of ourselves.
I also sand the handle and the tip overlays. To sand the handle, I start with 100 grit, and I use a lot of that so as to get out all the marks and imperfections. Once that's done, the rest of the sanding goes pretty quick.
Finishing up with the finishing up
The last things to do are to apply your favourite finish, put something on for an arrow rest and a strike plate, and go shoot it. Sometimes when you put your favourite finish on, you'll notice white streaks in the fiberglass. This especially shows up when you use darker woods. From what I hear, just about all fiberglass has this, and it doesn't cause a structural problem. It only causes an aesthetic problem. If you have air bubbles under the glass that usually won't cause a problem either unless they're just enormous. Air bubbles are uglier than those streaks, though, because they show up better. This bow has some little white lines, and I'm not sure what they are. They don't look like the ordinary streaks that usually run down the length. But they don't look like air bubbles either. The other bow came out perfectly, though. Maybe I should've used the other one for this build along. It didn't have any problems like this one had with the sliding lamination and the ugly fiberglass.
Anyway, here's some pictures of the finished bow.
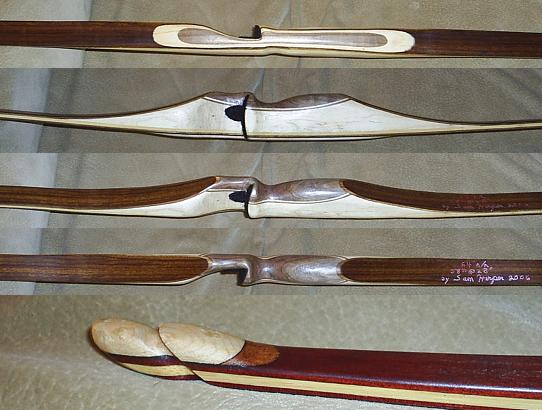
Those tip overlays are birdseye maple and mesquite. Now you might be wondering why I'd use birdseye maple in the tips and then plain ole ordinary maple in the handle. That's because I didn't have a piece of birdseye maple that was big enough for the handle.
I think this probably would've looked better if I had put another curved accent on the other side. That's just too much maple and not enough walnut in my opinion.
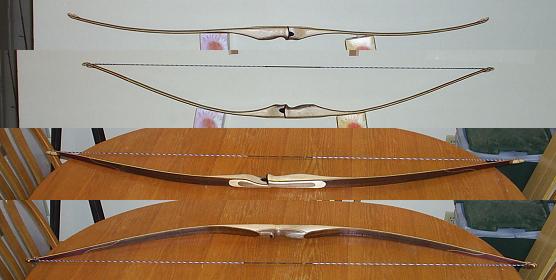
There's so little contrast bewteen the bloodwood and the zebrawood that the spliced limbs were almost a waste of time. If not for the maple accents, you might not be able to notice the splices at all in these pictures. Oh well, it was a learning experience. Next time I'll either use brighter zebrawood or a different combination of woods altogether (which is more likely).
Finally, here's a full draw picture:

Length: 64" nock to nock
Draw weight: 58# at 28"