I've been putting this one off for a while because it's a big of a "project" if you know what I mean. The reason I'm doing this is because unlike self-bows and things like that, there aren't a whole lot of comprehensive fiberglass build-alongs. There are a few that amount to, "cut the wood," "glue it up," "yada yada yada," and "you have a bow." Mine will be a bit more detailed than that, but mind ye, it'll be a little less professional as well. I live in an apartment and get by with the bare necessities.
When I make a fiberglass bow, I actually have several things going at once. I glue up my risers and spliced lams at the same time while preparing my fiberglass. That makes it hard to do a chronological build-along. Some of this build along, then, will be more topical than chronological.
This build-along also won't be quite as idiot-proof as the other build-alongs, because I just can't muster the enthusiasm to cover the same stuff over again. You might want to have a look-see at the ipe build-along or the red oak build-along to fill in any gaps.
The first topic shall be the form.
Three kinds of forms
There are basically three different kinds of forms you could use to glue your bow up on. One utilizes the firehose method, one the rubber band method, and one the c-clamp method. Of course there's also the combination rubber band and c-clamp method.
The firehose method, I think, is probably the superior method for getting good even pressure all over the bow. It's also much quicker to glue a bow up with that method. I have two problems with the firehose method, though. First, it's more difficult to make the form. Unlike the c-clamp and rubber band forms, the firehose form requires two pieces--a top and a bottom--that fit together, and the bow goes between them. If you're gluing up a riser, too, then you have to really cut that thing pretty accurately to accomodate the riser, and every riser you stick in there has to be identical. With the other two methods, you only have to have the bottom part of the form, and you have a lot more flexibility to try different kinds and sizes of risers. Second, it requires an air compressor to inflate the firehose unless you want to spend a lot of time pumping it up with a bike pump. I don't have an air compressor, I don't have room for one, and I can't afford one.
The rubber band method does a good job of putting even pressure all over the limbs. It's also dirt cheap. You just go to a bike shop and say, "Do you have any inner tubes you're throwing away?" They'll give you a few, and then you can just cut them into rubber bands. Once you have a bow glued up, the form is also very light (lacking any c-clamps or twice as much form), so it's easy to manuever through your crowded apartment to your hot box carrying the form. There are two problems I have with the rubber band method, though. First, even if you wrap saran wrap around the bow loosely, if you cover the bow in rubber bands, there's nowhere for the glue to expand when it gets squeezed out. It will pop through the plastic and glue your bow to the form. Second, I still haven't figured out how people use the rubber band method exclusively on the riser. If I were going to use the rubber band method, I would use it in combination with c-clamps. The rubber bands would go on the limbs, and the c-clamps would go on the riser.
I'm not going to go into the previous two forms. I use the c-clamp method for all my fiberglass bows. Now I'll tell you how I made my form.
Making my c-clamp form
For me, this was the most difficult part of making a fiberglass bow. The good and proper way to do it is get your shape (a difficulty in itself), tracing the shape onto a thin piece of plywood, cutting it out with a band saw, then using a drum sander to perfect it. Then glue two or more pieces of plywood together to get at least 1.5 inches thick and trace your form onto that. Then you cut that out with a band saw, leaving plenty of room outside the line. Then you place the thinner piece of plywood you perfected earlier on it so that it sits a little under the area you just cut with the bandsaw, and clamp them together. Then you use the thin piece as a guide for your router, and you use the router to bring the thicker piece (your form) to perfection. That gives you a perfect surface that is also nice and squared.
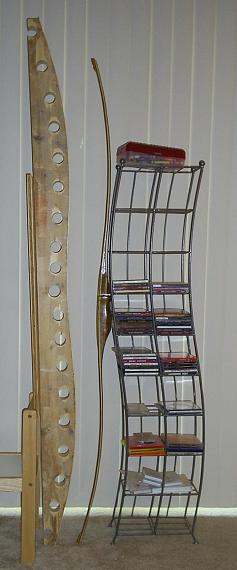
I am both lazy, cheap, and without a router, so I chose a different method. First, let me tell you how I got the shape. I got this CD tower at Bed Bath & Beyond that seemed to have a nice curve to it, and I used that shape to make my form. Here's a picture of the form, my first bow from it, and the CD tower.
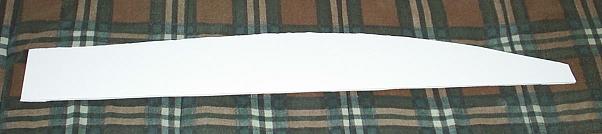
To get the form from the CD tower, I got some poster board and layed the tower on it. Then I traced the tower. Then I cut it out with a box cutter. An exacto knife, pocket knife, or even a pair of scissors would've also worked. Then I used my belt sander to sand to the line and get it perfect.
Then, I went to a construction site and liberated a 2x6 which had been thrown away. I must warn you that a lot of people warn against using a 2x6 for a bow form. The reason is because they warp, and if your form is warped, your bow will be misaligned or twisted. I believe it, too, because I've had pine warp on me after the first time being in the hot box. I guess I got lucky with this piece of wood, though. I've made something like eight bows from it, and it has yet to warp. Anyway, I cut the 2x6 down to 6 ft, found the center, and drew a line. Then I placed the poster board template on half the board and traced it. You can vary the amount of reflex or deflex by varying the angle at which you put the poster board on there. Just measure marks on both ends of the 2x6 so you can put the poster board at the same place on both ends and not have one with more reflex than the other. Trace one side, then trace the other.
Once that's done, I cut it out with a band saw. This would be incredibly difficult with my dinky little 9" band saw, so I went to a friend's house and used his 12" band saw. Since the wood is six feet long, it helps to have a friend who can hold one end while you guide the other. Go slowly so you can get a good accurate cut.
After you've cut it out, sand to the line with a belt sander. It would probably be a lot easier if you had a drum sander or spindle sander at 90 degrees from a table. I had to hold it free hand on a belt sander, but I was able to do a decent job.
This is another advantage of a 2x6. It's softer and cuts easier than plywood, and it sands easier.
Next, I drilled holes in the form for the c-clamps. I use 3" clamps for the limbs, 4" clamps for the fades, and a 6" clamp for the middle.

The holes for the 3" clamps are 1.5" diameter. The one for the 6" clamp had to be bigger to fit the clamp. The holes are a little less than 4" apart when measure center to center.
Next, to get rid of the imperfections, I glued on a thin slice of ash. A lot of people use formica for this, but I think formica is too thin to really correct my kind of errors. The thicker the lamination you glue on there, the better it will correct your errors. I used my lam grinder to grind a good even piece of ash six feet long and glued that on there.
Once the ash is good and glued, I marked the center, and then measured out 8" on each side, made a mark, and labled it 16". That's because I figured 16" was a good length for a riser. I later discovered the 18" riser. I measured 1" from the 16" mark on both sides and labled that 18". (You see, one inch on two sides equals two inches, so one inch left of 16" on one side plus one inch right of 16" on the other side amounts to 18".)

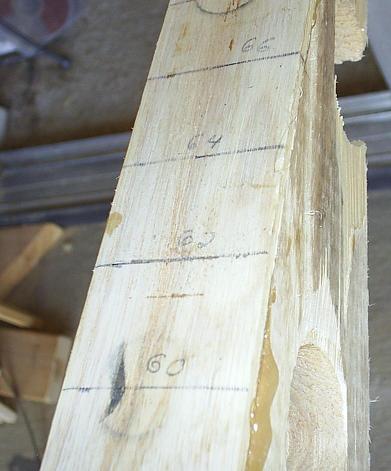
Those marks aren't really necessary, as I later discovered. The next marks are, though. Next, I wanted to make some marks near the end of the bow according to the length of the bow I wanted to make. I measure 30" on either side of center and labled that 60". If I wanted to make a bow that was 60" nock to nock, I would not cut the bow at the 60" mark. I would cut it at the 62" mark. That would give me an inch on either side from which to cut the nocks. I measured one inch intervals beyond 60" to get 62", 64", 66", and 68".
The only thing left on the form was to glue and screw a piece of plywood on the bottom so it wouldn't fall over.
There are many other ways to get the shape for your form. You could use an AutoCAD software program, draw it freehand (I did that once and it resulted in a fiberglass character bow, but some people are successful at it), bend pieces of aluminum and trace them, borrow somebody else's profile, trace a bow you already have, etc. Use your imagination.