The next thing we have to do is glue the bow together. For some reason, everybody calls this a "glue-up." Why it's a glue-up rather than down, or rather than a glue-together is a mystery to me. I suppose "up" is just shorter to spell and quicker to say. I'll stick with it for the sake of convention. I'm not a teenager anymore, so I don't feel the need to be a rebel.
Doing a dry run
Let's not worry about why it's called a "run." What's important is that it's called "dry" because we're not going to use glue yet. Not use glue you say? That's right. Before we use glue, we want to make sure we know how everything is going to work out. We don't want to discover that part of the form is going to fall apart, we haven't got enough reflex, or we don't have enough clamps or something. The dry run helps you to forsee unforseen calamities. It also helps build confidence.
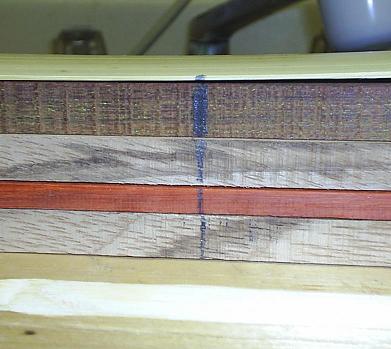
The first thing you should do is find the midpoint of the length on all the pieces (except the tip overlays)--the bamboo, the ipe, and the handle pieces. Make a pencil mark on the edges of all these pieces. That will help you get everything lined up.
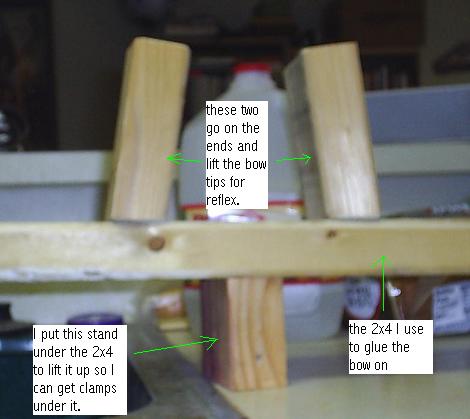
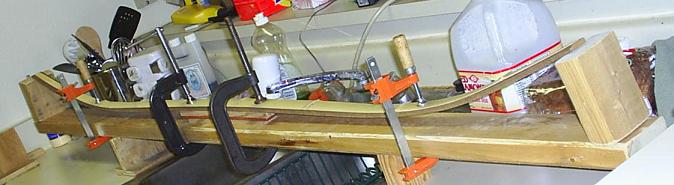
Now get your form ready. I just use a 2x4 I got out of a construction site dump. It has to be straight with no warping and no twist, and it has to be six feet long. I set the 2x4 on a couple of stands which lifts the 2x4 up and allows me to get clamps under it. You'll also need something to put on the ends of the boards to prop the bow tips up, giving the bow its reflex. Almost anything will do as long as they are the same height.
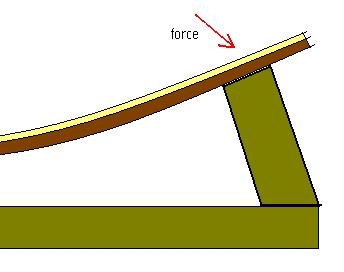
Notice how my doohickies sort of lean? There's a reason I do that. You see, a couple of times I've had the end pieces want to fly out from under the bow tip while under pressure.
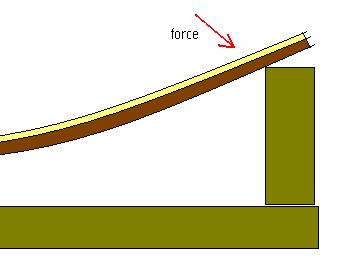
These leaning doohickies don't have that problem.
I got them cut to the same angle by tilting the table on my band saw and using the miter gauge to saw them. Then I got them both to the same height by grinding one with the belt sander until it matched the other.
When I do the dry run on a bow I've glued up a dozen times, I don't do the whole shabang. That is, I don't put every single clamp on there that I'm going to use. I just put the critical ones on there--a couple to hold the handle and the ones for the deflex.
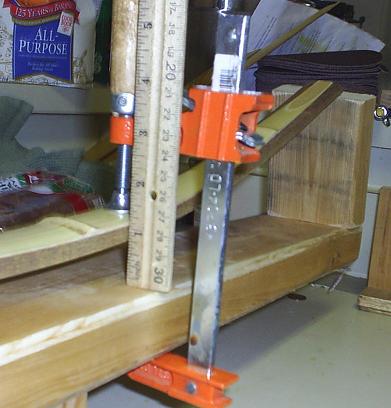
I measure 12 or 13 inches from the tips and put a pencil mark on the bamboo. That's where I put the deflex clamps. But that's a matter of personal preference.
There's about a gazillion ways to do one of these glue ups. Most I've seen have separate pieces for the deflex and the handle. The method I use is about as simple as it gets. I just put the handle of the bow straight down on the 2x4 and use the two orange clamps to give it whatever amount of deflex I feel like giving it. For bamboo-backed bamboo bows, I don't give it any deflex at all, because it'll have plenty of deflex once it's tillered. I just crank the deflex clamps down until it's about even with the handle. But in the case of ipe or Osage, I give it a little deflex. Since my handle is an inch thick, I make the gap between the deflex part of the limb and the 2x4 about 3/4".
This is all a matter of personal preference, though. The truth is, just about every bow I do is a little different.
The procedure I use is to first clamp the bow at the handle. Then put the leaning doohickies under the tips. Then put the deflex clamps on. That seems to be the easiest way.
The leaning doohickes are about 4.5" high, but that, too, is a matter of personal preference. After all, you could just make a perfectly straight bow if you wanted to.
Gluing the bow together
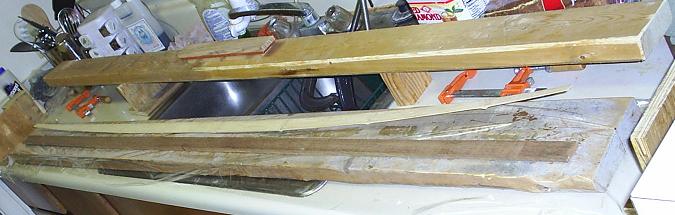
To glue the bow together, I put a 2x6 in front of the form to use as a table. Then I put a piece of saran wrap long enough to extend past the table. I want it to be long enough to wrap the bow up in. I lay the bamboo and the ipe on the saran wrap with the surfaces facing up that I'm going to apply glue to.
Then I mix the glue up. Unless you plan to make fiberglass bows, I recommend using Urac-185. It's about half the price of Smooth On. I'm using Smooth On because I also like to make fiberglass bows, and you can't use Urac for that. Smooth On comes in two parts--the glue and the hardener. DON'T EAT THE HARDENER!!! I know it looks like caramel, but it's not. I use about equal parts of each, but I don't really measure it that accurately. I take plastic spoons and get a big heaping spoonful of each, plus just a little extra. That is plenty for one bow. If you run out of glue before you have everything together, don't panic. Smooth On gives you plenty of working time, so you can just mix up a little more. Here's my stuff.

On the left, you'll see a blue-handled seam roller I got at Lowes. That really makes the glue-up easier. In the middle you'll see a plastic yellow bowl with hardener on the left and glue on the right. The stick of wood laying across the bowl is what I use to mix it. You gotta mix it really well, too. I use that same stick of wood to scoop glue onto the bow parts. Then I use the seam roller to spead it. It works really well.
Be sure to put glue on both surfaces that are glued together. That ensures there are no dry spots. Here's the procedure I use: First, I glue the bamboo and ipe together. Then I glue the three handle pieces together. Then I glue the handle to the ipe. Then I glue the tip overlays on. Whenever I glue two pieces together, I squeeze as hard as I can with my hand. That reduces the amount of sliding around later on when you try to put the clamps on.
After everything is together, I wrap the saran wrap around the bow.

I don't know if you can see it, but I've got a couple of pieces of masking tape wrapped around the limbs. That's to prevent the bamboo from sliding around on the ipe. It helps. Do you remember when I told you about how the bamboo is wider in the middle than the ipe, but that the tips of the bamboo are more narrow than the ipe? Well, somewhere on the limbs, there'll be a point where they are both the same width. I put my fingers on that spot and get the bamboo and ipe all situated; then I put the masking tape around that spot.
Now it's time to apply the clamps. This is really easy if you have a lovely assistant. One of you can hold the pieces together, keeping them lined up while the other applies the clamps. But if you're alone, there's still some techniques you can use. A friend of mine drills a tiny hole through the pieces and puts a nail in it. I don't do that, though. What I do is put one clamp in the middle and only tighten it enough to keep it from falling off, which is not much at all. Then I adjust the alignment if needed. Then I put one on the end of the handle, and another at the other end of the handle. Again, I only tighten them enough to keep the clamps from falling off. After that, I tighten each one slightly, then repeat, and keep repeating until they're pretty tight. If you do this gradually, the handle won't slide around, and when it does, you can make the necessary adjustments as you go.
Once I have the two clamps on the ends of the handle kind of tight, I move the middle one to the side and put a fourth clamp on there. You should put a piece of cardboard, rubber, cork, wood, or whatever between the clamps and the bamboo because if you don't, the clamps will put dents in the bamboo.
Once the handle is clamped down, the rest is easy. Put the leaning doohickies under the tips, put the deflex clamps on (make sure you have the same amount of deflex in both limbs), then put the rest of the clamps on. Don't forget the clamps for the tip overlays, and be careful not to let them slide around.
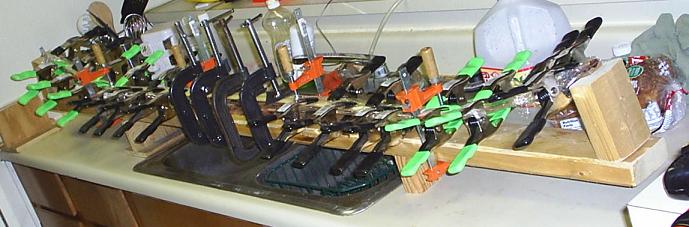
When you put the rest of the clamps on, don't put them all on one side. If you've got too much weight on one side, that could cause the limbs to twist. That's especially true if you use all C-clamps, because they're heavy. Alternate sides instead. I'm using a bunch of squeeze clamps because (1) they're a lot cheaper than c-clamps, (2) they don't weight nearly as much as c-clamps, (3) they're much easier and quicker to apply, and (4) they keep constant pressure on the bamboo. Lemme explain 4 a bit. You see Smooth On is a bit thick at room temperature, but it thins out when you heat it up. If you were to put a c-clamp on there and then stick it in the hot box, the glue would become thinner and more would leak out. When it leaks out of the joint, that takes the pressure off the c-clamp, and the c-clamp will become loose. You don't have that problem with squeeze clamps, because no matter how much glue squeezes out, they will continue to keep the same pressure. Also, (5) squeeze clamps don't leave dents in the bamboo, and (6) squeeze clamps don't have a problem staying on the crowned surface of the bamboo like c-clamps do.
Don't get in a rush. Smooth On gives you plenty of working time. After I have everything together, I put it in my hotbox for six hours. You can use the c-clamps for handles to carry it around. After six hours, I unplug the hotbox, but I don't take the bow out. It needs to cool, so I leave it in there until the next day. The bow will hold its shape better if you let it cool before taking it off the form.