
For the rest of the day yesterday, I debated with myself on whether I should go ahead and try to straighten out that tiller. I decided against it, because the tiller is really not bad, and my drive toward perfectionism would only result in a weaker bow that doesn't perform any better.
I also thought about putting the bow back on the tillering stick and taking better pictures, but that didn't feel honest. I'll take a full draw picture at the end of this build along so you'll be able to see a clear picture of the final tiller anyway.
Shaping the handle and tips
I use the belt sander to get most of the shape on my handle, and I use rasps and files to tweak it. I don't use the belt sander to round the fades, though. I use a rasp and a file to do that. After shaping it I go out and shoot it. The things I look for when shooting it are noise and vibration. I like to notice as little as possible of both. I also want to make sure it's not going to break before investing anymore time in it. After shooting it, I sand it. Here's the result:
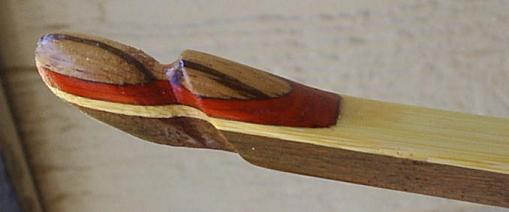
When I do the tips, I cut them a little shorter, but I leave them long enough to still be able to use a stringer. Cutting them shorter reduces mass which also reduces hand shock and increases speed ever so imperceptibly. Here's how I did my tips:
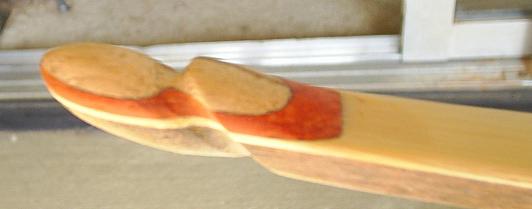
I saved the tips for last so I can sand/file away the red dye and wax from my string that gets in there. I want it to be nice and clean before I put a finish on it.
Putting the finish on
Before I put a finish on, I wipe the bow down with an old t-shirt to get as much dust off of it as possible. Sometimes, though, dust settles down into the pours, and I can't get it all out. So I sometimes wipe the bow down with acetone. I should warn you, though, that whenever you wipe acetone on padauk, it causes red stuff to smear into the other wood, and then it's impossible to get it off. So I'm very careful. First, I wipe down the limbs. Then I put a dab of acetone on my shirt-wrapped fingertip and trace it carefully along the padauk accent.
Remember that ipe is oily. I've tried tru-oil, polyurethane, and sparurethane, and none of it will dry on ipe no matter how much time you give it. A friend of mine suggested Deft. It's cheap, comes in a white spray can with a blue and brown wavy stripe, and it's available just about anywhere, including WalMart. After the first coat, I found it to be completely dry within 20 minutes. I've been using Deft ever since. It's so easy to use! If you still prefer other finishes, you can use a couple of coats of Deft lacquer to seal the ipe, and then put your favourite finish over that. As for me, I'm just going to do the whole thing in Deft.
When I spray a bow, I hold it by the handle horizontally in front of me. I give a few bursts to one tip to be sure I get in the grooves. Then I make two passes on each of four sides of the limb--the back, belly, and two sides. Then I flip the bow over and do the other limb. Then I put the bottom tip down on a piece of cardboard and hold the top limb with my finger tip while spraying the handle. Then I just lean the bow over so the tip rests against the wall. That way, the only thing the bow touches while spraying and drying are the very tips. There are other ways, but that's how I do it.
While the Deft is drying, I make a new string for the bow. Brown and red seems to go well with the ipe and the padauk so that's what I'll use.
I put three coats of Deft on there and then string it up and check the final draw weight. Then I write on it with a metallic silver Sharpie. Coloured Sharpies don't seem to show up on the ipe, but this silver Sharpie does.
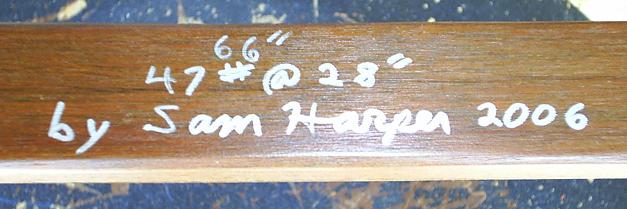
The reason I don't write directly on the wood is so you could easily sand the writing off if you ever wanted to. I don't write on top of the final coat either because I don't want the writing to smear. By putting it between coats, it's protected.
Before spraying anymore Deft on there, I wipe the nocks with my t-shirt to get any wax or dye from the string out. Then I put on a few more coats. Anywhere from five to seven coats altogether is what I use. I like to use the satin finish, too, because I don't like a lot of shine. Figerprints show up too easily on glossy surfaces. I like the way satin finishes look and feel. There are hunting considerations, too.
The last thing I do to the bow is put velcro on the arrow rest and strike plate. I use industrial strength velcro. It's self-adhesive and easy to apply.
Showing the goods
Now that the bow is all finished, here's some final pictures of it.


We hope you have enjoyed this excusion into making a bamboo backed ipe bow. Join us next time when maybe we'll do a fiberglass longbow build along or a belt sander lam grinder build along or a footed arrow build along or something like that.