 Chinatown and
Chinatown Sewers
Chinatown and
Chinatown SewersWeapons: M79-2 grenade launcher, M1911A2 handgun, M870 shotgun, M203-3 grenade launcher, Club 3, M79-3 grenade launcher
Armor: Cr Protector, B Protector
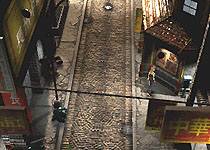
The day begins at the map of New York City. Your first destination is Chinatown. When you get there, keep going north until you reach the next screen. Go north a bit and look to your left for a chest containing a Medicine 3. From here, go directly right, across the street to find a chest with a PE +1 (or PE +2 20%). Go back into the street and continue north. In the next screen, go up and open the chest near the left lamppost for a M79-2 grenade launcher. Go down a little bit and pick up the Offense +1 (20% Offense +2) in a chest nearby. Directly right you'll find a phone. Save, and then keep going right to find a hidden area. Get the M1911A2 handgun, which is directly south from the door, and the Tool, which is in the bottom right corner. Leave, go back to the street, and continue north. You'll meet up with Maeda here. He'll give you a Narita Good Luck Charm. Now pick up the Ammo +30 in the chest in the upper left corner, then go down the sewers.
When you get to the bottom, go right to an intersection, then go down. In this tunnel, keep going down until you reach the next intersection. Get the M870 shotgun from the chest on the south platform, then go down some more. You'll come out through the archway on the left. To your right is a chest that contains an Offense +2 (20% chance of getting Defense +2). Pick it up, then go through the archway on the right.
In this tunnel, there's a shiny object on the ground that turns out to be a Tool. Get it, then keep going north. At the intersection, take the right path and you'll run into a dead end. There's a chest by the rubble that contains a Defense +1 or Offense +1, though. Take it, then go back to the previous screen. Go left at the intersection now, and continue left until the next crossroads.
Keep going left at this intersection again, and then go north at the next one. You'll find a Range +1 (the shiny object on the ground) in this tunnel. Once you get it, go back south to the previous intersection, and go left instead. In this intersection, there are three ways you should go. Go south first and there's a chest that contains a Medicine 3 (or Range +1 20% of the time). Go west next and pick up the M203-3 grenade launcher in the chest. Now go north.
Go north at the intersection and examine the glimmering item and you'll get a Super Tool. Return south and then head west. The object on the ground is a Cure-D. Get it and continue west. Continue west at the intersection and you'll run into a dead end. Get the Medicine 4 here, then go back east, and then south. Get the Cr Protector in the chest at the end of the tunnel, then go through the south exit. Go all the way south until you can go no more, then climb up the ladder (finally!). Note that you could've gotten to this same place by going west, south, south starting at the entrance to the sewers, but you would've missed all the items.
At the top of the ladder, go right, past the T-intersection and open the chest for the Club 3. Now go south from the intersection to the next screen. Go forward and you'll find the people from Central Park (in a slimy form). When you regain control, first go right, then climb down the ladder. You'll get into a fight with some familiar enemies. These two are the same as the alligator you fought in the Carnegie Hall Sewers. They use the same tactics and have the same moves, so they should be no problem. When you beat them, each one will give you a CR Evade +1 or a Range +1.
Climb back up the ladder, then go up, and take a right at the corner and go up the stairs. At the top, enter the door in the upper right corner. Now get the Ammo +30, then use the phone and save. Now examine the control panel. Turn on the power, activate both pumps, then turn off the power. Go through the door on the north. Cross the tunnel and enter the door on the other side, then run up the stairs and through the door at the top.
Cross the train tracks, then climb up the platform. Go to the left and get the CR Evade +1 (20% CR Evade +2), then go north. Get the Range +1 (20% Range +2), then get the Medicine 3 (20% chance of getting Ammo +30) to the left of the phones, then save. Jump down the platform to get on the tracks on the left side, then go north. Go right at the next screen and get the Medicine 3 (20% chance of Ammo +30) in the chest, and go right to the next screen. You'll have to fight a boss battle now.
Centipede
Level: 26
HP: 500 (1st stage), 250 (head), 180 (tail), 120 (body), 120 (body)
EXP: 10000
This boss has two stages to it. The first stage, you fight the whole body. It has three attacks. The first is a normal lunge attack that hits a certain area in front of it. The second, it shoots some electric bolts at you, which causes damage and darkness. The third, it shoots some things into the air, which rain back down on you, causing damage and poison. The first and second attacks can be dodged as long as you're standing to its side. Just keep shooting it from there. There's no need to shoot all your bullets in one turn, especially if you're using a slow weapon, since it will turn to face you while you're pummeling it, and will hit you with its lunge attack. The poison attack, you must dodge it on your own. It's pretty hard not to get hit, but it's not impossible either. When it takes 500 damage, it will explode into four parts, the head, two body parts, and the tail. At this time, it's best to switch to the rifle, because all four of them will constantly rotate around you, and usually they'll move right before you shoot, causing you to miss or do puny damage. Anyways, that's not all to it. When they attack, all four of them will take turns pummeling you. The head will attack first, then the nearest body will go and they'll continue in a circle until finally the tail has its attack. This is their only attack, and it seriously hurts, especially since the head can poison you when it hits you. One way is to always keep on the opposite corner of the head since it attacks first. Once it attacks, move to the opposite corner of the tail. You'll be hit by the two body parts, but they do the least damage, and you'll have dodged two out of four attacks. You can try to run in a circle (opposite side of head, body, body, tail), avoiding them as they each come out, but it's pretty hard, especially since Aya runs so slowly. When attacking, attack the two body parts first, because they have the least HP. When one part dies, the battle becomes a lot easier. Once the body parts are dead, take care of the tail, then finally the head. When you win, you'll get four various items from each part. First, you'll get an Ammo +30, Defense +1 or Offense +1. Second, you get Medicine 3, PE +1 or Range +1. Third, you get Medicine 3, CR Evade +1 or Bullet Cap +1. Fourth, you'll always get a M79-3 grenade launcher.
After killing the boss, run to the right until you bump into a train, go up, around and to the right of it, then go down, past it, and into a train at the bottom right corner of the screen. There are three chests in here. You'll find a B Protector, and one chest with a Tool. The third chest contains either a Tool or a Super Tool (5% chance). Leave the train, then go north to the bridge. Run across the bridge and examine the body of the guard for the Gate Key. Aya will notice the slime going towards the museum. Now go left, and that's the end of disc one. Put in disc two, and go back to the subway. Run all the way back to the train stop platform (where the phone was). Go south from the phone, and then go up the stairs under the EXIT sign and you'll arrive back at the map of New York City. Before you go anywhere else, you should head back to the Police Department and drop off all your stuff.
Pier Number 3 Warehouse
Weapons: PPK handgun, M203-2 grenade launcher, AT4 rocket launcher
Armor: Cm Protector, Sp Protector
This area is completely optional, but if you go here, you can get some good items, and also build up some levels in the process. If you decide that you don't want to go, then skip this section and head straight to the museum.
Upon going through the gate, swing to your right and open the chest for a PPK handgun. Search somewhere behind the sliding metal door for a Tool, then go up. The screen will shift and you'll be at the front of the warehouse. Run up the steps and enter.
Go forward and check your left for a chest that contains the Cm Protector, then continue north to the next screen. Here, you'll see a cat chasing a rat, and then after some mutations, the rat will chase the cat away, heh. Kill the mutated rat, then check the bottom right corner for a shiny object which turns out to be a Warehouse Key. Go up a little bit and under the bridge. Right after you pass the bridge, there's a chest to your right among the rubble that contains a M203-2 grenade launcher. Even though the chest is in plain sight, you might have trouble spotting it because it's camoflauged so well. Now go through the door on the north side. Keep going down and then enter the door under the red light. Head left and open the chest for the Sp Protector, then go near the bottom right corner and open the chest for a Rocket (hint hint). Go up the stairs on the left side and save before continuing through the left door. Also, after saving, go to the right of the phone, climb up the ladder and open the chest for an Offense +2 or Offense +3 (10% of the time). Now go through the left door.
Cross the bridge and enter the door on the other side. In the bottom left corner of this room you'll find an Offense +2 or Defense +1. A chest in the topright corner contains a Tool. The one in the topleft corner has an Offense +2 or a Defense +2. There's also a chance you'll get a Defense +3 (10% of the time). Once you've picked up all the items, go down the elevator.
Slide yourself down to the bottom, then go left. You'll be attacked by the boss.
Crab
Level: 32
HP: 856 (head), 420 (claws)
EXP: 2510
The Crab has three parts to it, two claws and the head. What you should do is always stick to its side. It shoots out bubbles in a cone-shaped direction in front of it that hits twice and lowers your defense. If you're to its side, it won't hit you. It also has two physical attacks. One is where it thrusts both its claws outward, and the other is a grab and smack you to 1 HP move, but both can be avoided as long as you're to its side. It has one more move where its eyes pop up and shoot lasers. You can't avoid this if you're to its side, so once you see the eyes come out, get as far away as you can from it. If you get hit by them, then heal and get back to its side. Kill the claws first, then go for the head. Once the claws are gone, the defense of the head lowers. If you have Burst effect on your weapon, then you might be able to hit both claws with one attack. Chances are that the far claw will be out of range, though. Note that you won't always be directly at its side because it's constantly moving away from you. As long as you keep following it, though, you'll be safe, because it stops when it's about to attack, giving you time to move in. Don't attack it while it's moving, wait instead until it has attacked, and then counter. When you win, you'll get the AT4 rocket launcher (ooh).
Once the crab is gone, go to the northwest. Watch the steam patterns. When you think you've got it down, go in (while there's no steam), pick up the shiny object (Tool), and get out. Return to the bottom right and climb back up the elevator lift. Now leave the warehouse. If you're thinking of equipping the AT4 right now, don't, because you won't find rockets in abundance as you do Ammo. Save it for the boss fights.
 American Museum of Natural History
Weapons: G22 or P220-2 handgun, M203-4 grenade launcher, MP5PDW machine gun, M500 shotgun, Maeda's Gun, M8000 handgun, M9-3 handgun
Armor: N Suit, Sv Protector, B Jacket 1, Cr Vest 2
After finishing the warehouse, go to the museum. You may also want to stop by the department first and drop off all your extra stuff.
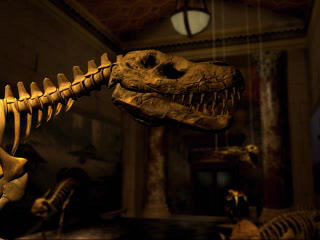
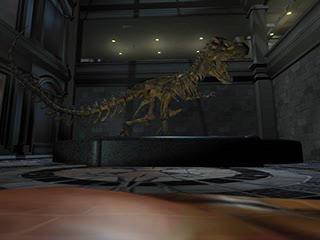
Enter the museum now. In the lobby, head towards the topleft, and follow the person who slipped behind the door (save before you follow). Run to the left in the next room and then go to the bottom left corner. Off screen in the corner is a chest that contains a Medicine 4. Get it, then take the door on the left. Go to the bottom left corner in this next room and open the chest behind the frog exhibit for a Medicine 3. Enter the doors at the north. You'll see the figure disappear behind a locked door, and then you'll have to fight a pair of dinosaurs. Once you kill them, go north near the middle of the room, and then check your left and right side for chests. The left chest contains a Tool or Medicine 3. The right chest contains either the G22 or P220-2 handgun.
Go back south, return to the lobby, and then save again. Take the north exit from the lobby, under the stairs. In the next screen, you're in an area with lots of green growth. Examine the machine on your right and you'll get a little quiz. Answer it correctly and you'll get a prize. Answer incorrectly and you'll get a chance at another not-so-good prize (check below for the answers). When done, continue north while pressing against the "wall" on your right. After a little bit of running, Aya should be able to get through, now go south and east to get to a hidden room. Pick up the Ammo +30 and answer the next quiz. Now go through the door on the right. Open the chest under the fire alarm for a Defense +1, then go south to the opposite side and open that chest for an Offense +1. Now run to the bottom right corner and get the N Suit in the chest, then go south a little, turn to face the west side, and push the box out of the way to reveal another room. Get the Trading Card and the Tool, then go back to the green area. This time, go all the way north.
When you get out of the green area, continue north through the passage, then turn left at the end. At the new screen, you'll see another quiz here. Take it, or don't, then continue left and beat up the scorpion. After it's gone, go left to the next screen. Take a right at the canoe in the center of the room, going through the north exit. Go to the bottom right corner, at the foot of the stairs, and open the chest for an M203-4 grenade launcher. Instead of going up the stairs, go north around them. When you get to the next screen (the place with all the heads), just try to leave, and you'll be attacked by three armadillos. Kill them, return to the previous room and now go up the stairs.
At the top, you'll see another quiz in the upper right corner. Go south for a bit, then look to your left and right for two chests that may be partially hidden. The left chest contains a CR Evade +1 or PE +1, the right chest has an Offense +1 or Defense +1. Now go through the north exit. Walk around the exhibits and take the door on the upper right corner. Climb down the ladder, pick up the Offense +1 or Defense +1 in the chest, then go through the door. Pick up the tool hidden by the left head, then climb back up the ladder to the second floor.
Climb up to the third floor now. Pick up the Rocket in the chest, then go through the door back inside. Take the quiz in the lower right corner, then go through the exit at the southwest. In the next room, you'll find another quiz in the bottom right corner. Take it, then leave the room through the south. You'll see some stairs to the second floor. Go down them, pick up the Revive inside the chest, then go back to the third floor. Now take the exit to your right.
 Inside the
next room, a pterodactyl will crash into the room and attack you.
Kill it off, pick up the Medicine 4 in the chest, then continue
going right. When you get to the room with the fall dinosaur
fossils, go south (or continue to go south, rather). Take the
door on the west side of the room. Open the chest for the Sv
Protectorby the smashed window, then climb through the window.
Run across the ledge to the right, jump down to the second floor,
and then climb through the window.
Inside the
next room, a pterodactyl will crash into the room and attack you.
Kill it off, pick up the Medicine 4 in the chest, then continue
going right. When you get to the room with the fall dinosaur
fossils, go south (or continue to go south, rather). Take the
door on the west side of the room. Open the chest for the Sv
Protectorby the smashed window, then climb through the window.
Run across the ledge to the right, jump down to the second floor,
and then climb through the window. After going through the window, go through the east door. You'll find yourself outside of Klamp's Office, but it's locked, so take the path leading north. Check under the tent labeled Museum Shop for a Defense +1 and a Tool, then continue north. Run down the long hallway and take a left at the end. At the red carpet area, take the door on the north. Examine the monitors, and examine the blinking object to the right of the monitors, then deactivate the alarm. Open the chest on the left for an MP5PDW machine gun, then use the phone to save (finally!).
Before leaving the room, stand in front of the alarm, then run to the right. When you can go right no more, head south (you're off the screen), and then examine everything around there until you appear in the elevator. Move it to the fourth floor. You'll come into a secret room where you can pick up some various items. Among them are the Tool, M500 shotgun, B Jacket 1, and Cure-D. Now go back to the second floor. Leave the monitoring room and head back to Klamp's office (go right from the red carpet area).
In Klamp's office, just watch the events as they happen. You'll come out with the Klamp Key and Maeda's Gun. Outside of the office, go through the door at the bottom left. Also note that the stairs are no longer blocked, but don't go up them. In the next room, keep going left and unlock the door with the Klamp Key. Do the quiz in this room, then take the door north. When you come up in the next room, walk to the center of the room and you'll be attacked by the Triceratops.
Triceratops
Level: 33
HP: 750 (1st stage), 900 (2nd stage)
EXP: 50,000
This boss has two attacks. One is a charging attack and another a lightning attack. The charging attack is fairly easy to dodge in the beginning. To be able to dodge it, though, you'll need to be running _before_ it charges, otherwise you won't have enough time to get out of the way. Once you get the pattern down, you should be able to tell when it's about to charge. When it loses more HP, it will charge two, then three times in a row. When it does this, it's pretty hard not to get hit, so make sure you're ready to heal. Its other attack is a lightning attack that curves around the whole room. When it fires, look for the little open spot in front and beside its head. That's where you should stand when it's about to shoot the lightning. Other than that, there's nothing more to this boss except dodge and shoot. When you deal enough damage, then its head will disappear. At this point, it's weak against ice, so switch to the M203-4 grenade launcher. Also, in this form it will charge less and shoot lightning more often. You'll get a mighty Ammo +6 when you beat it.
With the Triceratops dead, go back down the stairs to the lobby and save again. Do _not_ go south otherwise you will have to fight another boss without saving! After you've saved, go back to the Triceratops room and try to go south. You'll be knocked all the way down to the first floor. Pick up the Ammo +30 and Medicine 4, then run to the right. You'll be attacked by the T-Rex.
 T-Rex
T-RexLevel: 35
HP: 2400
EXP: 100,000
This guy is even tougher than the Triceratops (that is, if you thought the Triceratops was tough). In the beginning, it will work on shooting flames at you. The flames cover nearly the entire room in front of it, so if you don't want to be burned, then stay behind it. The best thing to do is stay near its left side and more behind than in front of it. That way, when it shoots the flames, you won't have to worry about getting into position. Sometimes it will jump to the other side of the screen and follow with the flame attack. When it does that, just quickly run back to position so you won't get hit. The flame attack can hit multiple times at about 150 damage each, and you can take up to 750 damage if you're standing in front of it when it fires, so you definitely don't want to get hit. Its other moves consist of a normal biting attack which is easily dodged and one where it shoots two bolts of energy at you. It's not as easily dodged, but the damage is bearable. To dodge, watch when it's about to shoot the balls, then start running away from it. When they actually start coming at you, start running towards it and then a little bit to the side. To kill it, just keep shooting at it from its side with your strongest handgun (using anything else is too risky as they fire too slowly) or machine gun. If you happen to have Liberate by now, use it, and the battle will be over. You'll get the M8000 handgun when you win.
Run to the bottom left corner, then enter the doors at the south wall. You'll end up back in the lobby. Save, then go into the elevator and go to the fourth floor. There's a chest here that contains a Full Cure or Full Recover. Get it, then go back into the elevator and head to the second floor.
Out of the elevator, go west two rooms, then go north. Head up the stairs back to the Triceratops room. Now go south (you won't be rammed this time) to the next room. After the "earthquake", you'll notice the window on the west side is shattered. Go through it, then turn south. You'll find two chests with a Tool and an M9-3 handgun inside. Also, before going up the stairs, go north again, down the stairs, and south to the room with the quiz. You'll find broken glass in this room, too. Go through it and head to the bottom left corner of the room. In the two chests you'll find a Cr Vest 2 and a Super Tool. After getting them, go back to the room where the "earthquake" occured and up the stairs.
Go through the door on the north, and watch the events take place. Aya will automatically leave the Museum after that. View all the cool FMV's and Aya will be brought to an aircraft carrier outside of New York City. Eventually you'll be able to save, and after that, you'll be at the Statue of Liberty.
Also, here are the answers to the Quiz questions in the Museum.
-How many animals are hiding?
9
-The name of the organelle that appeared in the first organism?
Mitochondria
-What was the nutritional source of the first organism that lived 3.9 billion years ago?
Nitrogen oxides from volcanoes
-The mitochondria creates ATP (adenosine triphosphate) within the cell. How much energy is this equivalent to?
200,000 V per cubic cm
-By taking mitochondria, which uses oxygen as its nutritional source, into the body and living with it symbiotically, the bacteria has acquired a tremendous amount of energy. What was the consequence?
Aging
-In 1987, Cann & Wilson released a theory stating that humans were derived from Mitochondria eve. Which organism is thought to be Mitochondria Eve?
An African female
-25 Million years ago, oxygen increased in the air. Why?
Photosynthesis by bacteria
 The Statue of
Liberty
The Statue of
LibertyWeapons:
Armor:
You'll land at the base of the Statue of Liberty. Before going north, check everything you can think of, because the upcoming battle is tough. Once you're ready, go north and you'll confront Eve for the final time.
 Eve
EveLevel: 37
HP: 1900 (Top), 1750 (Middle), 1600 (Bottom)
EXP: 0
There are three parts to Eve, so you should use a weapon with the Burst effect (probably a shotgun unless you moved it to another). Also, if you have it, now is a good time to use your AT4 rocket launcher. Eve has many attacks. One is where she shoots a pair of energy balls at you, four times in succession. You can dodge them by standing in between them, but it's much easier to avoid them by continuously running to either side. She also sprays needles around the whole screen in a circular fashion. Just run away from them, but angle yourself so that you're also running towards Eve. (Simple Geometry has it that as the radius of a circle becomes smaller, the circumference gets smaller. The closer you are to Eve, the less distance you have to cover, giving you more time to outrun the needle spray. If you're farther away, and you don't get close, then you'll probably get hit.) And then there's a move where Eve spins around in place and shoots boomerangs in the air which rain down back on Aya. They're pretty hard to dodge, but if you get directly under Eve, then you shouldn't get hit. Just remember to back off when she stops firing. Eve also has several close up attacks. You can tell when they're coming when waves of energy eminate from Eve's "tail". The only way to avoid this is to STAY AWAY from her the instant you see her. If you're far away enough, then her melee attack won't come out. If you get caught, though, then you're in trouble. Among her melee attacks are a multi-hit hurts-a-lot move, another multi-attack which doesn't have as many hits, but confuses you, and one where she just smacks you to one HP. The strategy to beat Eve goes as follows. Run in a counter-clockwise direction around Eve. Make sure you're always moving. When she attacks, position yourself correspondingly so that you don't get hit (easier said than done, but do your best). Once her attack comes out, get in range, and then shoot her. The bottom section has the least HP, so get rid of that first. By the way, you should have the Liberate spell at this point. Use it. It will help a lot. When yon win, you'll have to fight Eve in a different form.
Eve
Level: 35
HP: 2200
EXP: 0
This Eve moves a lot quicker than the previous one, so you need to keep Aya moving at all times. Eve has fewer attacks than the other, but they still hurt. The first is a quick physical attack where Eve rushes up to Aya and just hits her several times. Just keep moving away and you should be able to avoid at least some of the hits. Eve also has a paralysis attack that can't be dodged. You'll be either paralyzed or slowed. When that happens, cast Haste on yourself instead of Medic (you move faster and you use up less PE). Eve's final attack is where she flies into the air, summons an energy lance and throws it at the ground towards you. When she goes up into the air, move yourself to one corner (you can't see yourself, but you can still move). When she throws it (or right before she throws it) run to the opposite corner and DON'T STOP until the energy has completely disappeared. This is pretty hard to do, as Eve doesn't give you enough time to run to the corner and run back, and even though the lance won't directly hit you, the shockwaves that result from it cover a lot of the screen. But the further away you are from the center, the less damage you'll take. You'll be slapped with a Def. Down effect if you get hit, but there's nothing you can do about that. For this battle, just keep moving around and buy yourself as much time as possible so you can use your Liberate spell. Switch from the AT4 to the M8000 so your AT can go up faster. Other than that, it's more dodging and shooting. Beat her and that's the end of Eve! And the end of day five!