This video hardware page will help you to become familiar with the tools necessary to begin capturing raw video footage. Additionally, it will help you to learn the video and audio connections that are required to capture and edit video. Regardless of whether you will be editing on a computer (non-linear editing), or using traditional hardware (linear editing), this information is vital to your success as a videographer.
It is divided into two parts the first part is to allow you to become familiar with the operating controls of the video camcorder. A "camcorder" is a device that actually is the mating or blending of two devices into one. The camcorder was developed from the original stand alone video camera and the separate video recording deck. In the "old days", it was necessary to carry two separate devices. Now, camcorders are a standard in industrial, broadcast news and home video.
The second part of this section is dedicated to learning the different video and audio connectors required to record and edit video productions. Click on the specific area link below to review either section.
Go to the Panasonic AG-196-UP CONTROLS LESSON
Go to the CAMCORDER OPERATING CONTROLS LESSON
Go to the AUDIO and VIDEO CONNECTORS LESSON
| This portion of the lesson is being brought to you
courtesy of Videomaker Magazine
You can learn additional information about video and video production topics by clicking on the link to go to |
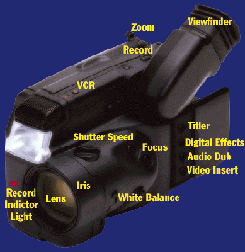
White Balance is the control that adjusts the camcorder's color sensitivity to match the prevailing color of white outdoor light, yellower indoor light, or (sometimes) greenish fluorescent light. On most camcorders, white balance may be set either automatically or manually. On some cameras, you can set white balance to closely match the exact light in which you're shooting. White balance may be set "incorrectly" on purpose to achieve special effects. Shooting outdoors with the indoor setting produces bluish "moonlight" results. Shooting indoors with the outdoor setting can achieve a romantic, "candle light" orange cast. Indoor (incandescent) white balance Indoor (incandescent) white balance is the camcorder's color sensitivity setting that matches the warmer cast of Tungsten-halogen lights (so-called "Quartz" movie lights, work lights, and low-voltage track lights). Household light bulbs use the same setting, though they are slightly warmer. Outdoor (natural) white balance Outdoor (natural) white balance is the camcorder's color sensitivity setting that matches the whiter ("cooler") cast of natural daylight. This is an average outdoor setting, because natural light can range from warm direct sunshine to cooler open shade to very cool high overcast. Fluorescent white balance Fluorescent white balance is the camcorder's color sensitivity setting that approximates the slightly greenish cast of cool fluorescent light. If your camcorder lacks this setting (not all models include it) set white balance for outdoors when shooting in fluorescent light. Even with a fluorescent light setting, results may be less than perfect because, unlike sunlight and incandescent light, fluorescent light does not contain all the colors of the visible spectrum. Auto white balance Auto white balance is a white balance setting that instructs the camcorder to analyze the color cast of the incoming light and set itself for the most pleasing results. Auto white balance may work in two ways. On less expensive units, it chooses between preset outdoor and indoor settings. On more elaborate camcorders, auto white balance fine-tunes itself continuously to adjust to changing light color. Manual white balance Manual white balance is a white balance setting that lets you select the overall color you prefer. It is useful in three situations: when shooting in cool fluorescent light, manually set white balance to outdoors, because the auto white balance control will sometimes produce unpleasant results. When shooting outdoors, you can achieve a bluish moonlit night look by setting the manual white balance to indoors and underexposing just slightly. When shooting indoors, you can produce a warm candle light or fire light effect by setting the manual white balance to outdoors. Iris is the control that adjusts the size of the opening in the lens' iris diaphragm, to govern the amount of light admitted. Along with the shutter, the iris is the principal component in the camcorder's exposure control system. The camcorder's sensor forms a good quality image only when struck by exactly the right amount of light. Video is shot, however, in widely varying light levels, from candle-lit dining rooms to glaring snow scenes. To accommodate this range, the chip is designed to create a good image in relatively low light. As the light grows brighter, the lens' iris diaphragm gradually closes, so that the amount of light reaching the chip remains the same. In all consumer camcorders, the iris can be controlled automatically by the camera's light-sensing circuitry. In better cameras, it can be adjusted manually as well. Auto iris Auto iris, often called "auto exposure" is a camcorder setting that automatically adjusts the opening in the lens' iris diaphragm to regulate the amount of light admitted to the camcorder. Auto exposure systems work well, in general, but they can be "fooled" by some lighting conditions. Manual iris Manual iris, or "manual exposure," is a camcorder setting that allows the user to adjust the amount of light reaching the image-forming sensor. This is useful in compensating for difficult lighting conditions, such as excessive back light. Some controls can close the iris diaphragm completely, producing a "fade out" effect. Manual iris control is best used sparingly; even slight changes can dramatically affect exposure. Backlight compensation Backlight compensation is a camcorder control that can improve exposure when dark subjects are shot against brighter backgrounds, such as the sea or sky. Simple back light controls increase exposure by a preset amount. More sophisticated versions can be fine-tuned manually, while studying the effect in the viewfinder. Shutter is an electronic control that governs the amount of time during which incoming light forms a single video field. (Each video image, or "frame" consists of two fields.) Since video is recorded at 60 fields per second (in the NTSC system -- 50 fields in PAL and SECAM) the normal camcorder shutter speed is 1/60 sec. The word "shutter" is actually a metaphor borrowed from the domain of film, where still and cine cameras control exposure time by means of mechanical shutters. Video cameras lack physical shutters. Instead, they control exposure length by adjusting the amount of time during which the sensor is allowed to accumulate a charge, before dumping it and starting another video field. High shutter speed(s) High shutter speed(s) are camcorder settings designed to improve image quality, sharpen images, or restrict lens focus. Where normal shutter speed is 1/60 sec. (in NTSC format; 1/50 sec. in PAL and SECAM) higher speeds usually start at 1/250 sec. and range up to 1/12,000 sec., depending on the camera design. High shutter speed are most commonly used to "freeze" motion in individual video frames, so that normally blurred action (like a golf swing) can be more easily seen and analyzed. However, excessively high shutter speed can produce an unpleasant stroboscopic, "jerky" effect. Low shutter speed(s) Low shutter speed(s) are camcorder settings designed to capture images in extremely low light, or to create "smeary" special effects. Where normal shutter speed is 1/60 sec. (in NTSC format; 1/50 sec. in PAL and SECAM) low shutter speeds may be half that or even less. Low shutter speeds are not widely found on consumer cameras, because low-light shooting is more often enabled by amplifying the signal, and the smear effect can be added by effects generators, either in the camcorder or in editing. Programmed iris/shutter Programmed iris/shutter is a camcorder control that adjusts both the iris diaphragm and the shutter speed together, to optimize image quality in different shooting conditions. Though these combined settings can be achieved manually on some camcorders, the programmed version allow the videomaker to achieve effects without bothering with technicalities. Outdoor programmed setting Outdoor programmed setting is a setting in which the shutter speed is moderately increased in order to reduce the incoming light. In very bright conditions, too much light can strike the image forming chip, even when the iris diaphragm is at its smallest setting. The result can be smeary colors. The outdoor programmed setting will usually correct this problem. Sports programmed setting Sports programmed setting is an iris/shutter combination in which the shutter speed is substantially increased and the iris diaphragm opening is widened to compensate. The higher shutter speed freezes the movement in individual frames, so that athletic form can be more easily analyzed. Portrait programmed setting Portrait programmed setting is an iris/shutter combination in which the iris is substantially widened and the shutter speed is increased to compensate. Outdoor portraits and closeups (such as flower shots) can be marred because the small lens openings required by bright light keep distracting backgrounds in sharp focus. Increasing shutter speed enables the opening of the iris until depth of field (focus) is reduced and the subject remains sharp while the distracting background is softened. Lens is the camcorder's image collecting system. Its many pieces of glass work together to gather the light reflected from camera subjects and focus it as a coherent image on a single plane -- the plane where the camcorder's image-sensing chip turns it into an electronic signal. Most, but not all consumer camcorders are fitted with zoom lenses, whose rendering of the image size and perspective can be varied over a broad range. Lens zoom range Lens zoom range is the variation in image size that a camcorder lens affords. All consumer camcorder zoom lenses vary from wide angle at one extreme to telephoto at the other. (You "zoom in" to telephoto and "zoom out" to wide angle.) At wide angle settings apparent depth is increased and the angle of view is quite broad. At telephoto settings, the angle of view is narrow and apparent depth is reduced. Distant objects look unnaturally large and movement toward or away from the camera is minimized. Motorized zoom lens is a zoom activated by a servomotor, controlled, in turn by the camcorder's zoom buttons or rocker switch. Motorized zoom has the advantage of extreme smoothness and regularity. On the other hand, the motor consumes battery power rapidly, and the zooming speed is too slow for some applications. More elaborate camcorders may have multi-speed zoom motors. Manual zoom lens Manual zoom lens is a zoom activated by the user, usually through a ring around the lens, equipped with a short handle. All camcorder zooms are motorized, but only some models include manual zoom. This feature is essential to sophisticated zoom control. It can be worked very quickly to create a new composition or focus on a new subject. It also extends battery life considerably because it uses no power. Digital zoom Digital zoom electronically enlarges the central portion of the image beyond the limits of the zoom lens' ability to magnify it. As the zoom ratio increases (20 to 1, 50 to 1, etc.) the image recorded full-frame on tape represents a smaller and smaller part of the image formed at the chip. Since the original image consists of individual dots ("pixels") enlarging part of it progressively coarsens the picture, lowering resolution and losing detail. Macro focus lens setting Macro focus lens setting is the focus position for very close work, such as copying photos or documenting a seashell collection. The macro focus position lets the camcorder come much closer than usual to the subject matter, for greater magnification. To find your camcorder's closest position, set the lens at the longest focal length at which the macro function will work (some camcorders do this only at the wide angle position). Then, physically move the camera toward the subject until it comes into sharp focus. Lens stabilization Lens stabilization is a feature that compensates, to some degree, for camera shake. Electronic stabilization works at the chip level, by recording only a large but incomplete portion of the total image created by the chip. So when the camera shakes in one direction, the image portion recorded moves proportionately in the opposite direction, canceling out the camera movement. Mechanical lens stabilization, by contrast, moves the image at the lens, by directing incoming light through a movable prism. When the image moves off the center axis, the front element of the prism tilts to re-center it at the chip. Focus is the adjustment of the camcorder lens to keep the image (or areas at selected distances within it) sharp in appearance. When the lens is focused at a certain distance, another distance from some point before it to some point beyond it appears acceptably sharp. This distance is called the "depth of field." Depth of field is affected by three factors: focal distance, lens focal length, and lens aperture (opening). The greater the distance, the wider the lens angle, and the smaller the aperture, the deeper the depth of field. Focused at infinity in bright sunlight, a camcorder lens at wide angle may be in focus from the horizon to the front of the lens itself. At its closest focus, in low light levels, a telephoto lens may be in focus through only half an inch or less. Autofocus Autofocus is the camcorder feature that focuses the lens automatically, usually by determining the distance to the subject in the central portion of the image. Though very convenient for fast shooting, autofocus has many drawbacks. It can be slow to respond; it can rack back and forth, vainly seeking a subject to focus on; it can have trouble in low light levels; it can mis-focus when the center of interest is not in the center of the composition; and it can change focus when a person or object passes between the subject and the lens.
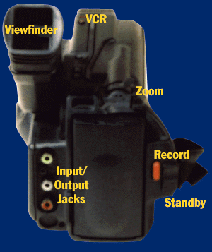
Manual focus is the camcorder feature that lets the videomaker focus the lens where desired. Though preferable to autofocus in many ways, manual focus requires frequent adjustment by the user, a process that takes some practice. When focusing manually on a scene, always zoom to full telephoto, center the most important subject, focus on that subject, disable autofocus, and zoom back to your original composition. This ensures that the important subject will remain sharp at any zoom setting. Record is the control that enables the camcorder's record function. Pressing it once begins recording, pressing it again stops the process. (It's not necessary to hold your finger on the button.) Record/playback Record/playback is a pair of functions intended for use when the camcorder is functioning as a camera (separate record and play controls are provided for the VCR function).
Record/review Record/review (which goes by different names on different cameras) allows you to play back what you've just shot in the camcorder's viewfinder, in order to check it. Use caution with this control: it burns up battery power and it can leave the tape with previously recorded material at the start point. When this happens, the next shot recorded will erase part or all of a previous shot. Record indicator light is a tiny red light that tells your subjects that they are being recorded. To avoid spooking sensitive subjects, you may want to tape over this indicator light (some camcorder let you switch it off). Standby is a battery-saving feature on some camcorders. If record is not enabled within a certain period (say five minutes) the standby function powers down all camera activities. Pressing this button reactivates the system. Power on Power on is the camcorder's main on-off switch. As long as it is on, the camera is ready to begin recording very quickly because the viewfinder displays an image, the tape is fully threaded in the tape transport, etc. At the same time, the camera uses battery power too, so don't switch the system on until moments before you're ready to tape. Viewfinder is the display on which you watch the image you are taping. With the exception of a few inexpensive point-and-shoot models, all camcorder have viewfinders that are, in fact, tiny video monitors. Some are now color monitors, and a few are large lcd screens, mounted externally so you can view them easily. Viewfinder contrast Viewfinder contrast is a control that adjusts the range between the darkest and lightest areas of the viewfinder image. Too little contrast makes the picture dull and gray; too much makes picture highlights burn out to white and shadows block up to black. Viewfinder Brightness Viewfinder Brightness is a control that adjusts the overall brightness of the viewfinder image. Viewfinder color Viewfinder color is the set of controls used to adjust color quality on a color viewfinder. Some models have separate controls for tint (coolness or warmth) and intensity (color saturation). To adjust a color viewfinder, reduce color intensity to obtain a black and white picture, adjust brightness and contrast, increase color intensity to taste, then adjust the tint control last. Viewfinder readouts Viewfinder readouts are words, numbers, and symbols superimposed over the viewfinder image to tell you what the camera's doing. Readouts vary tremendously among camcorder models. Typical readouts include tape counter, white balance setting, battery power remaining, date and time, zoom position, and area monitored by the autofocus system. Some readouts appear only when special functions are enabled. In some models, all viewfinder readouts can be disabled. Viewfinder diopter adjustment Viewfinder diopter adjustment allows videomakers with glasses to shoot without them. The controls are usually a ring around the viewfinder tube, or a slider below it. To use a diopter adjustment, focus the lens on a distant scene, then adjust the diopter until the viewfinder image looks sharpest. VCR is the set of functions that enables a camcorder to work just like a table-top video deck. Almost all camcorders will function either as a recording camera or as a VCR, but not both at once. Some models use a switch to toggle between camera and VCR mode; others protect the VCR buttons with a door or slider that incorporates a switch. When the cover's open, you have a VCR; when it's closed, you have a camera. VCR record VCR record enables the camcorder to copy from video sources such as cable or another VCR. To perform simple editing, most videomakers edit from the camcorder to a desktop VCR, but in many cases, it' better to dub in the opposite direction, if the camcorder has more advanced editing features. VCR play VCR play acts exactly like the play button on a VCR deck. VCR pause VCR pause acts exactly like the pause button on a VCR deck. When editing to the camcorder, begin each edit by pausing the deck at the start point of the new shot, then press record, to place the camcorder in record/pause mode. To begin actual recording, press pause again to disable it. VCR sreturn to top VCR stop acts exactly like the stop button on a VCR deck. Fast forward & reverse Fast forward & reverse act exactly like their counterparts on a VCR deck. Generally, camcorder visible fast forward and reverse have fewer speeds than the same controls on a deck. Video insert allows you to replace a length of picture on your edited tape without disturbing the sound. This feature is not available on those 8mm units whose sound tracks are co-mingled ("multiplexed") with their video recording. To use video insert, you make an edit as usual, but press this control instead of the record button. Audio dub allows you to replace a length of sound on your edited tape without disturbing the picture. This feature is not available on those 8mm units whose sound tracks are co-mingled ("multiplexed") with their video recording. To use audio dub you make an edit as usual, but press this control instead of the record button. On stereo VHS format units, you must disable the stereo playback feature of your deck, or else you will continue to hear the old sound instead of the new audio dubbed over it. Digital effects are functions like fades and wipes that are used to make transitions between video sequences or to create special visual effects. Though most videomakers enable these features while videotaping, it may be safer to use them in editing instead, when the camcorder is functioning as a recorder. If you add a visual effect to your original camera tape, you cannot change it. But if you add it to your edited tape, you can try it several ways, until you're satisfied. DVEs: Fade The simplest effect, the fade control lets you fade the video image down to black (or sometimes, to another selected color) to signal the end of a sequence. Fade up indicates the beginning of a sequence. DVEs: Dissolve In a dissolve, one image merges with and gradually becomes another one. Camcorder achieve pseudo dissolves by recording the last frame of the outgoing shot on a chip. At the start of the next shot, the circuit cross-fades from the still image to the new scene. DVEs: Wipe In a wipe, a line sweeps across the screen, progressively replacing one image with another one. Camcorder achieve pseudo wipes by recording the last frame of the outgoing shot on a chip. At the start of the next shot, the circuit wipes from the still image to the new scene. DVEs: Strobe In strobe mode, the camcorder circuits record a still on a memory chip, then record it for a short time (say, � second) before grabbing another still and repeating the process. The result is a jerky movement reminiscent of silent movies. DVEs: Mosaic In mosaic mode, circuitry divides the image into a grid of squares, averages the picture information for each square, and assigns it that average value. The result is to stylize and degrade picture quality until faces, for instance, are unrecognizable. DVEs: Paint In paint mode, line and color distortions are purposely introduced to the image to make it resemble a painted picture. DVEs: Smear DVEs: Smear. In smear mode, moving objects leave a succession of slowly fading ghost images behind them, creating an ethereal "comet trail" effect. Electronic enhancers are circuits designed to enhance the video image formed on the chip. Digital zoom enlarges the central portion of the image beyond the limits of the zoom lens' ability to magnify it. Gain up amplifies the electrical signal created by the image-forming chip. Electronic gain Electronic gain (sometimes labeled "gain up") amplifies the electrical signal created by the image-forming chip. At very low light levels, the chip may not receive enough information to form an adequate image, even with the lens aperture wide open. In this situation, the electronic gain circuitry amplifies the electrical image signal strengthen it and thereby improve the picture. The drawback is that electrical noise is amplified along with picture signal information, and the result is a washed-out, grainy looking picture. Date/time Date/Time is a function that superimposes current date and time information over the bottom of a video image as it's being recorded. You can set the date and time with separate controls (though the correct values will be retained only if the small lithium battery in your camcorder is fresh). Be careful: the date/time enabling button is very easy to hit on many camcorders, and the resulting viewfinder readout is easy to ignore. You may not realize you've recorded this information until you start editing. This button, found on some camcorders, turns the tape transport controls (record, play, pause, fast forward, fast reverse) into the controls of a primitive titling machine. By working them as you look through the viewfinder, you can create titles (usually up to four "pages" at a time) and store them in a camera memory chip. Later, as you shoot, you can superimpose one title after another over your live action shots. Like other special effects, the titler is easier to use if you're employing the camcorder as a record deck for editing. Input/output jacks are sockets that enable your camcorder to communicate with the outside world. The video and audio jacks let you cable your camcorder to an editing deck or monitor. The control jack, if present, will let you trigger certain VCR functions remotely, to partially automate the editing process. On some camcorders, both input and output audio/video jacks are provided, so that the camcorder can function a record deck as well as a source deck. Y/C jack Y/C jack. This connector (sometimes called an S-VHS connector) carries the video signal in its separate luminance and chrominance components. If your camcorder has it, use it, for better quality video. Composite video jack Composite video jack. This connector, usually an RCA-type jack, carries both the luminance and chrominance components of the video picture. It is typically coded yellow. Audio jack(s) Audio jack(s). This connector, usually an RCA-type jack, carries the audio signal. If the camcorder has stereo sound, the white-coded jack handles the left channel and the red-coded jack handles the right one. RF jack RF jack. This connector, a screw- or push-on type with a central wire, carries both video and audio signals combined. Though transmission is not as high quality as that of RCA or Y/C cables, an RF connector is useful for sending the signal directly to a monitor or tv set. Edit control jack Edit control jack. This jack permits remote control of the camcorder by an edit-control system, either standalone in a desktop computer. Control-P type jacks communicate commands to the VCR section of the camcorder. Control-L and Control-M types also let the camcorder send information (on tape position and function mode) back to the control system. Headphone jack Headphone jack. This jack enables you to plug in a headset and monitor the quality of your recorded sound or whether you're even getting any. Since there is no other way to verify sound recording on consumer-level equipment, it's always a good idea to utilize this function. External microphone jack External microphone jack. This jack lets you substitute a stand-alone mike for the camcorder's built-in model. Plugging the mike into this jack automatically disables the internal mike. Since most external mike jacks are tiny unreliable miniplugs, it's double important to check sound quality through headphones when using a separate mike. AC power/battery recharge jack AC power/battery recharge jack. This jack lets you deliver ac power to your camcorder. In most models, the same line will recharge a battery installed in the camcorder. |